


5 National Parks For Summer
They’re not too hot, not too crowded and they offer tons of summer-specific photographic opportunities. Photography by QT Luong
Assignments
Share your best shots in our weekly “Assignments” photo challenges. Submit your images that fit the week’s theme—you may be our next Assignment winner.
Tip Of The Week
Available on our website—or delivered directly to your inbox—our “Tip of the Week” provides shooting and processing techniques to sharpen your photography skills. Sign up today.
On Landscape
William Neill’s column on the fine art of landscape photography explores thoughtful approaches to composition and creativity.
Connect With Us
Get the latest news and be inspired by great photos from the Outdoor Photographer community.


Subscribe today for updates on the latest features, how-to articles and photography news


Wes Pitts
Editorial Director
Kristan Ashworth
Managing Editor
George D. Lepp
Field Editor
COLUMNISTS
Elizabeth Carmel, Melissa Groo, Amy Gulick, Bill Hatcher, Dewitt Jones, Ken Kaminesky, Frans Lanting, George D. Lepp, David Muench, William Neill
CONTRIBUTING EDITORS
Mark Edward Harris, Lewis Kemper, Glenn Randall, William Sawalich
PROFESSIONAL ADVISORS
Daryl Benson, Jim Brandenburg, Carr Clifton, Daniel J. Cox, Bruce Dale, James Kay, Robert Glenn Ketchum, David Muench, Marc Muench, Michael Nichols, John Shaw, Art Wolfe
ART & PRODUCTION
Scott Brandsgaard
Senior Designer
SALES & MARKETING
Alexandra Piccirilli
Media Solutions Director
Bob Beucler
Senior Media Solutions Manager
Client Services
Tim Doolan
Social Media & Marketing Manager
Tommy Goodale
Senior Marketing Associate
Anthony Buzzeo
Content Marketing Supervisor
For reprint information, contact:
Advertising/Sales, (617) 706-9110
For digital editions:
For an extensive archive of back issues:
OPERATIONS
Jason Pomerantz
VP, Circulation Strategy
Cheyenne Corliss
Operations Director
Andrea Palli
Senior Client Services & Operations Lead
Toni Eunice
Operations & Human Resources Coordinator
Darren Cormier
Client Services Associate
Amanda Joyce
Accounting Director
Tina McDermott
Accounts Payable Associate
Wayne Tuggle
Accounts Receivable Associate
DIGITAL OPERATIONS
Leza Olmer
Director of Digital
Ryan Gillis
Audience Development Analyst
Mike Decker
Senior Digital Designer
David Glassman
WordPress Developer
EXECUTIVE
Jeffrey C. Wolk
Chairman & Chief Executive Officer
Courtney Whitaker
Chief Operating Officer
Stuart Crystal
SVP, Sales & Strategic Partnerships
Matt Martinelli
Content Director
NEWSSTAND DISTRIBUTION
Weekly Retail Service
In memory of Susan Fitzgerald, COO, 1966-2018
Corporate Headquarters
Madavor Media, LLC
25 Braintree Hill Office Park Suite 404
Braintree, MA | 02184
PRINTED IN THE U.S.A.
Outdoor Photographer (ISSN: 0890-5304) – Vol. 36 No. 7 – is published monthly except bimonthly Jan./Feb. by Madavor Media, LLC. Executive, editorial and advertising offices: 25 Braintree Hill Office Park, Suite 404, Braintree, MA 02184, 1-800-437-5828. Periodicals Postage Paid at Boston, MA, and additional mailing offices. Single copy price—$7.99. Annual subscription in U.S., Possessions, APO/ FPO—$15.97. Canada—$25.97; other foreign—$30.97, including postage and taxes. Payable in U.S. funds. For orders, address changes and all other customer service, phone toll-free (800) 283-4410. POSTMASTER: Send address changes to Outdoor Photographer, P.O. Box 8507, Big Sandy, TX 75755-8507. Canada Post Publications Mail Class Agreement No. 1559788. Email us (editorial matters only) editors@outdoorphotographer.com or visit our website at www.outdoorphotographer.com. Copyright ©2020 by Madavor Media, LLC. No material may be reproduced without written permission. This publication is purchased with the understanding that information presented is from many sources for which there can be no warranty or responsibility by the publisher as to accuracy, originality or completeness. It is sold with the understanding that the publisher is not engaged in rendering product endorsements or providing instruction as a substitute for appropriate training by qualified sources.
EDITORIAL SUBMISSIONS: Outdoor Photographer assumes no responsibility for solicited or unsolicited contributions and materials. We do not accept original transparencies or negatives. Otherwise, insurance for such materials, in transit or in our possession, must be the responsibility of the writer or photographer. Outdoor Photographer does not accept or agree to the conditions and stipulations printed on delivery memos, packing slips and related correspondence as they are presented without prior notice accompanying submission materials. Exceptions to this disclaimer of liability on the part of Outdoor Photographer must be prearranged, executed in writing and signed by both parties prior to the shipment of materials in question. All submissions must be accompanied by a self-addressed, stamped envelope (SASE) with sufficient postage to cover the cost of return. The class of mail and insurance coverage for returns will be determined by the amount provided for on the SASE.
SUBSCRIBERS: Any obligation we owe to you, including delivery of your magazine, is contingent upon you providing us with your correct mailing address. If the Post Office notifies us that your magazine is undeliverable, we have no further obligation to you unless we receive a corrected address from you within two years of the Post Office notification. BACK ISSUES are available for one year prior to the current issue. To order within the U.S., send $7.00 plus $4.00 postage and handling (Canada: $7.00 plus $5.00; International: $7.00 plus $10.00) for each issue to Back Issue Dept., Outdoor Photographer Magazine, 25 Braintree Hill Office Park, Suite 404, Braintree, MA 02184, or go online and visit the eStore. No orders processed without proper funds and specific issue information.
Outdoor Photographer is a registered trademark of Madavor Media, LLC. Copyright ©2020 Madavor Media, LLC. All rights reserved. Reproduction in whole or in part without permission is prohibited.
To Subscribe Or For Subscription Questions: outdoorphotographer.com or (800) 283-4410 or email customerservice@OutdoorPhotographer.us
Member, Alliance for Audited Media
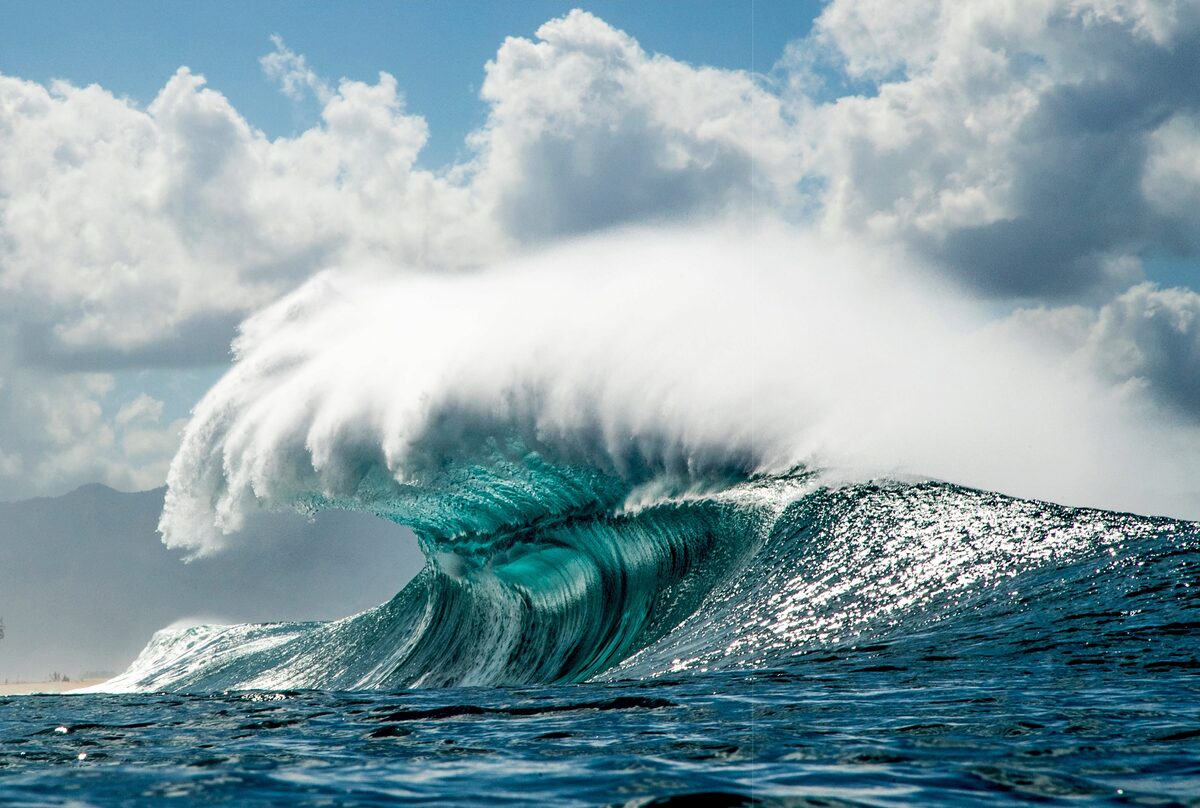
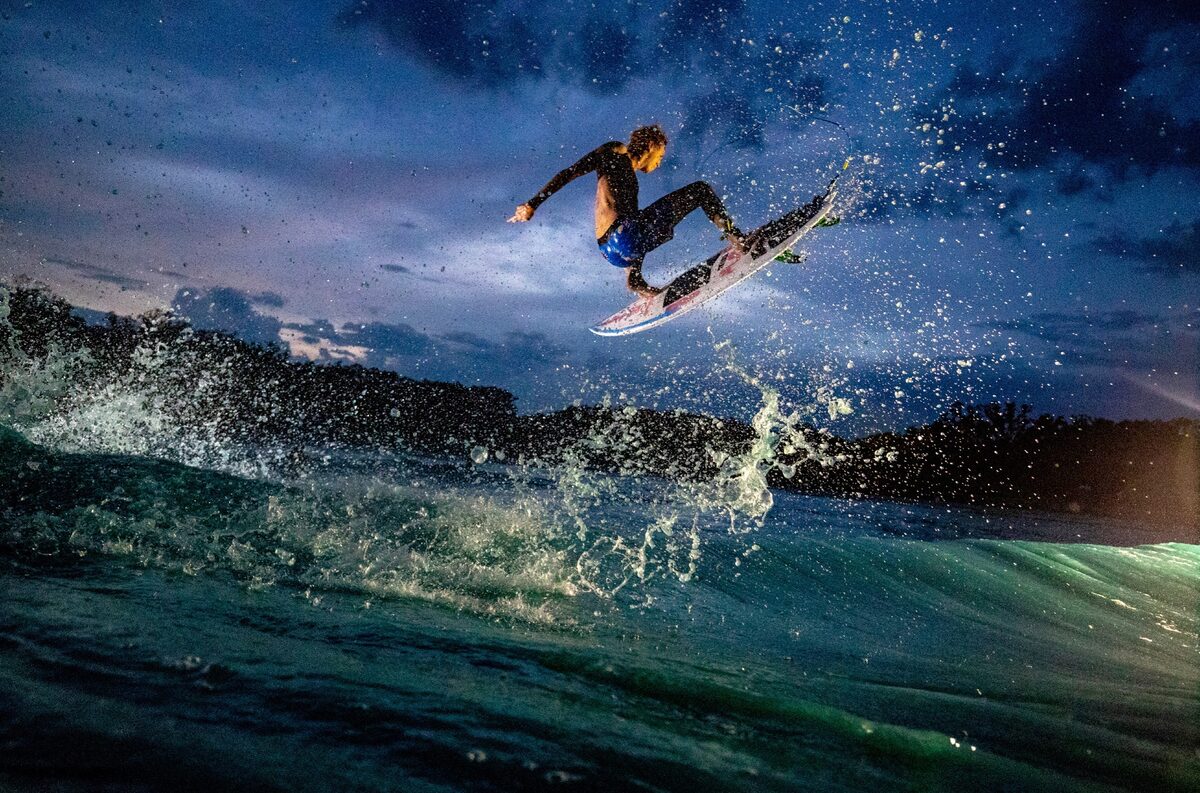
cover shot
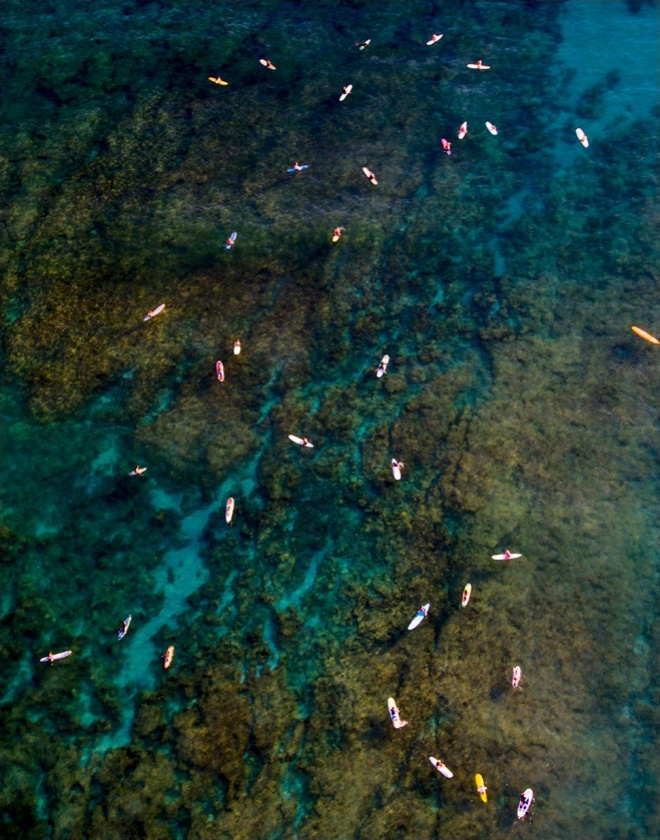
Photographer: Zak Noyle
Location: Honolulu, Oahu, Hawaii
Equipment: Canon EOS-1D X Mark II, Canon EF 70-200mm f/4L IS USM
Situation: Waikiki, the birthplace of surfing. The waters seen in this image are where it all began for the now-global sport. When flying into Oahu, planes take a path right over the waters of Waikiki, giving a glimpse of the surf below. These reefs have played the part of learning grounds for many surfers, including Duke Kahanamoku, an internationally known waterman who won five Olympic medals for swimming, including three gold medals, and played a major role in the popularization of surfing in the early 1900s.
Growing up in Hawaii, my entire childhood revolved around the water, and the ocean has been a constant backdrop for my happiest memories. These days, I get to travel the world, seeing beautiful places and exploring the bond that the ocean creates between people—connections that served as my springboard into the world of professional surf photography. For me, photography isn’t just about “getting the shot.” It can be used to inspire and educate people and help raise awareness of the importance of protecting our oceans.
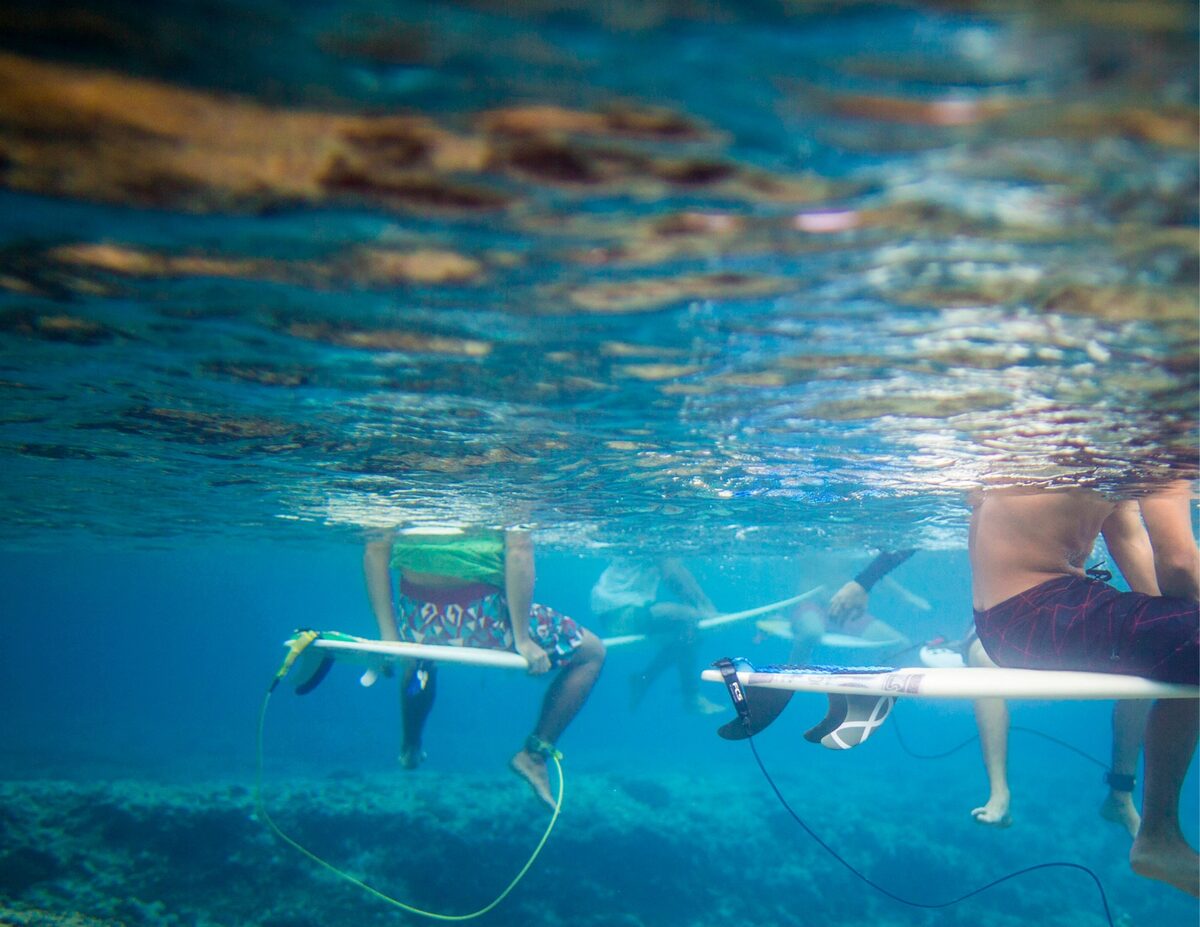
This image was taken aboard a helicopter while flying over Waikiki. The reef is what makes the waves break, and you can see here how shallow it is. The surfers are waiting for the next set of waves to come through to ride together, a “board meeting” of sorts—done Hawaiian style.
–Zak Noyle

in this issue
Y ou never realize how the pieces of your life are fitting together as it’s happening,” Zak Noyle observes in the introduction to “The Surfing Life” in this issue. “Then one day, you find yourself swimming through a world-class wave making photos of the world’s best surfers, and you take stock of how you got there.” For pros—and especially those who photograph sports like surfing—a passion for the subject is the foundation of success. Just as wildlife photographers who study animal behavior have an advantage, sports photographers with a personal connection to their subjects are able to anticipate the action and distinguish an exceptional moment from the mundane, and the resulting images display that knowledge. Immersed in the lifestyle of the sport, photographers like Noyle make images that the passerby would miss, with authenticity that comes from being part of the community they document.
Everyone starts somewhere, and it’s never too late. If you’re drawn to the genre, opportunities for adventure sports photography are likely readily available not far from where you are now, and summer is an ideal season to start down the path. In “Local Adventure,” Tom Bol highlights four of the most accessible outdoor sports and recreation subjects to begin building your portfolio. “You don’t have to cross an ocean to get there,” Bol notes, “these gems are only a road trip away.” From easygoing hikes to adrenaline-fueled climbs, Bol shares insights collected throughout his career in photographing adventure sports, with tips for technique and equipment selection, along with recommended locations.
Another subject for adventure-seeking photographers this time of year is the awesome displays of lightning during the summer storms in the southwest. Photographing lightning is both technically challenging and a pursuit that requires an abundance of caution and safety considerations, but the rewards for landscape photographers can be, ahem, electrifying. Iconic landscapes like Grand Canyon come to life with the extra exclamation that one of nature’s most fascinating phenomena adds to the scene. In “Lightning Strike!” Gary Hart covers everything you need to know to photograph lightning, from precautions to recommended accessories and exposure settings.
Also in this issue, Matt Stirn shares a personal story of how nature photography led to a deeper appreciation for his family home, a storied ranch on the edge of Grand Teton National Park. Like Noyle’s, the backdrop of Stirn’s childhood is intertwined with the subjects and narratives of his images. Of those early years, Stirn remarks, “While living in a place surrounded by natural wonders and visited by millions of people each year was an incredible experience, the reoccurring wonders occasionally dissolved into the routine of everyday life, and it wouldn’t be until years later that photography helped me rediscover and reconnect with the uniqueness of my home.” Though most of us don’t have a neighbor as celebrated as Grand Teton, Stirn’s reflections are especially relevant at a moment when we’re spending more time close to home, a reminder that you probably don’t have to look far to find inspiration in the great outdoors.
–Wes Pitts, Editor
contributors
One of the world’s best surf photographers, Canon Explorer of Light Zak Noyle spends countless hours in the water, creating dramatic imagery and artful interpretations of the most magnificent ocean environments and the athletes who call them home. See more of his work at zaknoyle.com.
Tom Bol is an editorial and commercial photographer based in Colorado. Specializing in adventure sports, he has shot assignments ranging from documenting Himalayan climbing expeditions to photographing Patagonian kayaking voyages. His images are published by clients worldwide. See more of his work at tombolphoto.com.

Gary Hart is a professional landscape photographer and writer based in Northern California. Hart leads photo workshops, sharing his more than four decades of photography experience around the U.S. and abroad. See more of his work at eloquentimages.com.

showcase
After graduating from college, Tim Kemple moved into an old RV and wandered the world climbing rocks. Somewhere along the way, he picked up a camera, and years later, he can still climb 5.14 but is far more well-known for his iconic images of world-class athletes in wild places for clients such as Ram, Mitsubishi, Amtrak, Johnnie Walker and Wolverine. He also thrives helming light and fast film crews, informing an epic yet intimate, authentic style apparent in recent digital campaigns for Jaybird Sport, Merrell, The North Face and Apple. See more of Kemple’s work at kemplemedia.com.
Phase One IQ250, Schneider Kreuznach 28mm LS f/4.5 Aspherical. Exposure: 1/500 sec., ƒ/5, ISO 100.
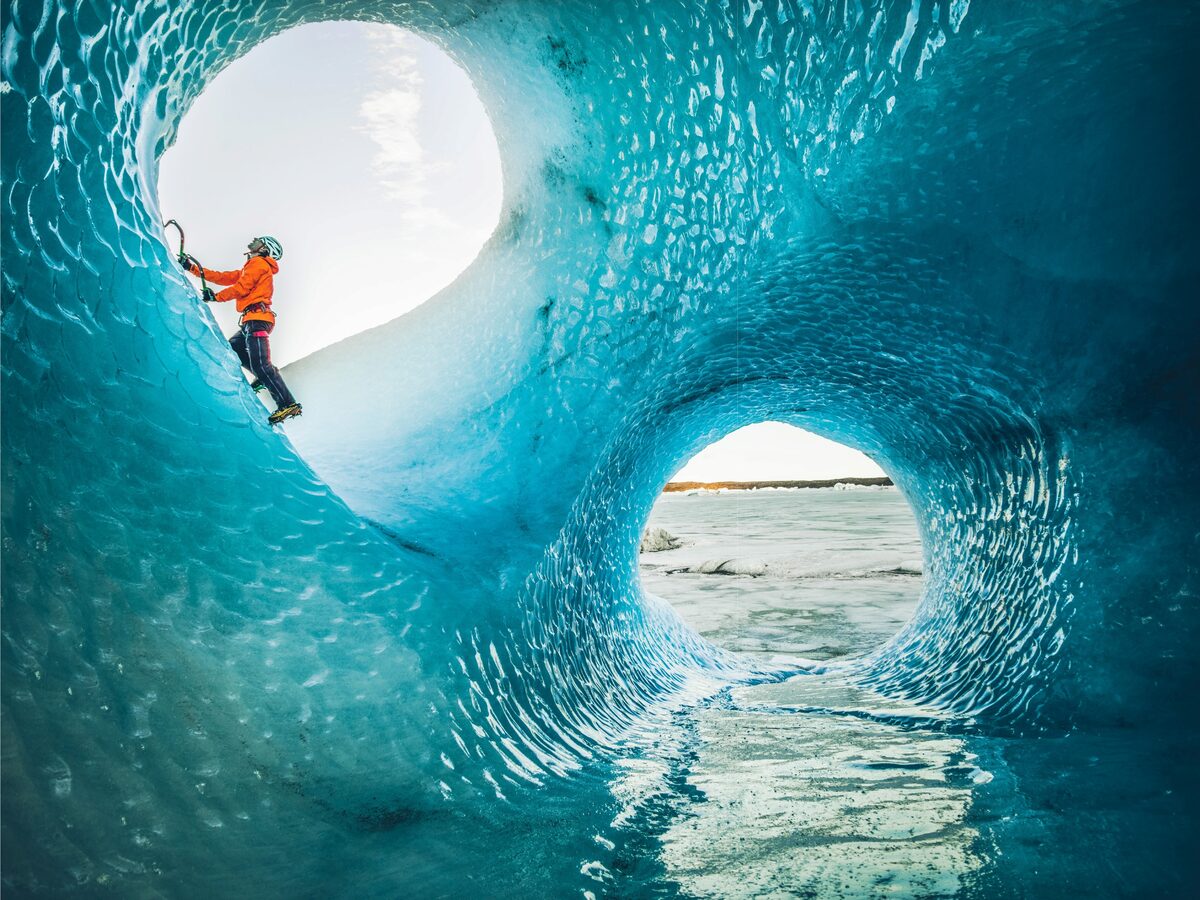
Klemen Premrl ice climbing inside the Skaftafell Glacier, southern Iceland. “Over the past five years, I’ve traveled to Iceland several times to document outdoor athletes pushing the limits of their sport in the otherworldly landscapes found across the country. One of those trips was a highlight of my career: following two elite ice climbers as they explored the three-dimensional ice climbing opportunities around, and even inside, the large glaciers on the southern side of the island. On one particular day, we found a detached section of glacier that looked like a giant piece of Swiss cheese. We spent the day climbing and exploring a feature that truly seemed like it came from another world.”
Phase One IQ180, Schneider Kreuznach 28mm LS f/4.5 Aspherical. Exposure: 1/1600 sec., ƒ/4.5, ISO 400.
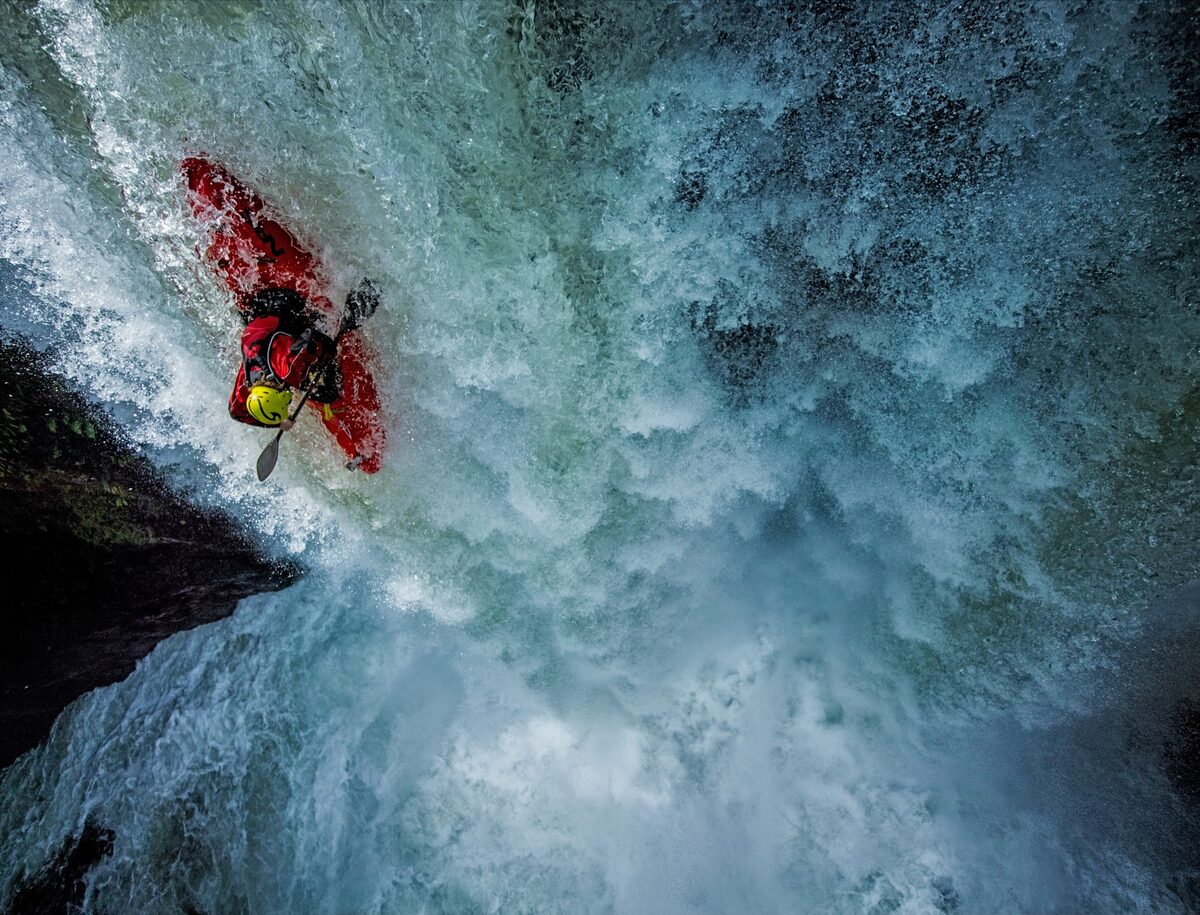
Tyler Bradt drops into Tomata One, a 60-foot waterfall in Talapcoyan, Mexico. “Few rivers in the world have the extensive runnable waterfalls as the Rio Alseseca and its tributaries near Veracruz, Mexico. Tomata One is one of the classics, and the sheer nature of the drop provided the perfect opportunity to rig a zip line right in front of the lip of the waterfall. With my toes dangling a few feet from the lip of the waterfall—and a high-resolution medium format camera in my hand—I sat shooting image after image of my friends dropping over this 60-foot drop in their kayaks. This image of Tyler was my favorite.”
Canon EOS 5D Mark II, Canon EF 15mm f/2.8 Fisheye, Profoto B1. Exposure: 1/30 sec., ƒ/3.2, ISO 3200.
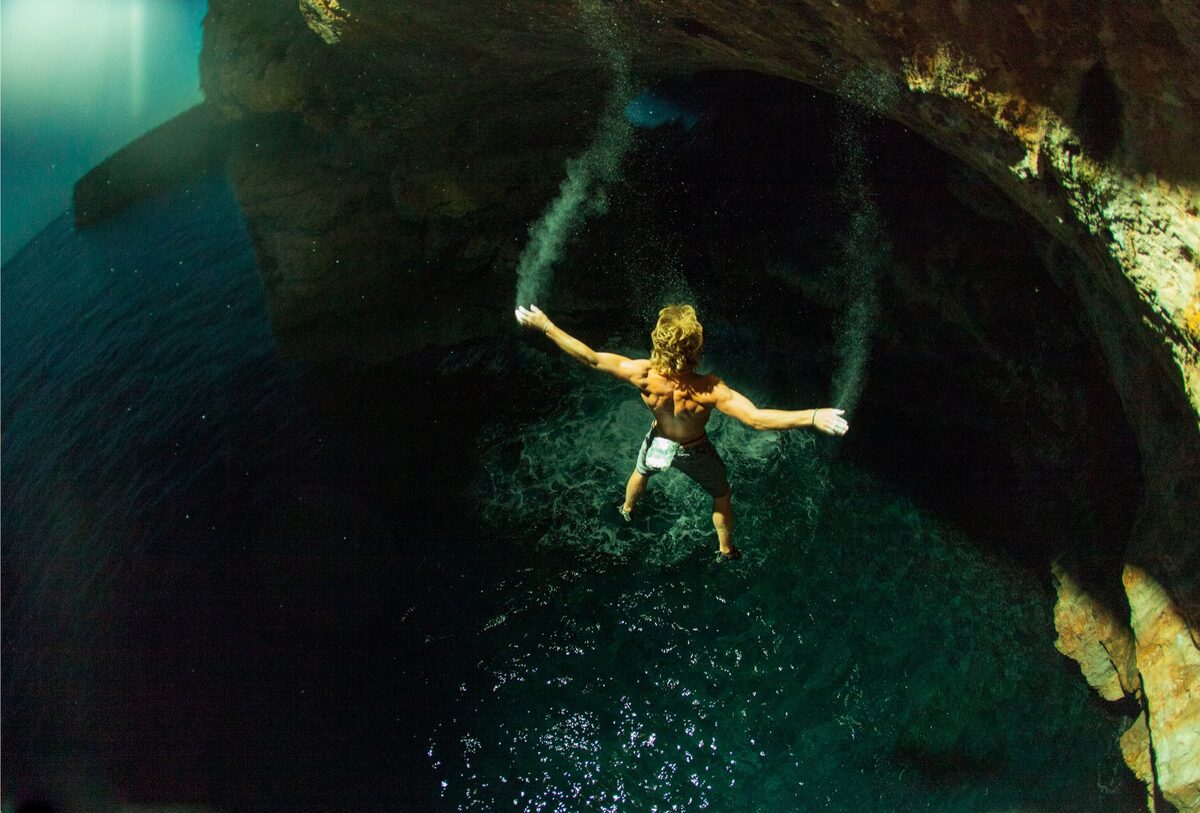
James Pearson falls into the Mediterranean after almost climbing a route at Cala Sa Nau, Mallorca, Spain. “Mallorca is the birthplace of a type of climbing known as Psicobloc, or climbing ropeless over the ocean, where a fall means a trip straight to the water below. I had this idea to photograph James climbing above the ocean at dusk, and when he fell, I was there hanging on a rope nearby to snap this image.”
new gear & tech
Get In The Action
Capture perspectives from air, sea and everything in between
By The Editors
A s impressive as today’s interchangeable-lens cameras are, there are still some things they can’t do on their own, like soar through the sky, dive underwater, clip inconspicuously to your backpack or take a serious tumble. For a unique point of view on adventure sports, these specialty cameras make it easy to capture images that would be nerve-wracking or even impossible with a traditional camera.
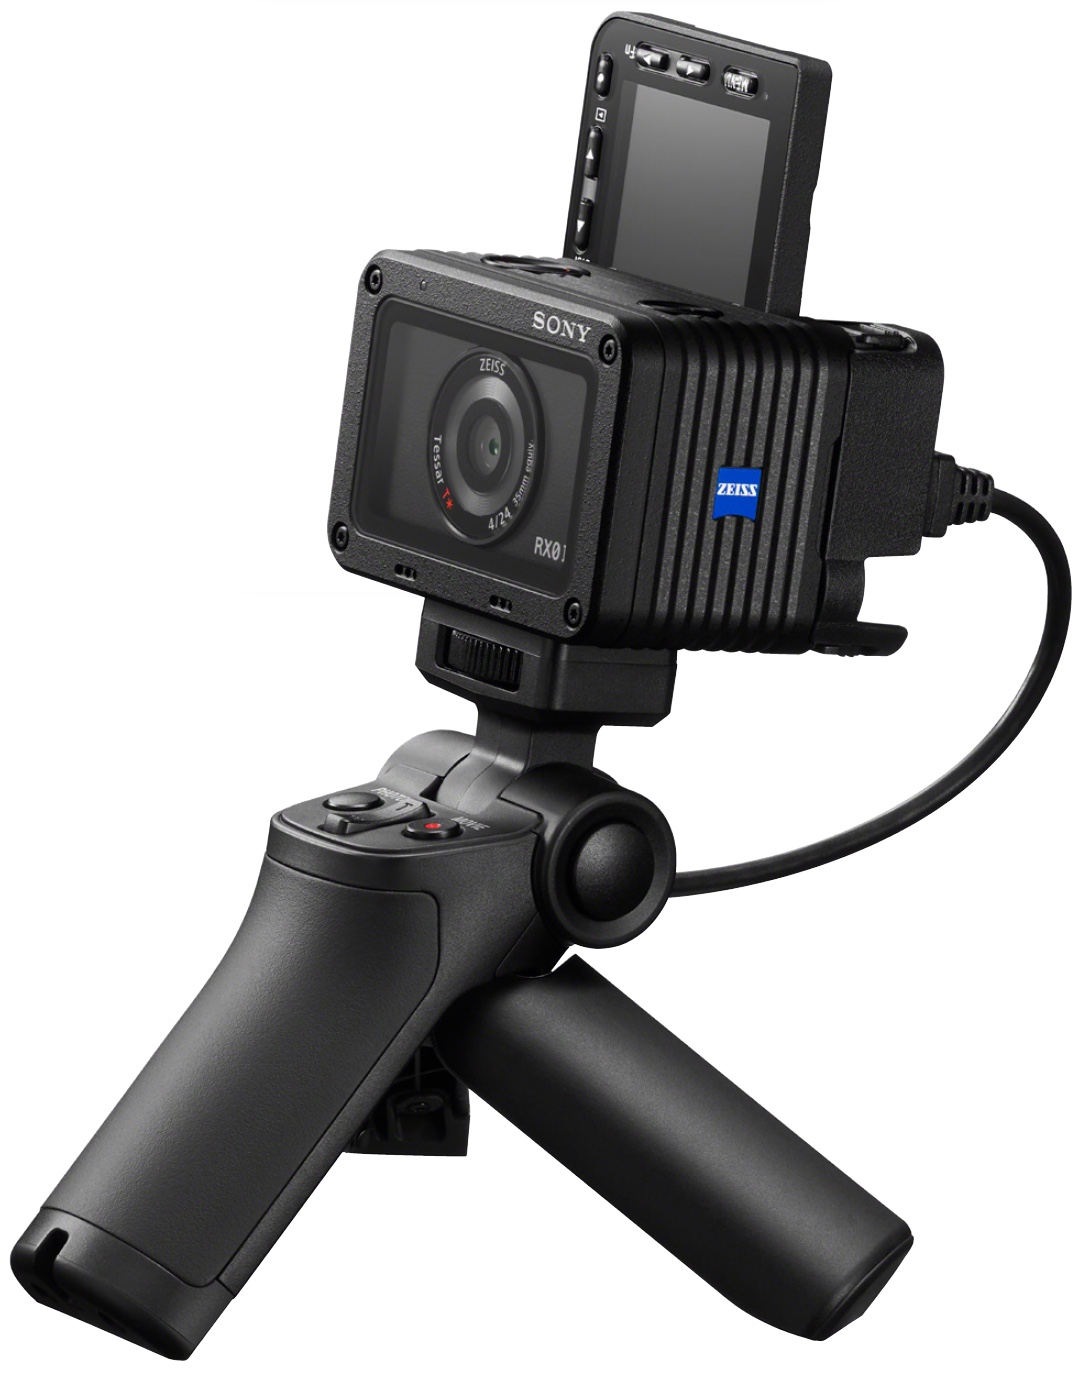
THE “GO ANYWHERE” CAMERA
Underwater, attached to your handlebars or tethered to your life jacket, the Sony RX0 II is a 15-megapixel ultra-compact camera that can go pretty much anywhere you can. Though it’s incredibly small at 2.5x1.8x1.5 inches, it packs a 1-inch sensor that can capture stills—and 4K video with image stabilization—to microSD-format memory cards.
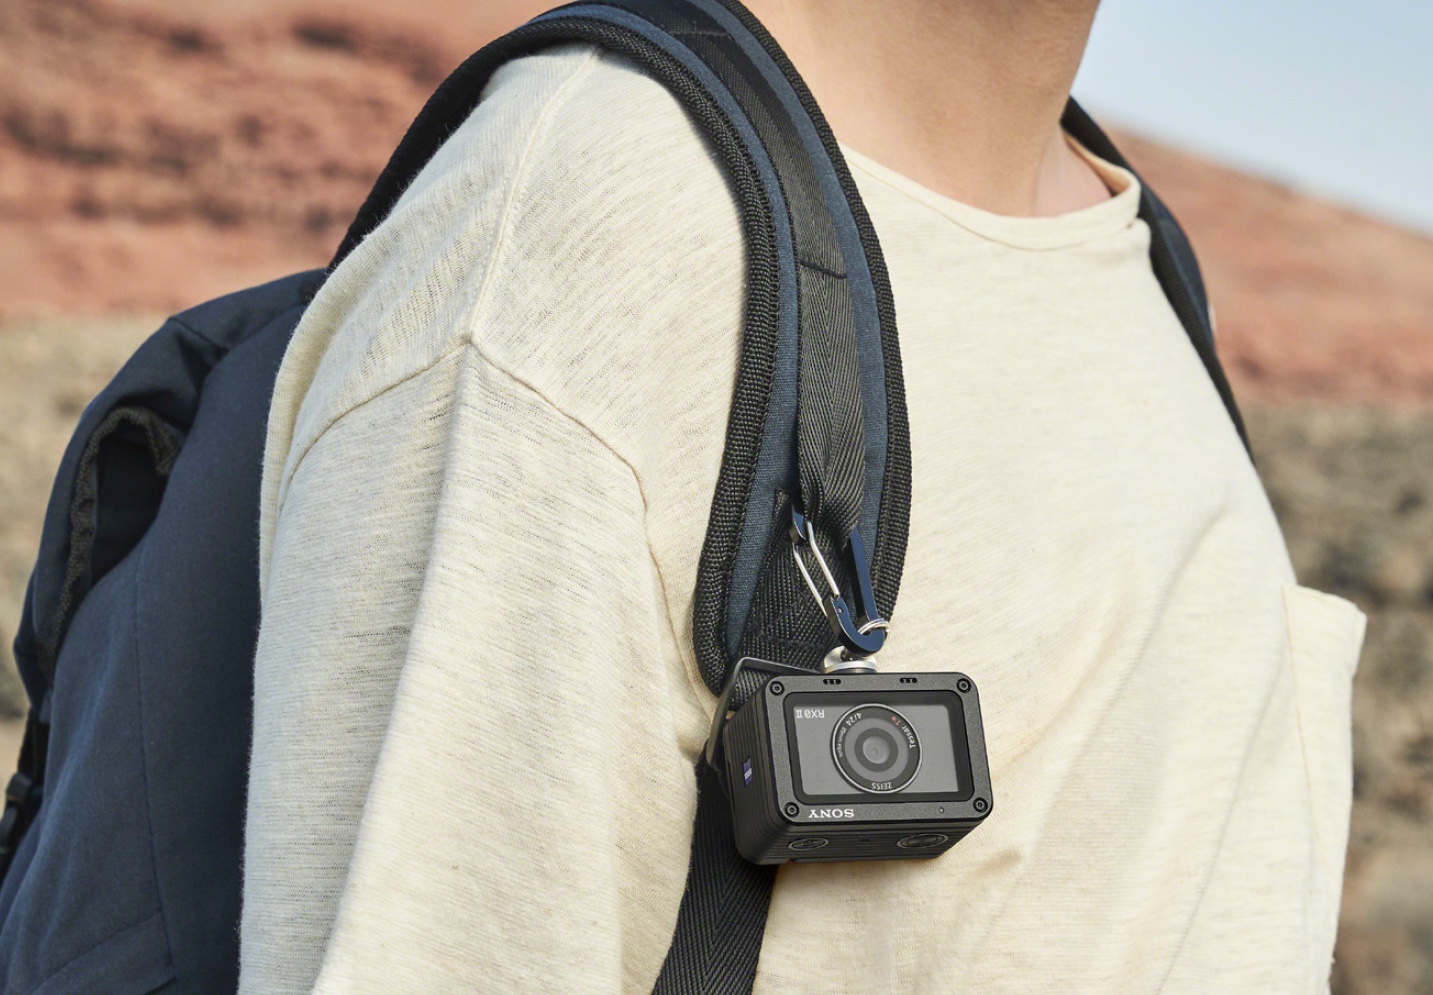
The RX0 II is built to withstand the bumps and splashes of adventure sports without additional accessories. It’s waterproof to 33 feet, dustproof, crushproof and shockproof, able to take a drop of over 6 feet.
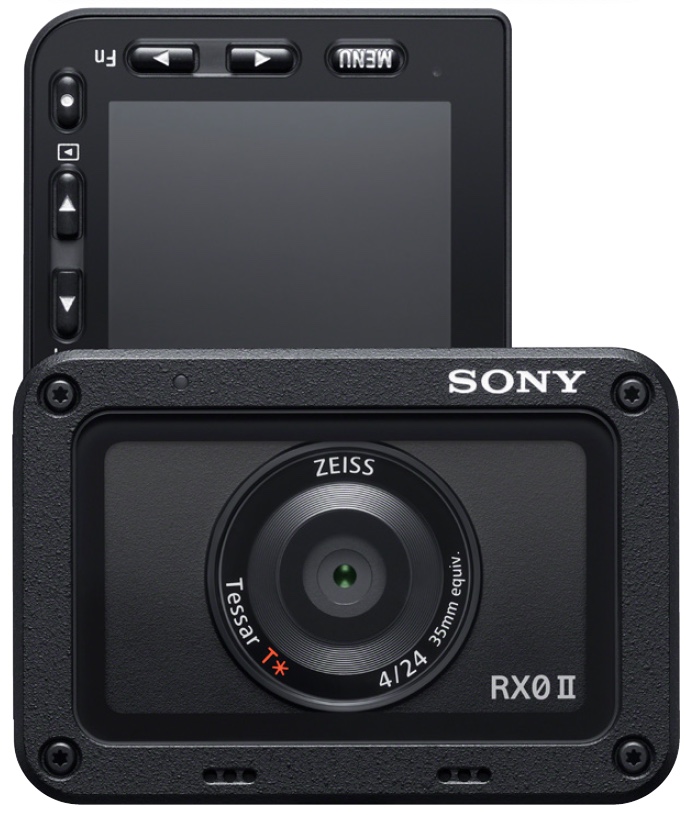
For still photos, you can shoot at 16 fps in bursts up to 129 JPEGs. The camera also offers interval recording to make time-lapse videos and a slow-motion video mode. The ZEISS lens is equivalent to 24mm to capture the action and your surroundings, and there’s a jack for an external mic to boost your sound quality when shooting video.
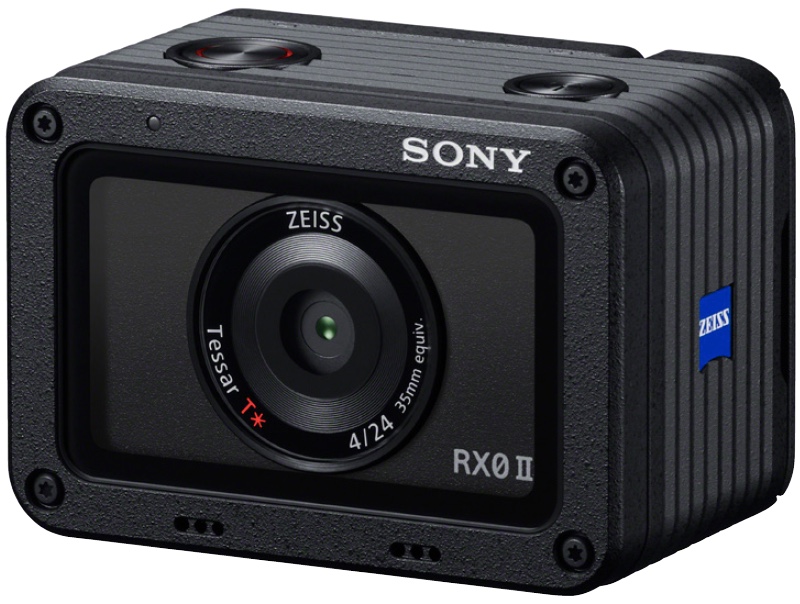
The camera’s flip-up LCD allows you to turn the camera on yourself for “I was there” shots. There’s also an optional VCT-SGR1 Shooting Grip available that provides integrated controls and can convert to a tripod for low-to-the-ground perspectives. Estimated street prices: $699 (RX0 II); $99 (VCT-SGR1 Shooting Grip).
Contact: Sony, sony.com.
ELEVATE YOUR PERSPECTIVE
Drones allow you to capture photos and videos from perspectives that you simply can’t get any other way. Drone use is regulated pretty much everywhere, so you need to know the rules that apply to your location, but once you’ve handled that, they can open up exciting ways to catch the action.
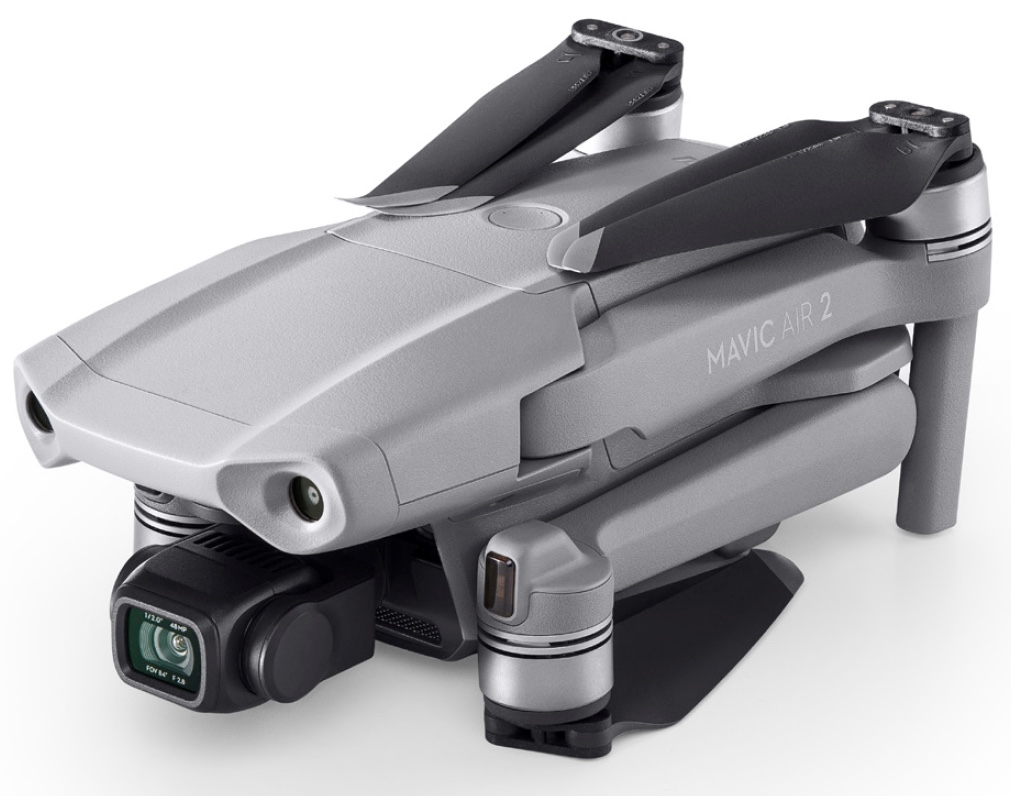
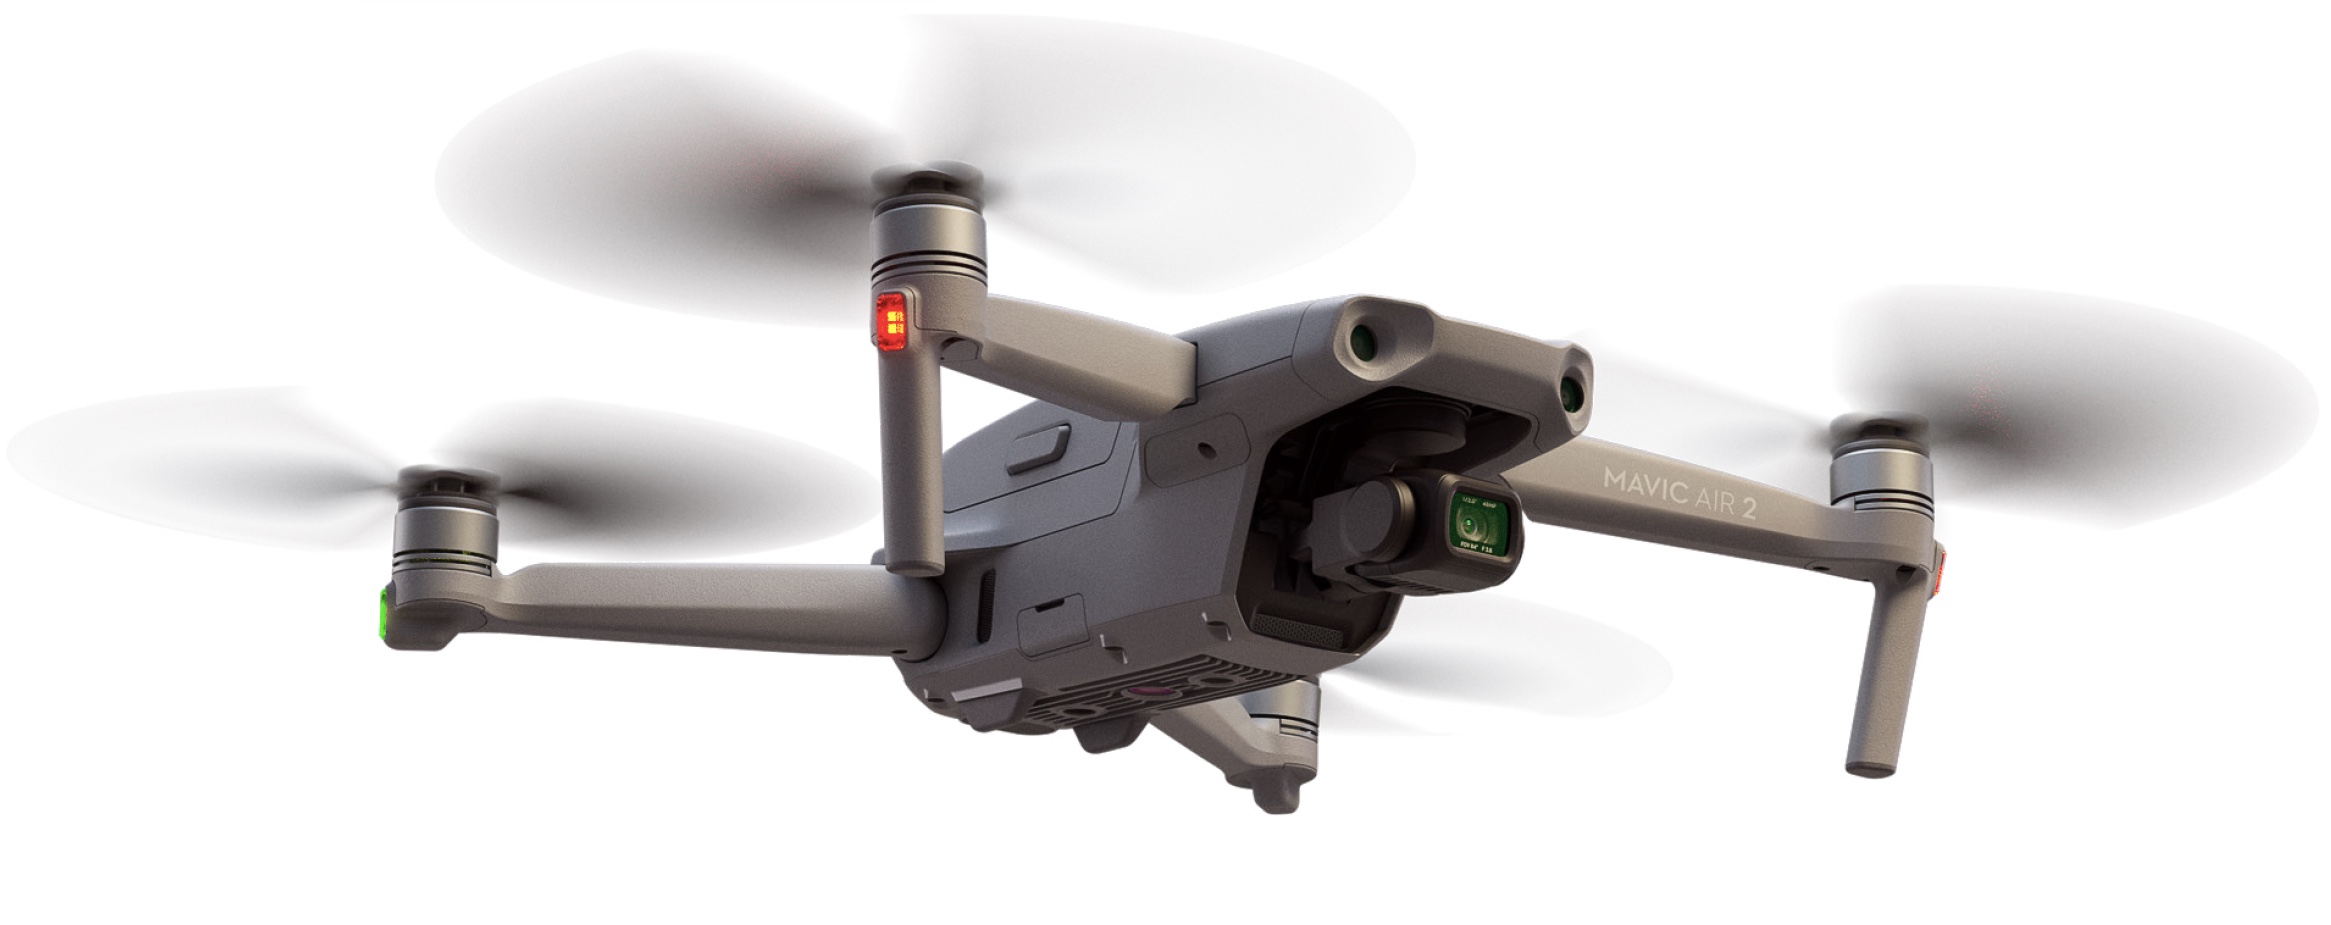
There are many drones to choose from these days, ranging from very basic toys to sophisticated aircraft designed for experienced, trained users. The DJI Mavic Air 2 hits a sweet spot for photographers, with strong imaging capabilities, helpful automations and a reasonably affordable price.
The camera in the Mavic Air 2 is a 1/2-inch, 12-megapixel sensor that can produce 12-megapixel stills and also 48-megapixel stills in some modes (by combining multiple exposures into a single frame), as well as 4K video. The SmartPhoto mode uses scene recognition, HDR and HyperLight (low-light compensation) technologies to optimize your exposure results in tricky lighting conditions.

Usability is another reason we like this drone for photographers. It has a 34-minute flight time per charge and includes several features to help novice flyers avoid problems. For example, the Advanced Pilot Assistance Systems (APAS) 3.0 maps out the drone’s surroundings to avoid obstacles automatically. The Mavic Air 2 also includes technologies to help you get the shot, especially when recording video, with the ability to track and maintain focus on a specific moving subject. List price: $799.
Contact: DJI, dji.com.

A RUGGED, COMPACT SYSTEM
It may look like an ordinary point-and-shoot, but the Olympus Tough TG-6 is far from it, with impressive durability built in and an array of optional accessories that make it a customizable camera system for adventure photography. Accessories include three optical converters, two ring lights, an underwater housing and strobes for deeper dives than the camera can do on its own, plus protective equipment like a lens barrier and floatation device.
The camera itself is waterproof to 50 feet and can survive drops from up to 7 feet and operate in temperatures as low as 14 degrees Fahrenheit. The 12-megapixel TG-6 includes an optical zoom lens equivalent to 25-100mm, a versatile range on its own, which can be further extended with optional wide and tele lens adapters.
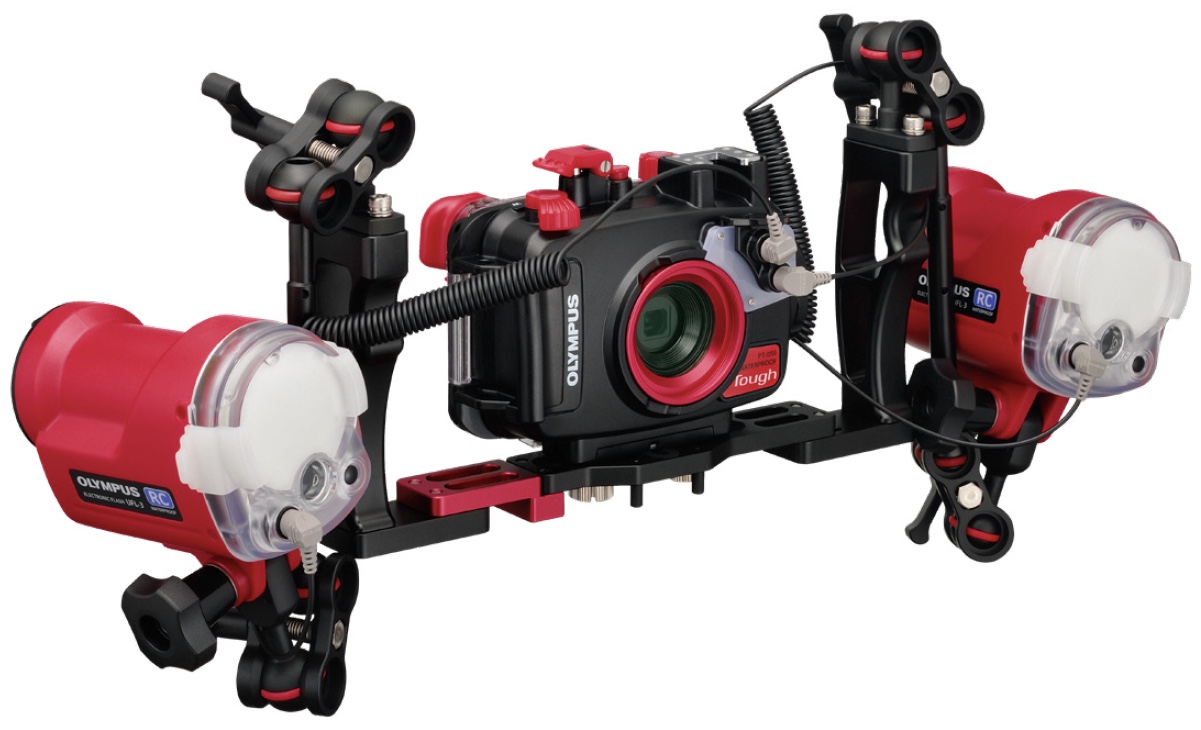
If you’re headed out to do some rafting or other near-the-surface photography, a floating strap is available to keep the camera from sinking to unreachable depths. If a deeper dive is what you’re after, the PT-059 Underwater Case and UFL-3 Underwater Strobes can allow the camera to travel with you up to nearly 150 feet below.
The Olympus Tough TG-6 also offers noteworthy macro capabilities, able to focus on objects as close as 0.39 inches. The LG-1 LED Light Guide and FD-1 Flash Diffuser (the latter of which can also be used underwater) are optional accessories to achieve more even illumination with macro subjects. List price: $449 (camera only).
Contact: Olympus, getolympus.com.


favorite places

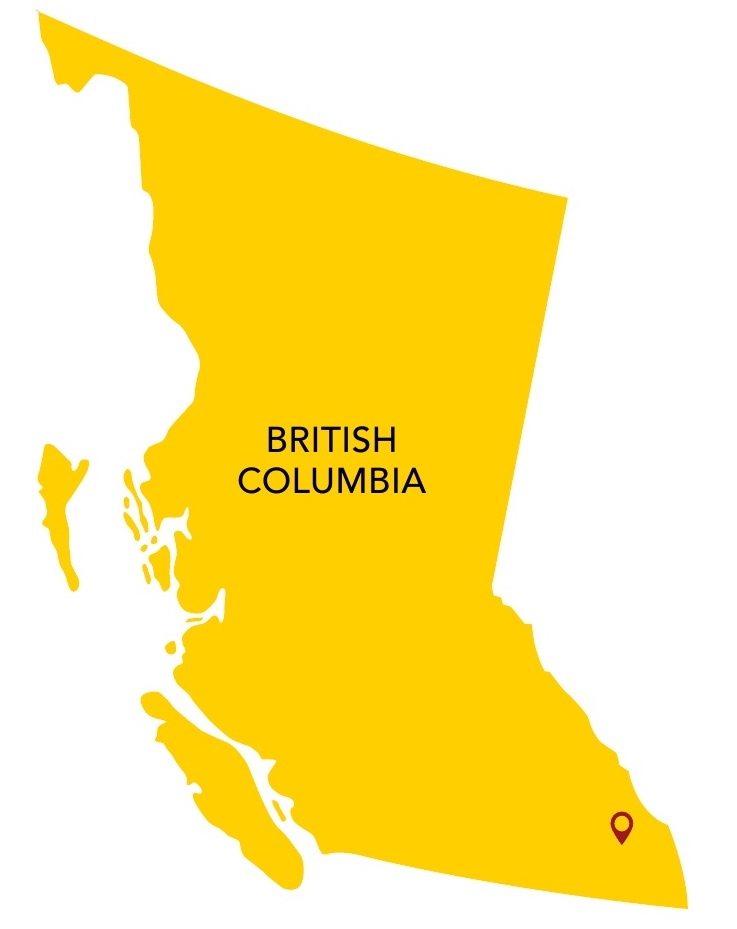
Pigeon Spire
Bugaboo Provincial Park, British Columbia, Canada
Text & Photography By David Connel
Location
Bugaboo Provincial Park is located in the Purcell Mountains of British Columbia, Canada. The park contains isolated 10,000-foot granite spires soaring above ice fields and glaciers with stunning views in all directions. Access to the Bugaboos begins in the small town of Brisco on British Columbia Highway 95. Turn west onto Bugaboo Creek Road and navigate the maze of logging roads for 28.5 miles to the trailhead parking lot. The park provides chicken wire and wood posts to build a fence around the lower half of your vehicle, which prevents the porcupines from chewing the rubber parts off your car!
The approach trail is steep, consisting of 2.8 miles and 2,360 feet elevation gain to the Alpine Club of Canada’s Conrad Kain Hut, and another 0.6 miles and 820 feet elevation gain to the Applebee Campground. In spots, the trail has been carved into steeper rock sections with cables to grasp.
Weather
A hallmark of the Bugaboos is how quickly the weather can change for the worse. A predawn start is required since afternoon storms, some with serious lightning, are the norm. The storms usually come in from the west. In my multiple trips to the Bugaboos, I’ve experienced severe lightning storms, white-out conditions and snowstorms. Always be prepared. Due to the harsh conditions, I elected to bring my old backup camera gear.
Photo Experience
The West Ridge route on Pigeon Spire is one of the most classic and spectacular rock climbs in the Bugaboos. The approach to the Pigeon Spire requires experience with glacier travel to traverse the Upper Vowell Glacier and to ascend/descend the steep Snowpatch-Bugaboo Col. Be aware, there have been serious accidents on the col. The climbing route isn’t technically difficult, mostly fourth class scrambling with plenty of exposure. There is one 5.4 technical section near the summit and one other exposed area that may require a rope for extra security.
An alpine start from the hut allowed us to gain the West Ridge as the sun rose and to capture the image before the light became too harsh. When the ridgeline became more pronounced and steeper, I knew immediately this was the Bugaboo climbing image I envisioned. I let the other climbing team in our party proceed along the ridge until they appeared dramatically on the ridgeline. Bright, colorful jackets made them stand out. The soft morning light and the gray granite spire made for an easy, straightforward exposure.
I zoomed in to isolate the most dramatic section of the ridgeline and to ensure the climbers were visible for scale. My main photographic goal was to capture an iconic climbing image, but the location of Pigeon Spire provides awe-inspiring views and numerous photo opportunities, most notably of the Howser Towers. OP
Best Times
A trip to the Bugaboos is a serious undertaking, with a limited climbing season from mid-June to September. The best weather is in July. The roads to the trailhead are often closed in the shoulder season. Additionally, the approach trail is usually covered by snow until June.
Plan your photography in the mornings. The midday sun is harsh, and afternoons are either stormy or you’re pressed to return to camp before dark.
Contact: British Columbia Parks, bcparks.ca/explore/parkpgs/bugaboo.
Nikon D300, AF-S DX NIKKOR 18-200mm f/3.5-5.6G ED VR II. Exposure: 1/400 sec., ƒ/10, ISO 250.
wild by nature
How To Photograph A Fox Den
Field ethics and technical advice for capturing the delightful interactions of the marvelous fox
Text & Photography By Melissa Groo
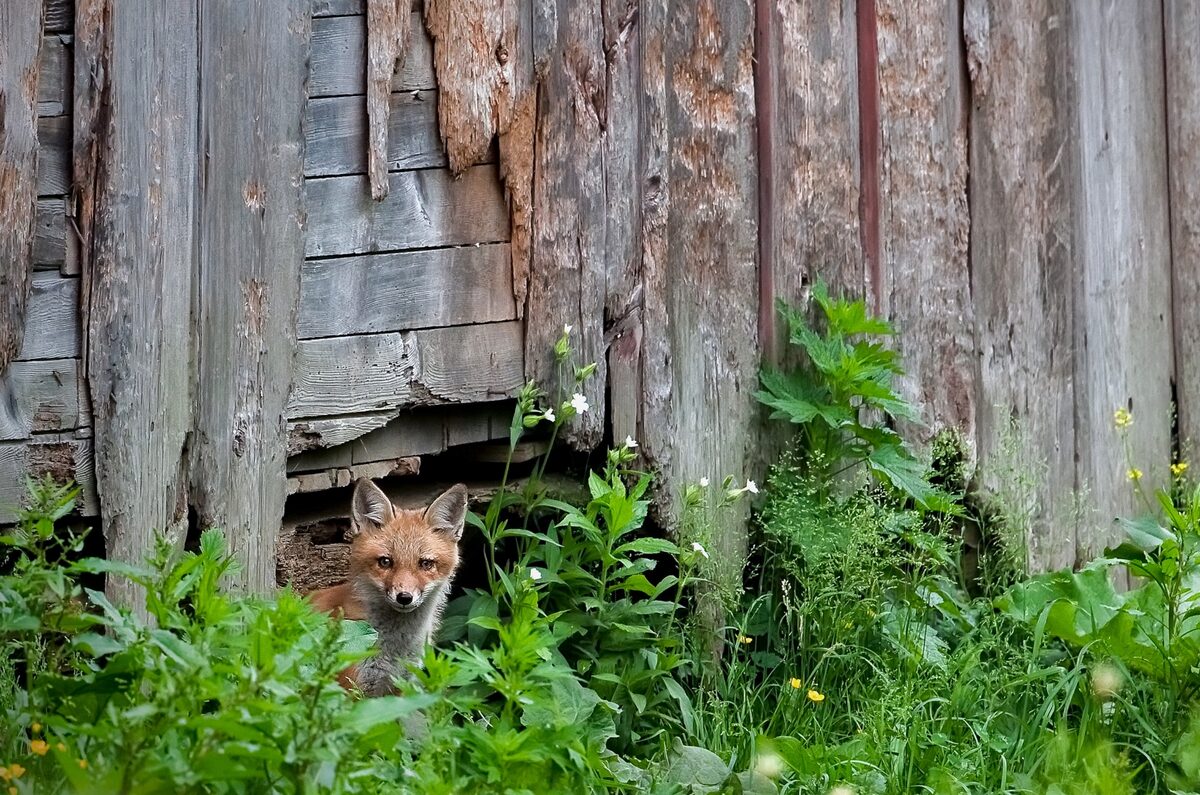
A red fox vixen peeks out from her den under a barn.
F oxes are highly coveted subjects for wildlife photographers. They’re beautiful, playful, intelligent and express strong family bonds.
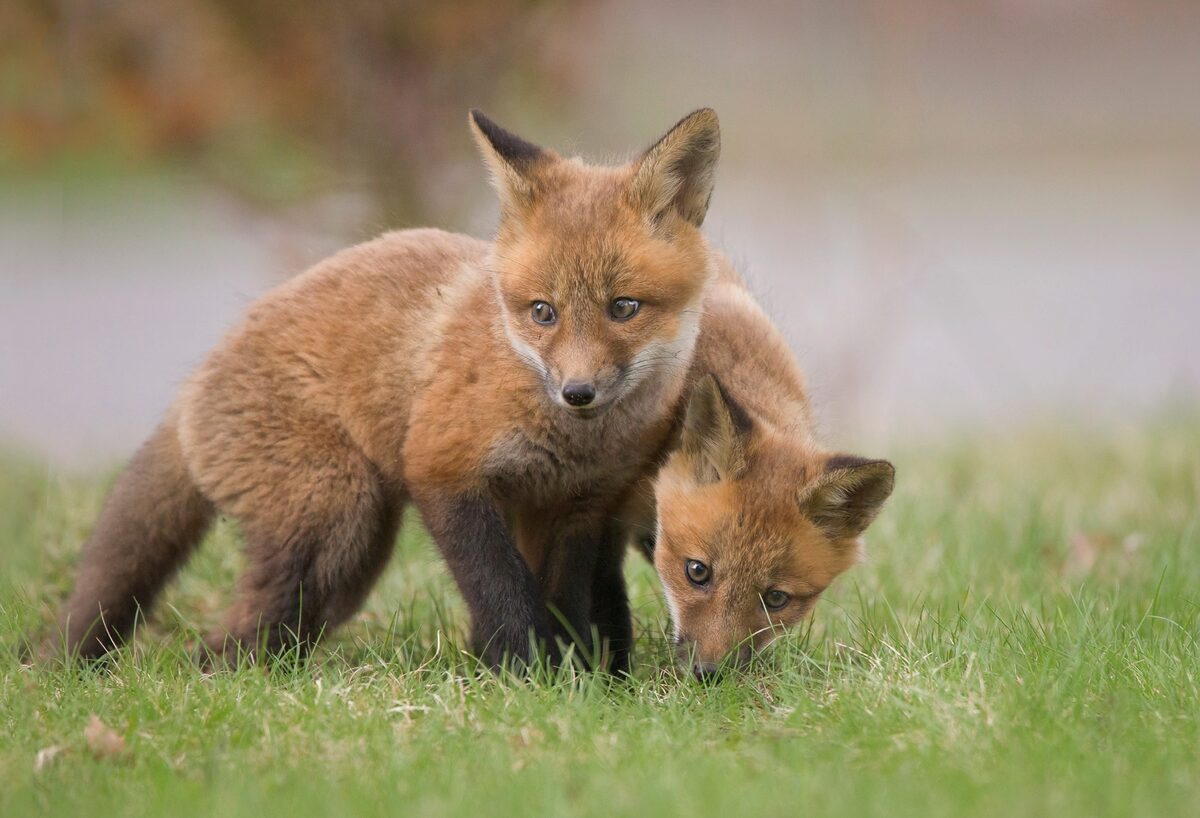
If just a glimpse of a fox is a treat, finding a den full of fox kits is like winning the photography jackpot. Dens offer a wealth of different photo ops, from tight portraits to compelling action shots, kits wrestling each other and practicing their stalking techniques, and parents bringing home rodents for meals.
In North America, we have six species of fox: red, gray, swift, kit, island and arctic. Red foxes and gray foxes are the only species that can be found in suburban and urban areas. Given this accessibility, their dens are easiest for us to locate, and thus these two species tend to be the most photographed. Dens might be located in an old woodchuck burrow or in spaces under a barn, shed or porch. They may have several entrances.
The months of March and April find a mama fox snuggled up in the den with her kits, nursing them, while the father brings in food for her. The kits don’t emerge until they’re about four to five weeks old and then begin to explore their world. Mother’s milk is supplemented and then replaced by the meat of animals brought home to them.
Both parents hunt and tend to the young (typically four to six kits) through the spring and summer, until they’ve learned to fend for themselves and go off to seek new territory. It surprises many people to learn that father foxes are very devoted parents, serving as both fierce protectors and gentle groomers for their young. Their strong bond moved me when I spent a long time one spring in a blind near a red fox den and witnessed this firsthand.
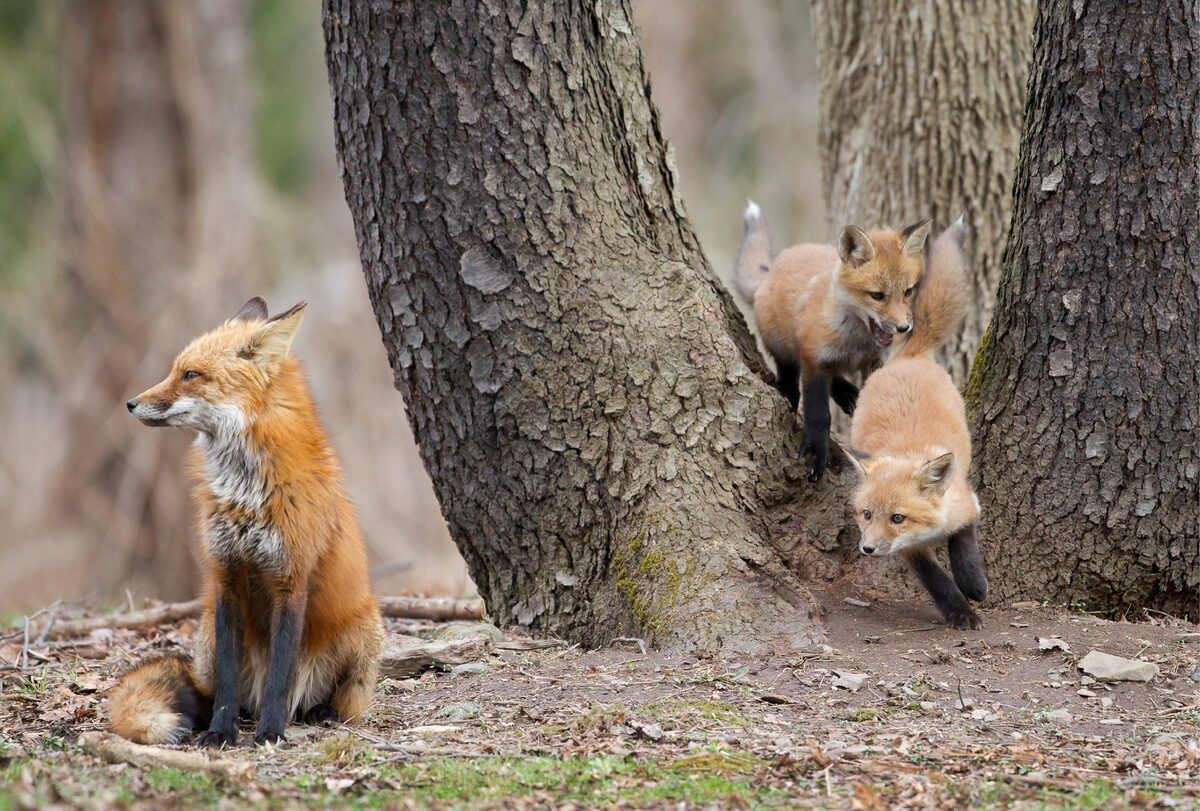
A father fox keeps a look out while two of his kits play in the crook of a tree.
Basic Field Ethics
How best to photograph a fox den once you’ve found one? This requires a lot of careful thought and decision making, both in terms of photography potential and—more importantly—the safety and welfare of the fox family. Foxes face many challenges and lead short and brutish lives. Their life expectancy is said to be about two to three years. They are killed for sport, for fur or out of fear and ignorance, hit by cars, poisoned by rodenticide, preyed on by coyotes and vulnerable to diseases like mange. In many states, they’re the victims of barbaric killing contests, which seek to kill as many foxes in a day as possible.
If foxes feel their den is in jeopardy due to a perceived threat from one or more humans, they may move their kits out of that den to a different location. That other location may not be as safe or as carefully chosen as the original one. As a photographer, I know that I’d never want to be the cause of that, and so my decisions must be made extremely carefully in recognition of the potential effects of my presence.
I strongly recommend the use of blinds for fox dens. A blind might be a pop-up tent blind, or it might be your car. The few exceptions to this are places where foxes are used to people out in the open, such as the island foxes on the Channel Islands off California or the red foxes on Prince Edward Island in Canada. These foxes aren’t persecuted or hunted and are considered a tourist attraction. But in most places, foxes aren’t safe from human persecution; they’re sadly still considered “vermin” by many who don’t appreciate their beauty or importance in the ecological health of our natural communities. For these reasons, habituating them to human presence can present a risk, and thus as much as we can hide our human form, the better.
Of course, the fastest way to habituate a fox is also the best way to shorten its life: feeding it. A fed fox is a dead fox. Even if it’s just you feeding that fox, the fox will assume all humans may hold out that potential, and the moment it begins to approach people with hopes of a handout is the moment it begins to be in great danger. Feeding foxes for the sake of a photo is truly the unkindest thing you can do for them.
As it’s not uncommon for foxes to den near roads, many people are able to photograph them from their cars. The foxes are used to cars going by, and as long as your car isn’t too close and you remain quietly in your vehicle, you may well be able to be an observer without any disruption to the foxes’ routines. Pull over to a safe spot, turn your engine off, rest your lens on a beanbag or other window support and keep your movements to a minimum. When other cars come by, pull your lens in and do your best to avoid bringing attention to the den. This is crucial.
A caution: It’s fun to share our photos of fox families with others on social media. They’re a popular subject, and the den can very quickly become a top destination for other photographers and observers. But sharing locations with others carries many risks for the foxes. Added human pressure, even from considerate observers, can cause the foxes to move their den. Our responsibility is first and foremost to the foxes and their welfare.
Father fox nuzzles his kit.
Placing A Pop-Up Blind
In many cases, using a pop-up, or tent blind, is the best way to photograph a fox den. The ideal situation is on private land—with permission from the landowner. Does someone you know have a den on their property? Contact them and ask if you can put up a blind, in exchange offering them a print of their choice from the photos you get. It can also be a wonderful opportunity to educate them about how to co-exist with the fox family.
With blind placement, the critical thing one must do first is make observations from afar to establish baseline behavior norms. This will inform both how you position yourself for best views and photos and also how normalcy looks for this family before you and your blind have affected their behavior. Consider factors such as:
Is there an area where the kits like to play?
• Do the parents tend to go out or enter the scene at a particular spot?
• Is nursing happening out in the open when mama returns from a hunt?
• Do the parents rest outside of the den?
• How do they act when they feel threatened? Many foxes will pin their ears back, like our domestic dogs, or may give short barks.
Observe the directionality of the light through the day. Is the situation best for a morning shoot or afternoon? What will it be like at golden hour at either end of the day? Does it take a while for the rising sun to clear the trees or a rise of land? A best-case scenario is when the fox den faces the south; this will yield the most hours of light on the den.
Of course, the position of the fox den vis-à-vis the sun doesn’t matter that much if the action is happening outside the den in a larger area. As fox kits explore their environment, they begin to extend their range. Ideally, you’ll want to position yourself such that you’ll have a wide angle of view. Keep in mind, you can shoot out of other sides of your blind than just the one that faces the den.
Don’t shy away from photographing directly into the sun at the end of the day. As the sun gets lower, opportunities for dramatic backlit photos will present themselves—a fox’s fur can make for stunning rim detail.
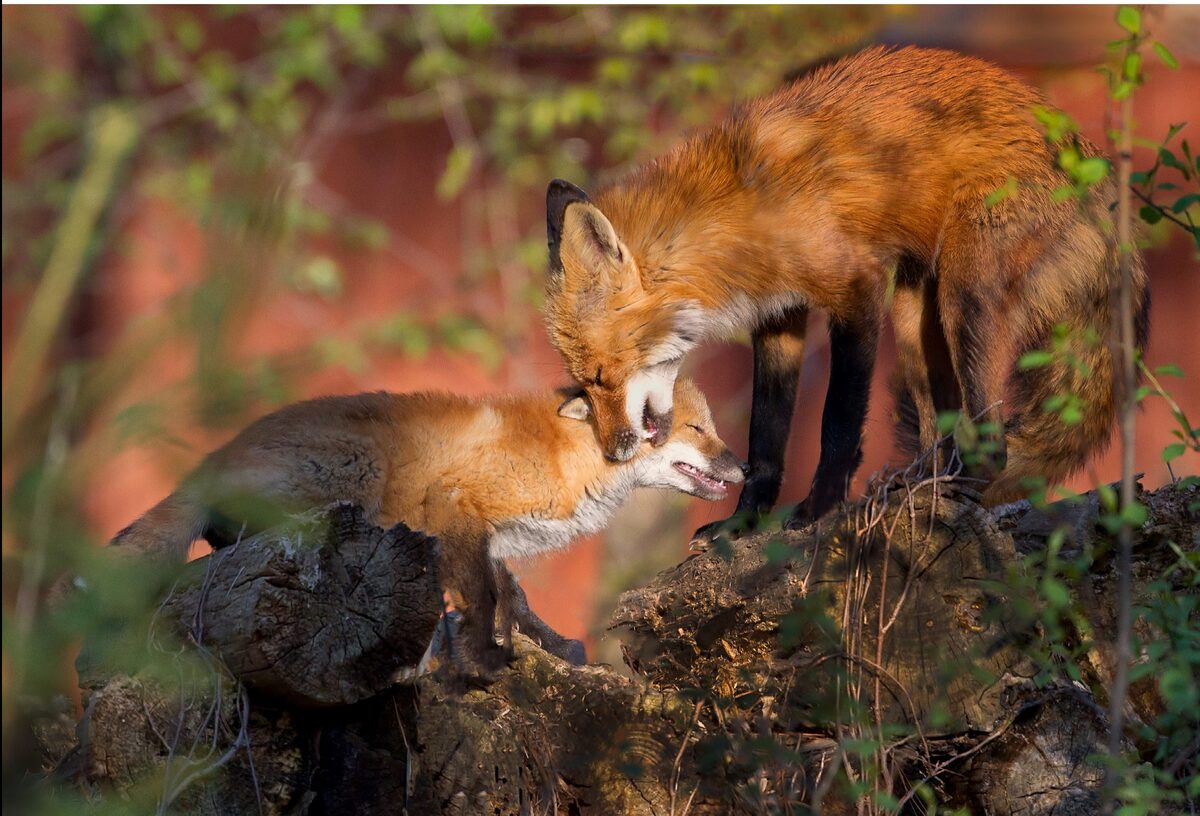
Father fox tenderly greets his kit near their den under a shed.
Setting Up A Pop-Up Blind
After a couple of days of observing baseline behavior, it’s time to set up your pop-up blind. I recommend using one that allows you to sit and shoot out at different levels—from a stool or camp chair as well as from the ground in case you want to get low-angle shots. Tragopan Blinds are my favorite as they provide various options for camera height. They also have ports for tripod legs to stick out.
Set up your blind a good distance away from the den. As time goes on, you may be able to move it closer, but to start, try to be about 50 to 60 yards away. This distance has less chance of causing concern to the foxes. Stake it down very well so there’s no chance it will blow away if a strong wind comes up. This can also be avoided by leaving a couple of the windows and doors open when you leave the blind so that wind can easily move through. Put some kind of seat in there, as well as a tarp or yoga mat that you can sit or lie down on if you want to shoot low.
Avoid occupying the blind for at least a couple of days so that the foxes have a chance to get used to it as a nonthreatening part of the environment. During this time, observe the parents’ behavior from afar and compare it to the baseline behavior you’d observed before putting it up. It’s really the parents’ behavior that’s most important. You don’t want them to feel intimidated or restricted by you or your blind to do the urgent work of protecting and feeding their young. Do they seem very wary of it even after a couple days? Are you seeing parents continuing to return with food? Is the mother nursing the kits in the open when she returns? Do the adults look relaxed while out of the den?
Kits, especially when they’re very young, are much like the young of many species, often overly trusting and carefree, and may not pay much attention to the blind after their initial curiosity. When both parents are absent, the kits may come out and play with abandon, but when mama or papa comes back and is nervous about the blind or your presence in it, they’ll signal to the young, through vocalizations and their own behavior, to hide. Over time, you’ll see the kits become more wary of you as well as everything else. This is in their best interest. Just as a fed fox is a dead fox, a wary fox is a survivor.
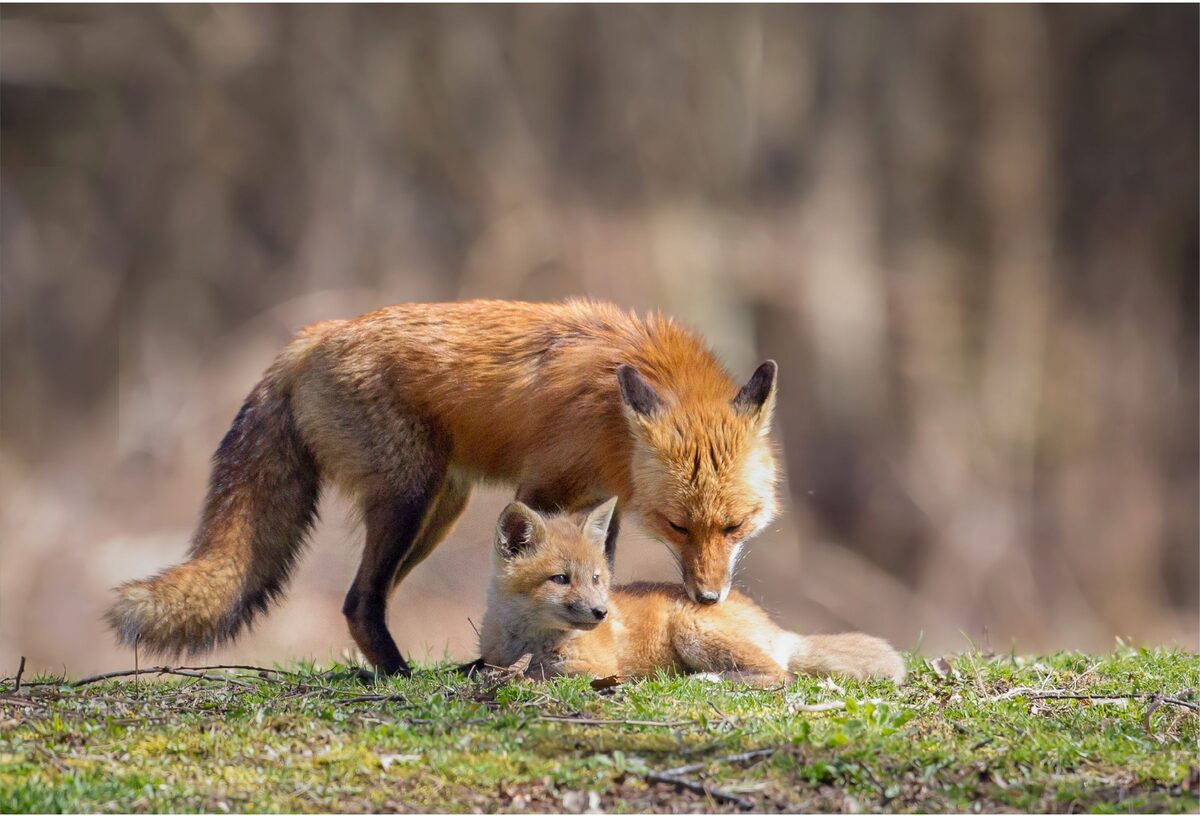
Red fox kits exploring the world outside their den.
Equipment & Technique
For photography of a fox family, you’ll want a telephoto lens of at least 300mm and a shorter lens like a 70-200mm or even a wide angle. Though the telephoto will allow you to get close-up shots, a wider angle can also be great for experimenting with larger views that depict the foxes in their environment. Close-up shots are wonderful, but they’re also really common, and sometimes a larger scene can be unique and beautiful.
If you have a camera with a silent shutter, this is the perfect time to use it. Even just a couple clicks of a loud shutter can send foxes running. You’ll also want a tripod (or, if in a car, a bean bag), which will allow for slower shutter speeds in low light and will minimize your movement. Maybe you have a light telephoto lens and don’t mind hand-holding it as needed; keep in mind that any movement of the lens as you lift it up and out or off the fabric of the blind will likely be seen or heard by the foxes, and they may stop what they’re doing or even take off. Remember, their senses are much sharper than ours. The truth is that much of the time foxes know you’re in the blind, but it’s the fact that you’re hidden and quiet that will put them at ease.
As for camera settings, make sure you use continuous, single-point autofocus, and high-speed continuous shooting. Turn on image stabilization if you have it. When you have decent light, keep your shutter speed as fast as you can so you’ll be ready for interesting behavior. Fox kits can burst into play at any moment, rising up on their hind legs and facing off, and you don’t want to miss that peak of action. Or an adult may return with prey and very quickly run into the den. Don’t be afraid to increase your ISO if you have to. Foxes can be quite crepuscular—meaning more active at dawn and dusk—so you’ll want to keep your shutter speed relatively speedy and be prepared to push your ISO to the limit at times. There’s nothing worse than capturing exciting behavior only to find out later it’s blurry. Also, make sure to shoot in RAW for maximum latitude in exposure adjustments in post-processing.
It’s a great joy to capture the moments of love and tenderness that are consistently expressed within a fox family. Take the opportunity to show these creatures for the marvelous, emotional and intelligent individuals they are. Find ways to open the eyes of others to the wonder of foxes and the value they bring to our landscapes as necessary members of a natural community. It’s the best way to give back to the fox family that has given you and your photography such gifts. OP
To see more of Melissa Groo’s photography and learn about workshop opportunities, visit melissagroo.com.
making connections
Mindful Photo Editing
An attitude of gratitude brings great things
Text & Photography By Ken Kaminesky
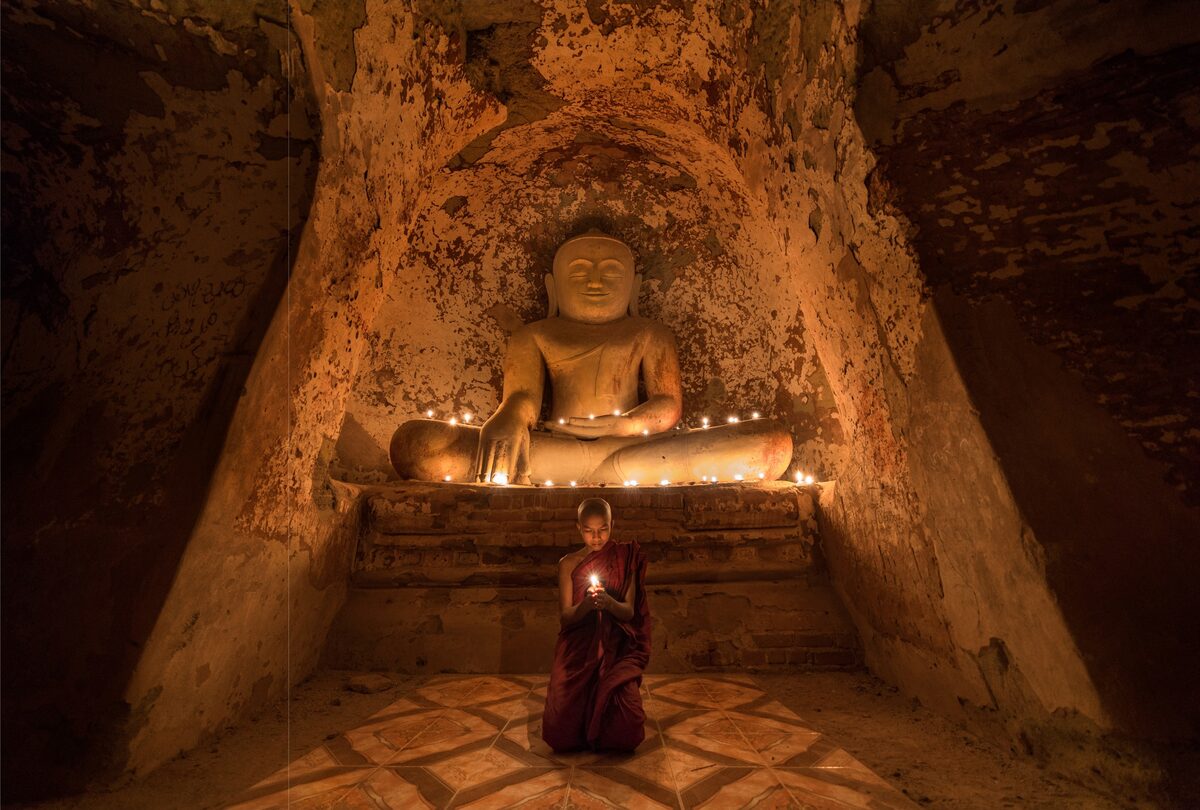
"In the Moment." Novice monk at Bagan, Myanmar.
G ratitude is the healthiest of all human emotions. The more you express gratitude for what you have, the more likely you will have even more to express gratitude for.”
–Zig Ziglar
What are you grateful for?
During challenging times like the coronavirus pandemic, it’s easy to get down, frustrated and sad. My heart goes out to those who have suffered from the disease and to those who have lost their jobs or had their companies shut down. I can relate just like so many other travel photographers.
So why am I writing about gratitude when the world is going through such tough times? Because I feel that right now I need to be more grateful than ever.
I often find myself wishing for:
More time with my mom and friends.
The opportunity to step away from my computer and read, walk, exercise, cook and be a social person.
The chance to edit old travel photos.
Peace of mind.
Since I’m not traveling and organizing photography tours (for now), I have the chance to do the things on the above list, and for that I’m grateful. I also have the time to work on projects like editing photos that I’ve put aside for far too long. I’m thankful for this opportunity as well.
While I can’t change what’s going on in the world, I do have the choice of how I deal with it. To me, the true testament of one’s character isn’t how we handle the good times or everyday routine but rather how we stand during trials and tribulations.
Instead of looking at the COVID-19 lockdown as a hardship—even if it is—a lot of photographers have taken this time as an opportunity to do some of the creative post-processing work on their images that have been sitting on their hard drives for weeks, months or years. To those of you who have done this, bravo.
Yes, the pandemic has been horrible in so many ways, but I love it when people take challenging moments to count their blessings and show gratitude, and take the time to do something creative like image editing. This is a two-fold positive act. It feeds your creative soul, and it offers the opportunity to share something beautiful with family, friends and followers on social media.
It’s rewarding to see beautiful images at times like this, and I’m inspired by so many other photographers and their visions of what they see, capture and create. For the photographer, editing images should be an exercise in gratitude. How fortunate are we to be able to travel, see spectacular sites, live beautiful moments and meet inspiring people? On top of that, photographers get to capture the essence of their journeys and share their vision with the rest of the world. How lucky we are for this privilege.
Image editing is a way for me and so many other photographers to take a walk down memory lane and revisit personal stories. These memories and experiences, good or bad, are part of the essence of who we are, and they build our character. This is what I love about travel photography; planning the trip, living the journey and remembering the adventures via the images we create. If you’d have told me as a child that I’d get to live a life that allows me to have these meaningful experiences all over the world, I’d never have believed you. What a ride, and there’s much more to come.
Life has given us all 86,400 seconds today. Why not use a few of those seconds to say thank you? OP
See more of Ken Kaminesky’s work at kenkaminesky.com and workshop opportunities at discoveryphototours.com.

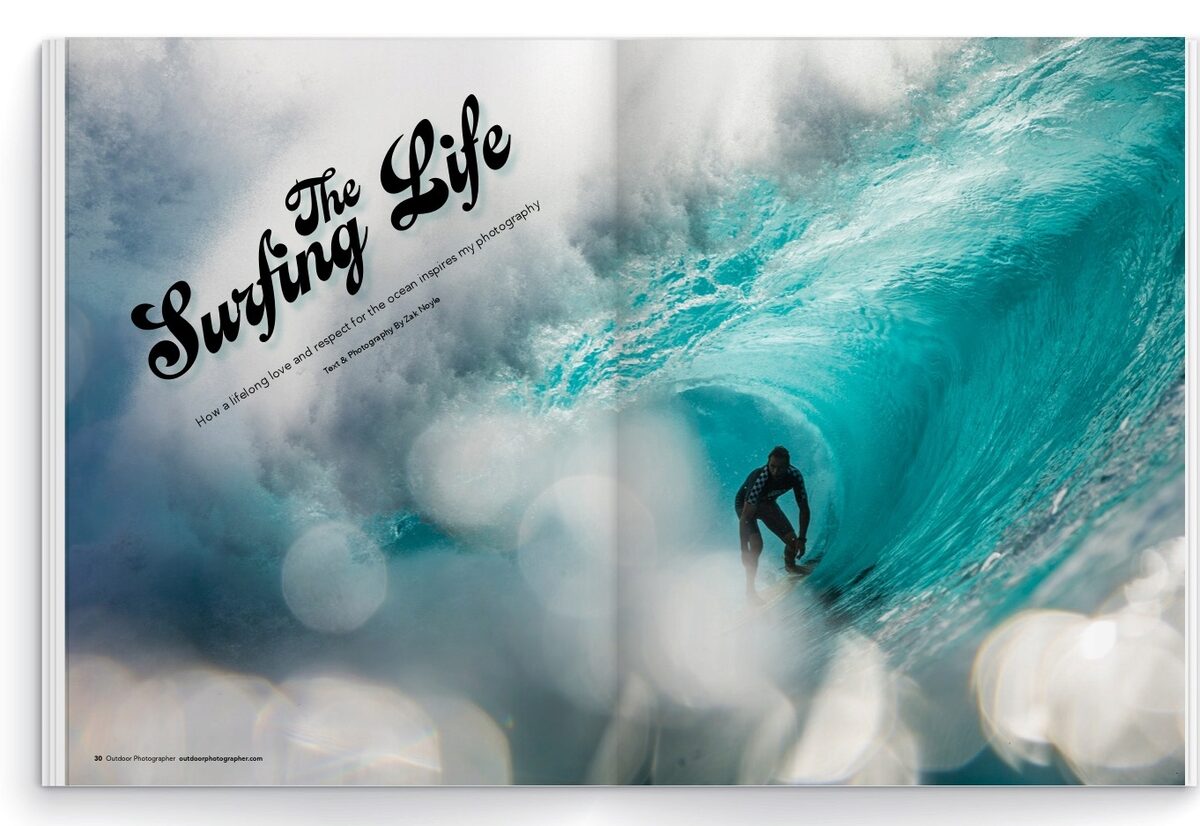
How a lifelong love and respect for the ocean inspires my photography
Text & Photography By Zak Noyle
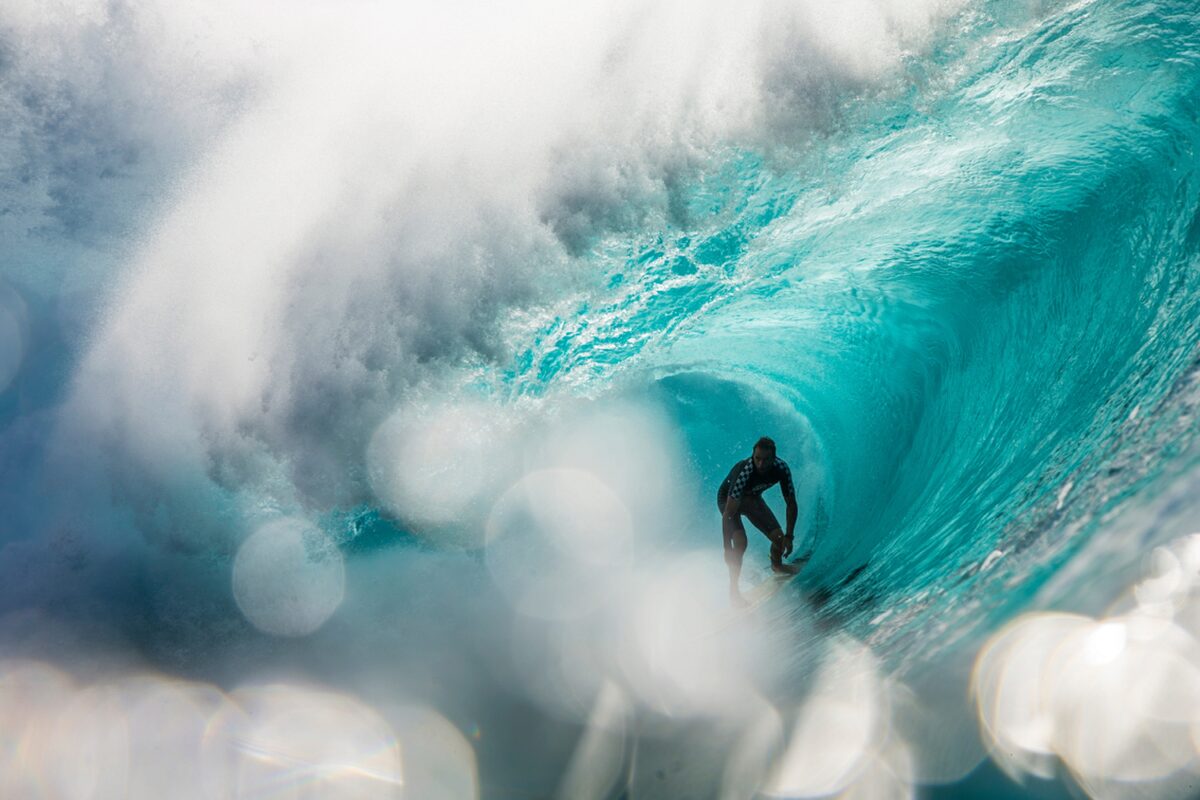
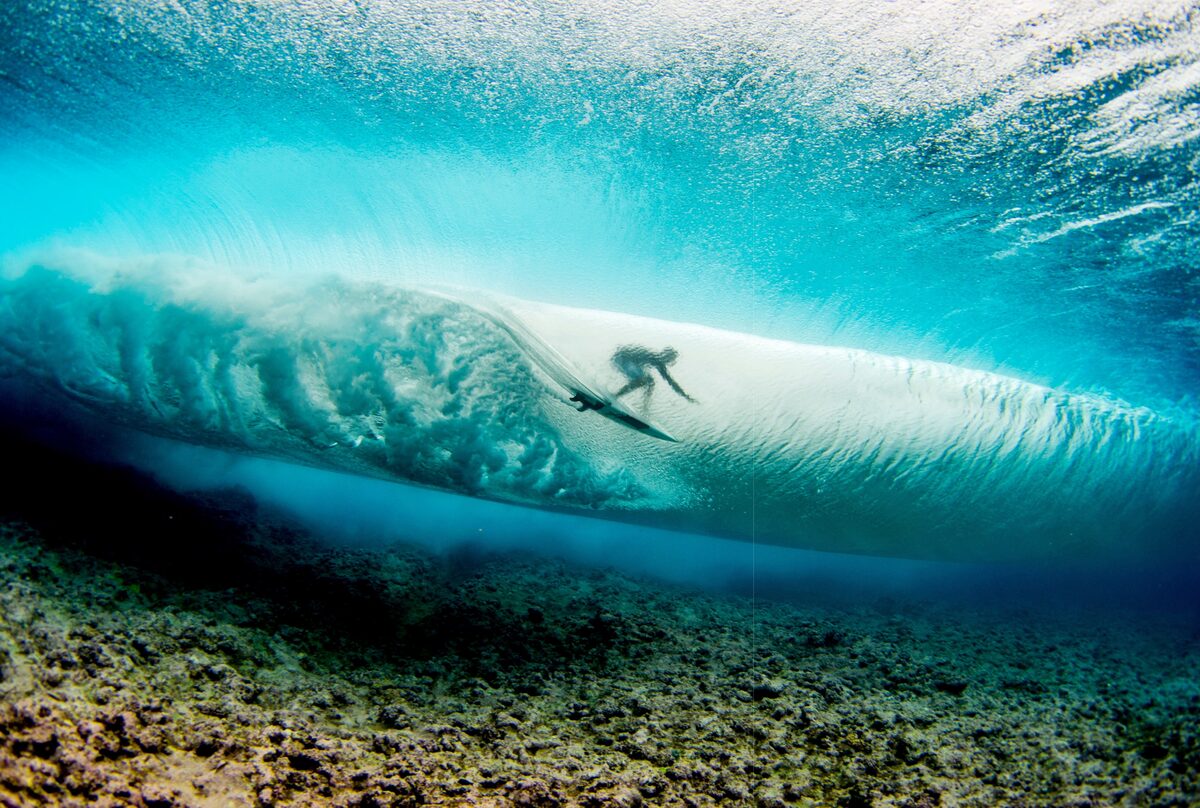
Nathan Fletcher in the barrel at Pipeline. This photo captures what defines Pipeline and its name.
Y ou never realize how the pieces of your life are fitting together as it’s happening. Then one day, you find yourself swimming through a world-class wave making photos of the world’s best surfers, and you take stock of how you got there. So many little things in my life, from where I was born to what my dad did for work to what sports I played in high school, led me to a career that seemed almost destined for me.
Backwash at Pipeline on Oahu’s North Shore. This is one of the most sought-after waves for very good reason—as dangerous as it is beautiful.
Ford Archbold with big air in the middle of Texas in a man-made wave pool. Utilizing several handheld lights, we were able to illuminate Ford as he flew through the Texas night.
Growing up in Hawaii, my entire childhood revolved around the water. When I was a kid, my parents would pack up towels, sunscreen and enough snacks to last us an entire day at the beach, and I'd play in the water until sunset, learning to navigate the currents and waves. As I grew up, my teenage social life continued to revolve around the ocean. After school and on weekends, there was only one plan: the beach. We’d go out in search of the best waves and the best conditions and come home tired and sunburnt. In high school, I swam competitively and played water polo, meaning that I could be in the water even during school hours. I couldn’t get enough. This instilled in me not only a love for the ocean but a deep respect for it as well. It has been a constant for me, serving as the backdrop for my life’s fondest memories.
Sunset in Mexico to end an amazing day together. It's these moments in between that really create memories and friendships that last a lifetime.
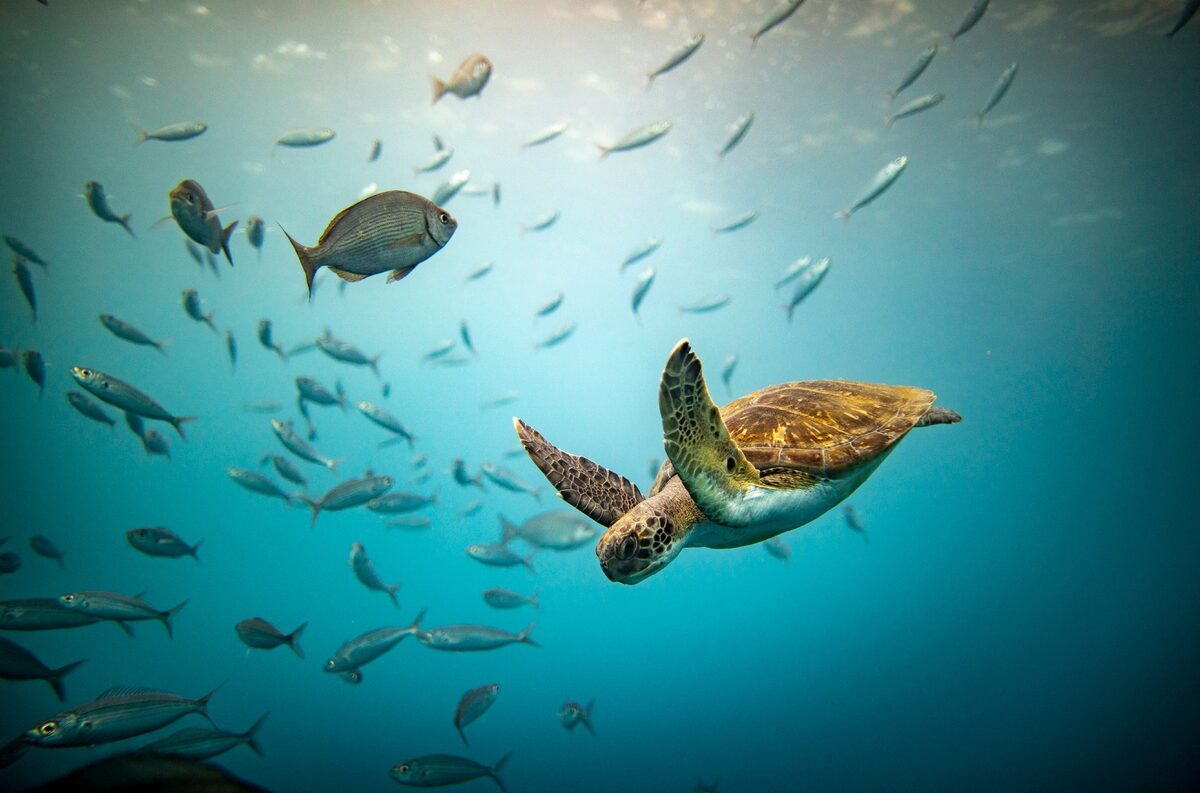
Documenting wildlife is something that I really love doing. We're in their world, and being a spectator while not upsetting their flow and movements is a must.
The other constant in my life has been photography. My dad is a commercial photographer. His subjects include everything from fashion to food to hotels. I'd join him on his photoshoots, carrying his sandbags and eating the food samples he was shooting, always carefully watching his process, his professionalism and how his passion fueled his art. It felt normal for me to be on set, and I thrived on the energy that came along with capturing moments.
When I left Hawaii to go to college on the mainland, I realized fully how special my home was. So I took the two things that I loved and respected most, the ocean and photography, and I combined them to create a career as a surf photographer. With my background in swimming and water polo, treading water wasn’t a problem, and soon I was pushing myself to be more patient and get shots that others weren’t seeking out. I wanted to show people the beauty of my island home, and I knew the best way to do it was to put them in the waves alongside me.
Deep in the South Pacific, beneath the ocean’s surface, we see this view of Ian Walsh as he rides the wave.
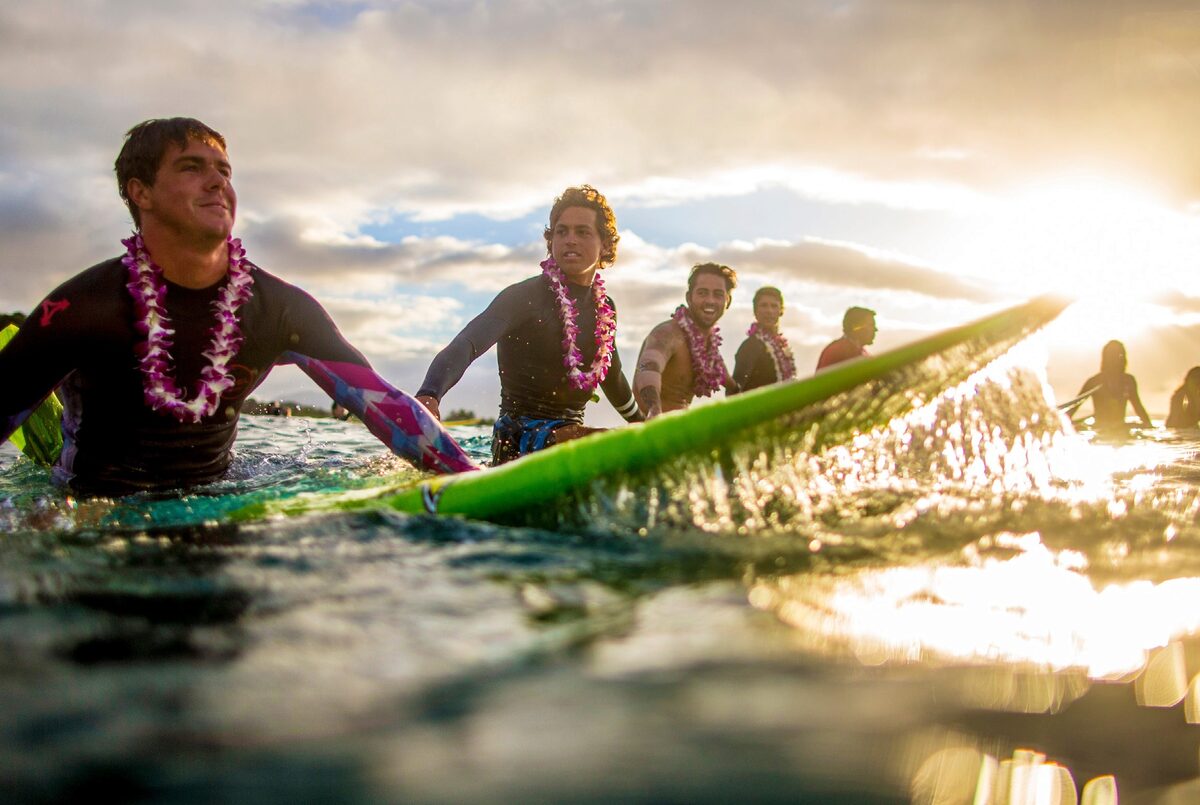
“Board Meeting.” Waiting in Tahiti between waves. A few down moments, but time with friends and laughs throughout.
Spending a lot of time in the water, you meet other people who do the same. I met photographers, surfers, bodyboarders and others who shared my obsessive love for the sea, and these connections served as my springboard into the world of professional surf photography. These days, I get to travel the world seeing beautiful places and exploring the bond that the ocean creates between people, no matter what coastline they live on.
I can pinpoint many images throughout my career that evoke strong feelings for me. But the one that instantly changed my mindset and is one of my favorites is my photo “Wave of Change.” It’s an image I shot almost nine years ago and still defines my photographic career. The trip started like most other trips do. Sitting in Hawaii, we pored over swell models and forecasts, studying tides and winds to try to make a calculated bet on a remote wave halfway across the world in Indonesia. When we decided we were a go, we went to book the flights and realized we had just missed the direct flight from Hawaii to Singapore. This meant we’d have to fly from Hawaii to Los Angeles, Los Angeles to Taiwan and Taiwan to Jakarta. From Jakarta, we’d have to drive 12 hours in the car to the southern coastline to get on a boat that would take us another eight hours to our destination. It would take a while, to say the least, but we were stoked.
The Eddie Aikau event is an event unlike any other, in memory of Eddie Aikau, a man who selflessly gave of himself to save and protect his shipmates aboard the Hokule’a. This photo was taken during the opening ceremony at Waimea Bay as we honored the man and legend that Eddie is.
Sandy Beach, Hawaii. This is where I grew up and learned to shoot photos. This photo is a vision that freezes time and brings back memories to me of early mornings at Sandy just before sunrise.
When we finally arrived, we settled in on the boat and organized our gear in anticipation of the swell we’d predicted back in Hawaii. The next morning it arrived. As the sun rose, we were greeted with the most amazing swell I had ever seen, the kind that you wait your entire career for. We jumped in the water to get our waves and photos, giddy with excitement and relief. Wave after wave came through, and with them, something completely unexpected. Trash…and a lot of it. The incoming swell was pushing a sea of man-made garbage right into the waves where we were shooting. The waves that we had traveled across the world to see were filled with wrappers, bags, straws and bits of plastic that barreled over the surfers’ heads, impossible to ignore.
Our crew had traveled by plane, car and boat to get to this remote wave. We spent hours and hours getting away from the crowds, but the evidence of humans mistreating the planet was everywhere, even in the middle of the sea. Those moments ended up not being about the waves at all, which became un-surfable after only two hours due to changes in the wind, but about the necessity of taking care of our oceans. It was a moment that changed things for me in the snap of a shutter.
After that trip, I realized that photography isn’t just about getting the shot. It can be used to inspire and educate people in order to protect our underwater world. I created the “Changing of the Tides” surf photography contest to inspire and give back to my community. Gaining access and opportunity into the photo world is no easy feat. I wanted to open that door through this initiative and give the next generation of surf photographers the springboard to grow and become all they wanted to be.

As photographers, we hope to create memorable images of moments that last a lifetime and can help others. “Wave of Change” is just that for me—an image that can bring awareness to protect what I love so much, the ocean and waves around the world.
So, as the pieces of my life continue rearranging themselves and fitting together in different ways, my constants stay the same. And I hope that through my photography, I can teach the world to respect and cherish our oceans for years to come. OP
NOYLE’S GEAR
Canon EOS-1D X Mark III
Canon EF 16-35mm f/2.8L III USM
Canon EF 24mm f/1.4L II USM
Canon EF 50mm f/1.8 STM
Canon EF 24-105mm f/4L IS USM
Canon EF 70-200mm f/2.8L IS II USM
AquaTech EVO III Water Housing
See more of Zak Noyle’s work at zaknoyle.com.

Opportunities for adventure sports photography are likely nearby or just a short drive away
Text & Photography By Tom Bol
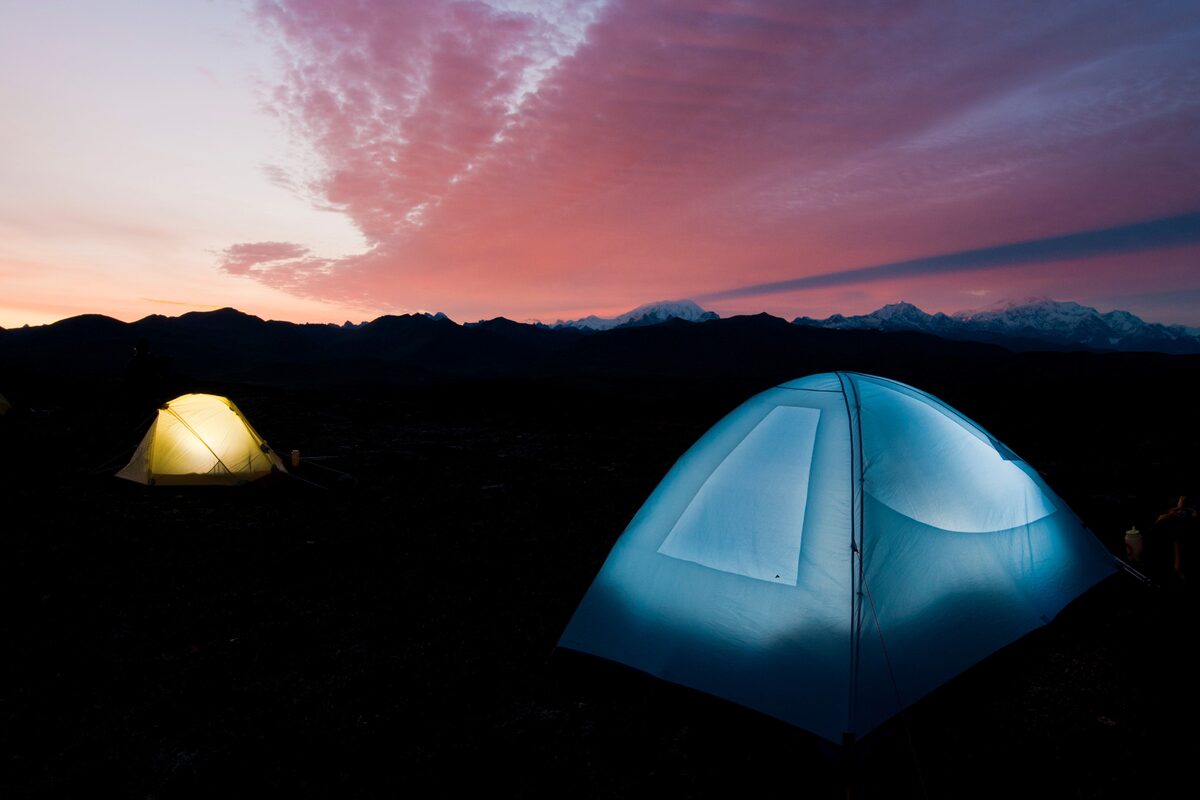
Camping in Alaska at sunset. Tents illuminated by firing speedlights triggered by wireless transmitters. Nikon D300S, AF-S DX Zoom-Nikkor 12-24mm f/4G IF-ED. Exposure: 1/40 sec., ƒ/9, ISO 200.
I ’m sitting in my tent right now watching crimson sunbeams drift across pyramid-sized sand dunes. The smell of juniper and rabbit brush permeates the air, slightly diluted by my strong Kona coffee. Unzipping the tent door for a better view, I notice a lone hiker dwarfed by the massive orange dunes. The scale of this landscape reminds me of hiking in the Sahara Desert of Morocco. Except this isn’t North Africa. This is Great Sand Dunes National Park, located right in the middle of America and only a few hours from my house. This national park is a day’s drive or less for millions of Americans.
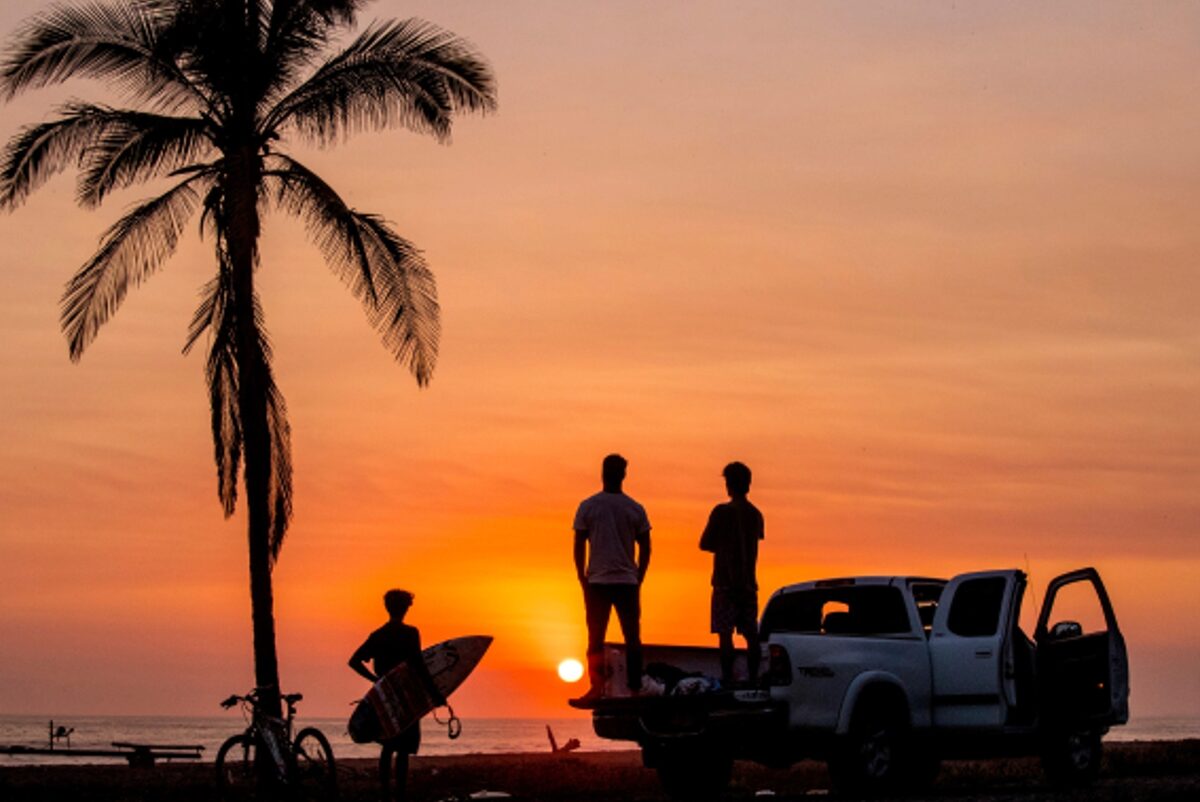
After months of stay-at-home orders during the pandemic, outdoor photographers and adventurers are ready for some fresh air. Here’s the good news. America has some of the most diverse landscapes, vast wilderness areas and magnificent national parks on the planet. The range of environments is remarkable. Red rock deserts, high alpine peaks, subtropical islands and millions of acres of wilderness are waiting to be explored. You don’t have to cross an ocean to get there—these gems are only a road trip away.
My career has revolved around photographing adventure sports for 30 years. I’ve photographed everything from sea kayaking in the Florida Keys to mountaineering on Denali. I’ve learned some helpful photography techniques while guiding and photographing these adventure sports and gotten a lot of bumps and bruises along the way. Here are some of the most popular and accessible adventure sports and photography tips for each. I’ve also included some of my favorite destinations for these sports. Many of these adventures are likely right in your backyard or not too far away. All you have to do is load up your car and head out. Let the road trip begin!
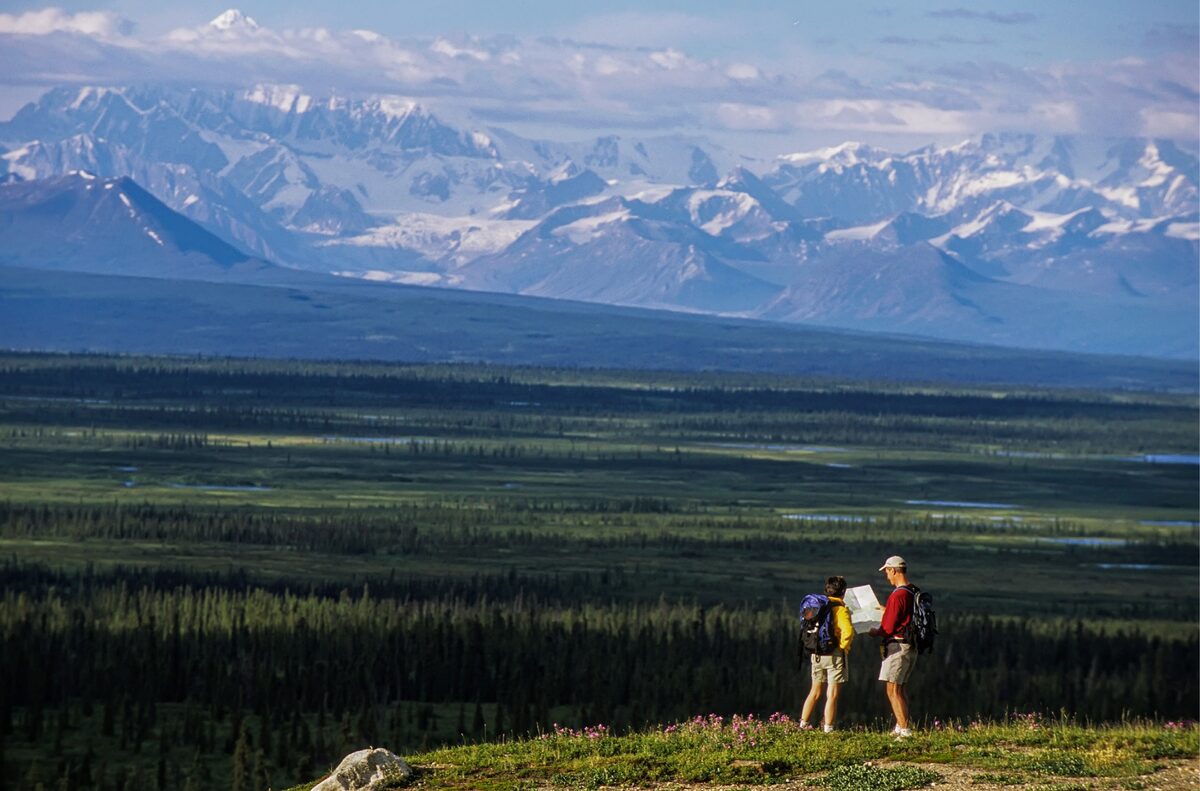
Hikers looking at a map while taking in the view of the Alaska Range in the distance. Nikon F5, AF-S NIKKOR 70-200mm f/2.8E FL ED VR, Fujichrome Provia 100F. Exposure: 1/250 sec., ƒ/8.
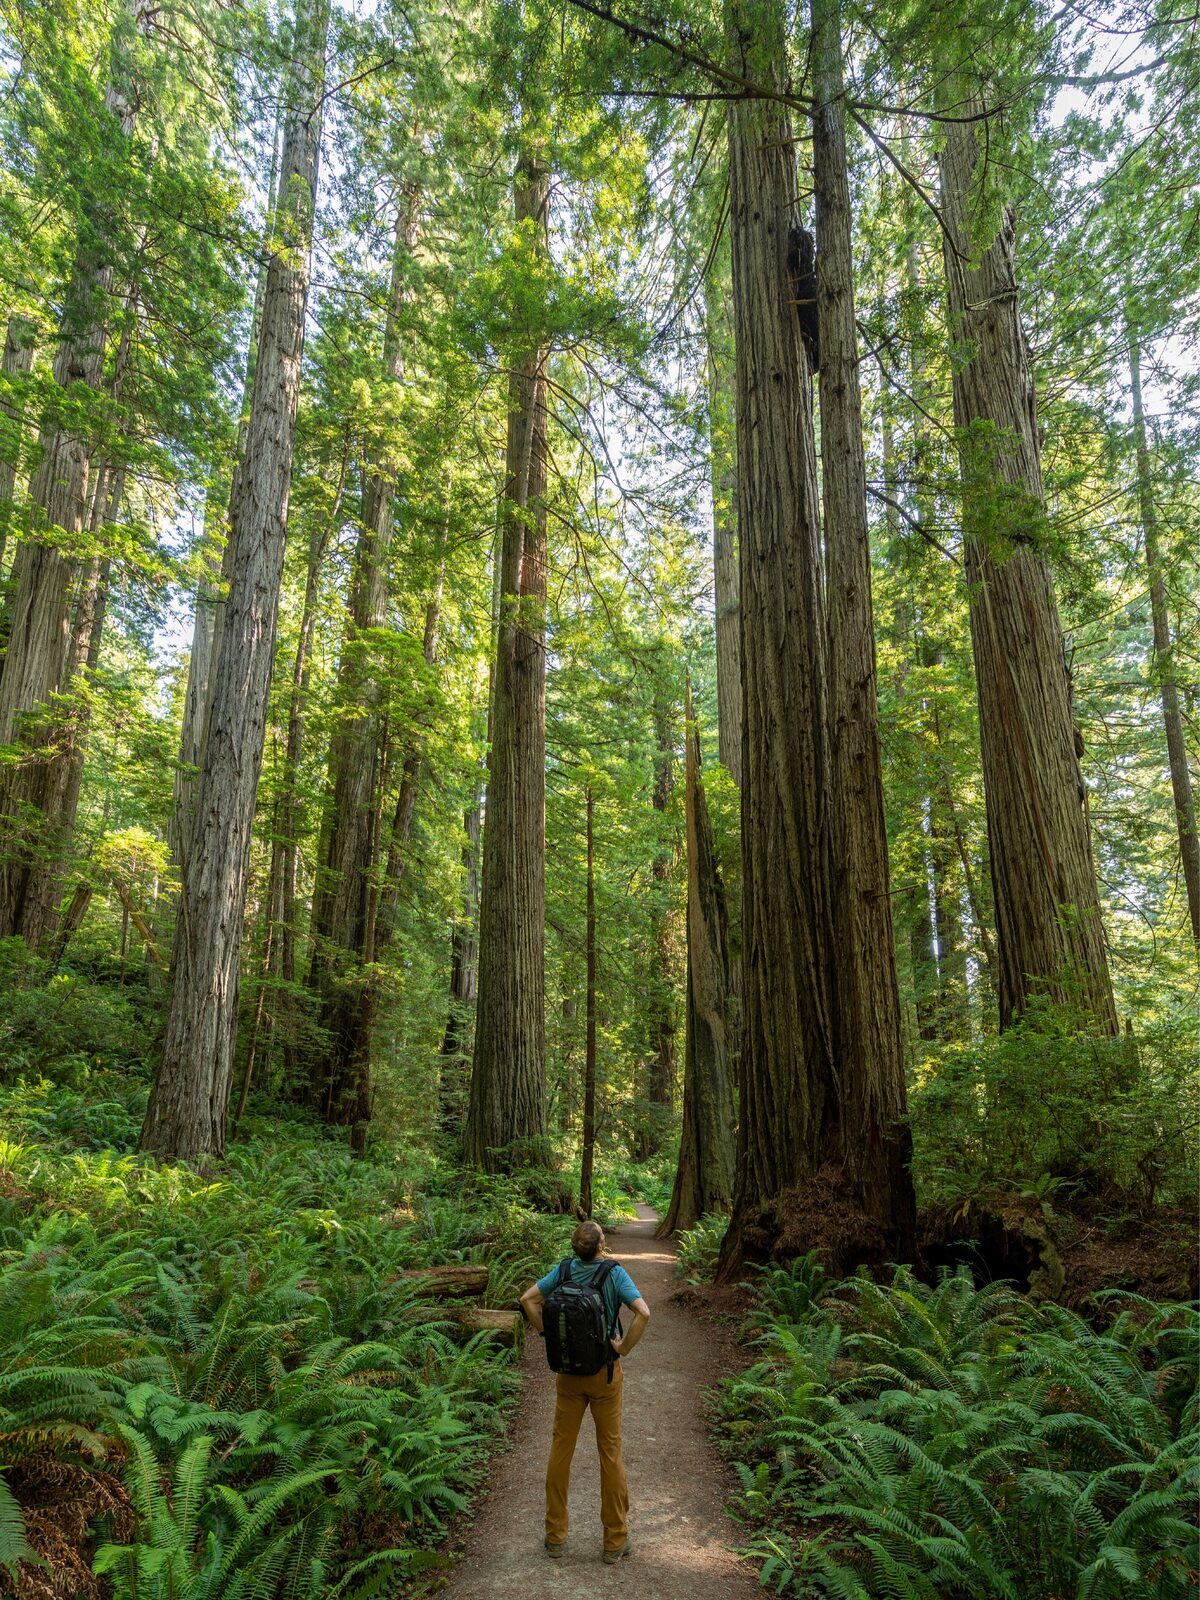
Hiking in Redwood National Park in northern California. Nikon D850, AF-S NIKKOR 14-24mm F2.8G ED. Exposure: 1/20 sec., ƒ/5.6, ISO 200.
Hike To Camp
Go camping and hiking this summer. The simplest way to get into the backcountry and find plenty of adventure is backpacking. While you’ll need to be able to deal with the elements, cook outdoors, read a map and know some basic first aid to be safe and comfortable, a trip to a nearby campground will transport you from the constant chatter of city life to the serene bird calls of the wilderness.
Less is more when it comes to backpacking since you’re carrying everything on your back. Be selective in what you are bringing on your trip. I worked as a NOLS (National Outdoor Leadership School) instructor for years, and its standard trip was a 30-day expedition into remote wilderness areas. Day one of every course was going through students’ gear piece by piece and eliminating superfluous items. Resist the temptation to bring lots of extra food, and carefully plan out your meals for each day of your trip. Of course, if your campground is near parking for your vehicle, you can be less restrictive on what you bring.
Camera gear quickly adds weight. But with today’s mirrorless camera options, equipment is much lighter. My lightweight kit includes a Nikon Z 6, NIKKOR Z 24-70mm f/4 S and an AF-S NIKKOR 70-200mm f/4G ED VR (used with the Nikon FTZ adapter). This system is under 5 pounds. If I can handle another pound, I’ll add the NIKKOR Z 14-30mm f/4 S. I also often bring my lightweight Really Right Stuff tripod, Singh-Ray polarizer and 10-stop ND filter for landscape photography. Battery usage is critical—I limit LCD image review. For short trips, I bring extra batteries. On longer trips, I carry my Goal Zero Sherpa 100AC solar charging system. The Sherpa has standard 100-watt AC power so I can charge camera batteries, and a lightweight solar panel recharges the power pack in the field.
Camping and hiking offer access to stunning remote landscape photography. But there are some unique adventure images to be made as well. One of my favorite shots is photographing my tent at twilight in a beautiful location. Adding the human element to a landscape may resonate with the viewer; they want to be that person in the tent. If you have a wide-angle lens, try photographing through the tent door. As the sun sets, consider illuminating your tent with a headlamp or flash to produce a warm, friendly glow.
Hiking trails can create graphic lines through your photograph and draw the viewer into the picture. I also like to photograph hikers from ground level. Getting up close to gritty hiking boots offers a fresh perspective.
The beauty of hiking and camping is how accessible it is to everyone. Local, state and national parks are great hiking areas, as are national forests and wilderness areas. Some of my favorite hiking areas are Acadia National Park in Maine, the Wind River Mountains in Wyoming, Redwood National Park in California and the magical slot canyons of southern Utah.
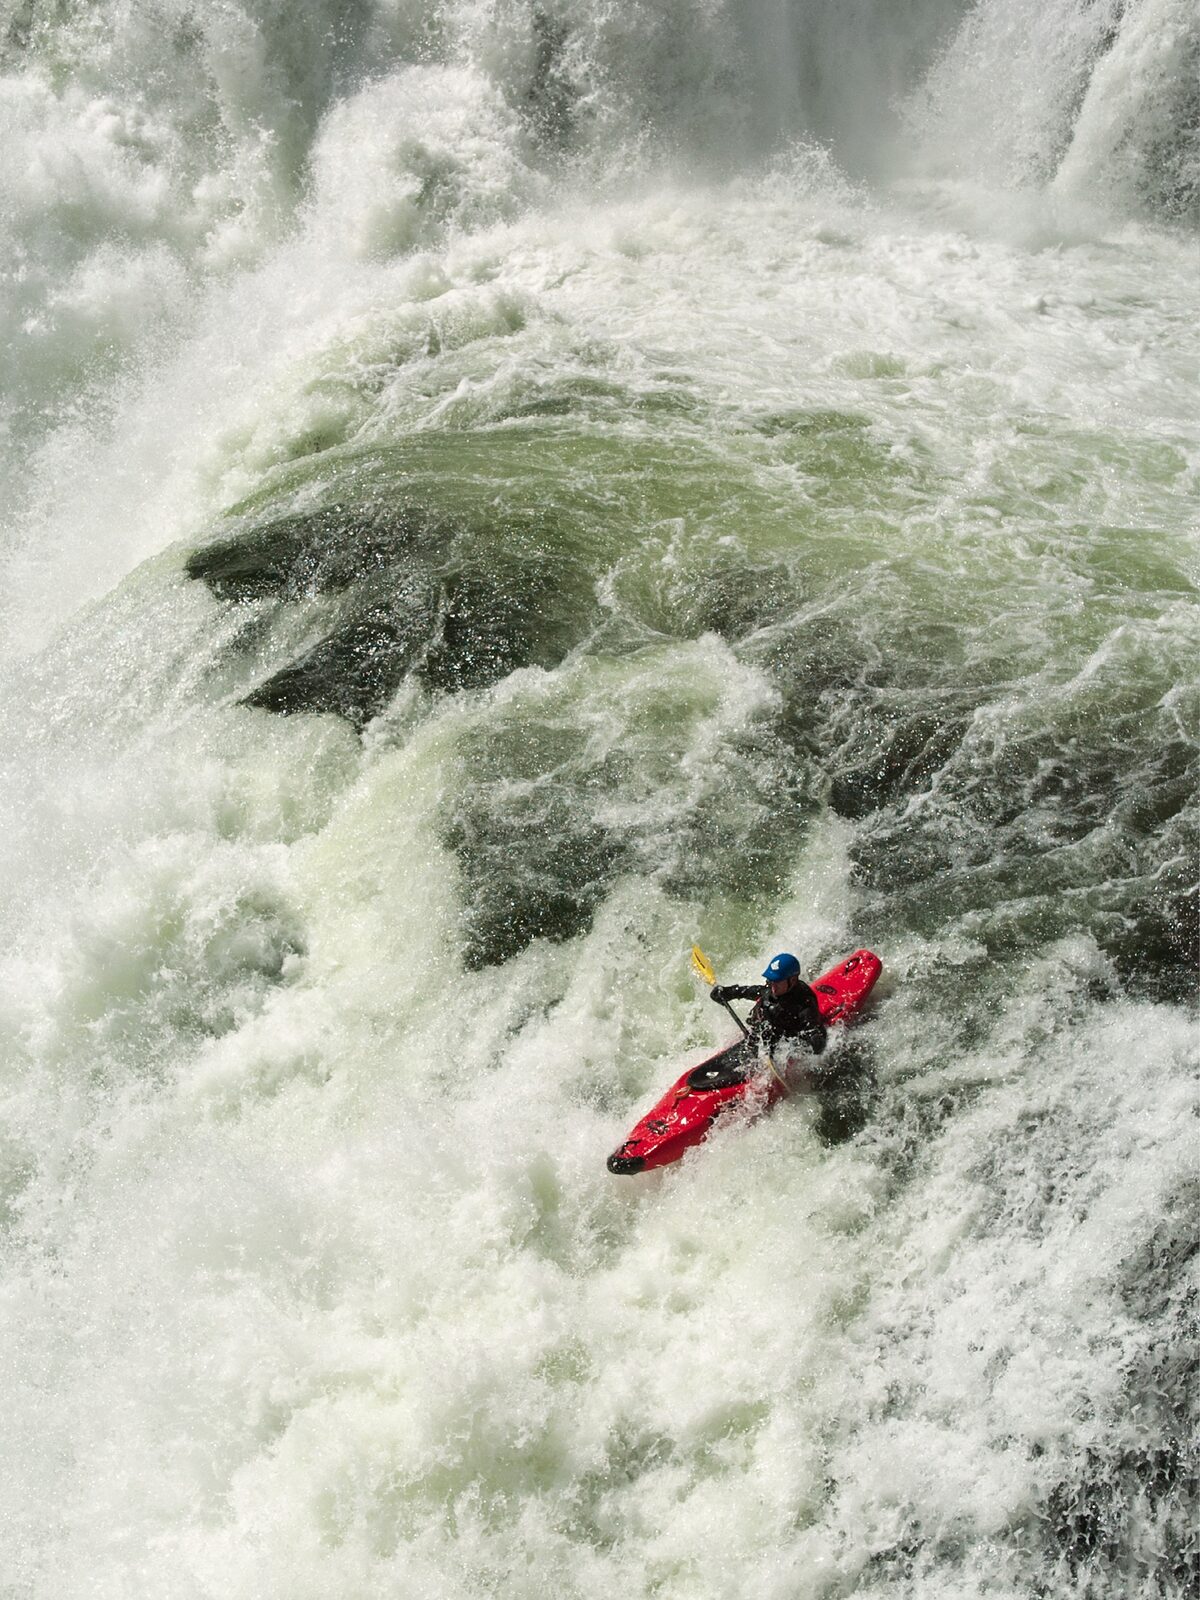
A kayaker paddles off Lower Mesa Falls on the Henrys Fork of the Snake River in Idaho. Nikon D2H, AF-S NIKKOR 24-70mm F2.8G ED. Exposure: 1/800 sec., ƒ/8, ISO 200.
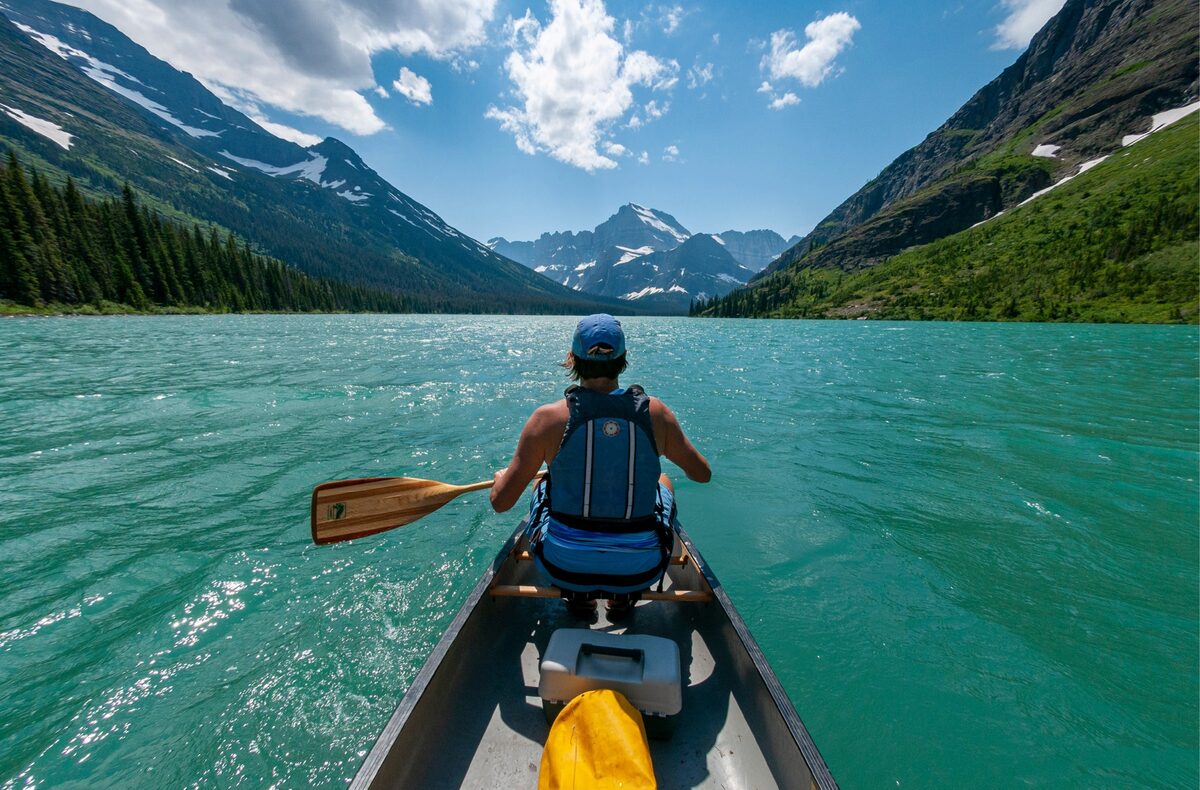
Canoeing in Glacier National Park on Lake Josephine. Nikon D300S, AF DX Fisheye-Nikkor 10.5mm f/2.8G ED. Exposure: 1/800 sec., ƒ/11, ISO 200.
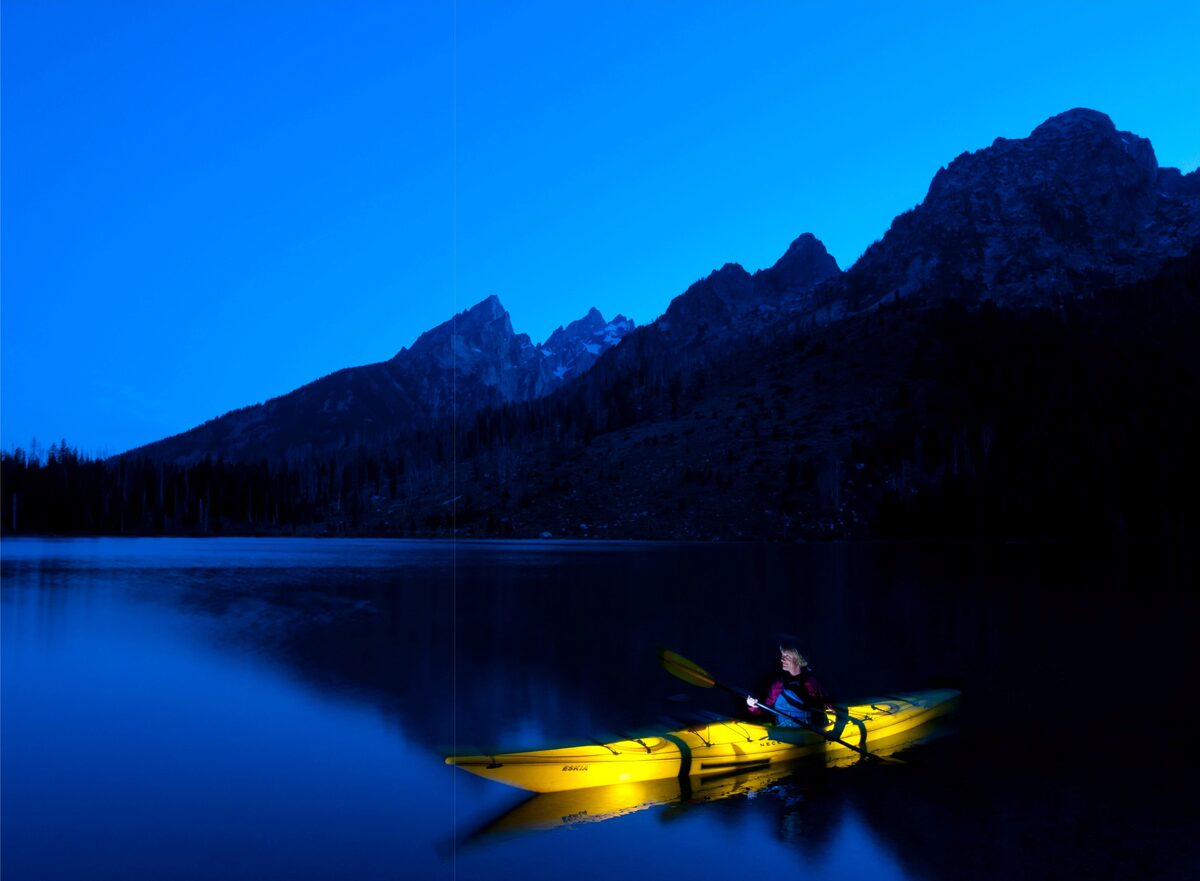
Sea kayaking on String Lake in Grand Teton National Park. The kayak was illuminated by three speedlights placed inside the boat and triggered with wireless transmitters. Nikon D300S, AF-S DX Zoom-Nikkor 12-24mm f/4G IF-ED. Exposure: 1/13 sec., ƒ/13, ISO 200.
Grab A Paddle
Canoeing, kayaking and rafting offer one great advantage over backpacking; you don’t have to carry your gear on your back. On the other hand, photography can be more precarious since you’re photographing near the water.
Paddling can take many forms, from flat water lake canoeing to adrenaline-pumping whitewater kayaking. Make sure you know the risks and paddle with experienced boaters. Always use PFDs (personal floatation devices), and consider the water temperature and how close you are to shore.
Canoeing on a small lake is an easy way to try out paddling. Be comfortable canoeing before bringing your camera with you. Sea kayaking is another great option. Sea kayaks can be very stable and open up ocean paddling trips. I also really enjoy sea kayaking on large lakes. I once had an assignment photographing a sea kayaking trip around Isle Royale on Lake Superior. The “lake” looked more like an ocean, but despite large waves, we were able to paddle most days.
Whitewater paddling is for experienced boaters only. Part of whitewater kayaking is rolling if you flip, so this sport isn’t for everybody. But capturing teeth-gritting whitewater images is possible from shore.
One consideration for all paddling photography is keeping your gear dry. I use a range of waterproof cases to pack my camera gear. I tie them off in my canoe or on the top deck of my sea kayak. They’re totally waterproof, so I can grab my camera for a shot while paddling and then quickly seal up my camera against the elements. Dry bags are another option. These bags are flexible and have a foldable closure to keep things dry. Their advantage is they’re easier to pack, but it also takes longer to get your camera in and out of a dry bag.
Paddling offers exciting image-making possibilities. You have two approaches: from the shore or in a boat. Some sports, like whitewater kayaking, photograph great from the river’s edge. We have a wild and scenic river that flows near our house, and kayakers paddle by all summer. I photograph from a few key spots that are only 10 feet from big rapids. This low perspective at water level is fantastic for close-up action.
I like to use a shutter speed of 1/1000 sec. and faster to freeze the flying water droplets. Set your camera to a fast frame rate so you get as many images as possible. Paddle position changes frequently, and you want to capture an image without the paddle blocking the kayaker’s face.
If you’re photographing canoeing and sea kayaking, consider photographing from the boat. I love creating POV (point of view) images while paddling. I use a fish-eye lens and attach my camera to a helmet or high on the front of my PFD (try twisting your camera strap to shorten it so it rests high on your chest). Use a cable release or self-timer to trigger the shutter.
I once attached a Nikon DSLR to a helmet and kayaked through a rapid to create a POV whitewater kayaking image. The photo looked fantastic, but it was a little nerve racking knowing if I flipped I’d trash thousands of dollars of camera gear. These days, a waterproof action cam like a GoPro would be a good choice—and your neck won’t be as sore after paddling with a full-sized DSLR on your head.
There are incredible paddling locations all across the U.S. Rivers like the Nantahala in North Carolina, the Niobrara in Nebraska or the Colorado River in Arizona are well known and offer a range of whitewater options. If you want to try out some subtropical island hopping, consider doing some sea kayaking in the Florida Keys. If you’re more interested in canoeing, drive north and explore the countless lakes in Maine or the Boundary Waters in Minnesota. Canoe rentals are available at popular destinations. If you want one destination that’s great for all paddling options, consider the ultimate road trip to Alaska!
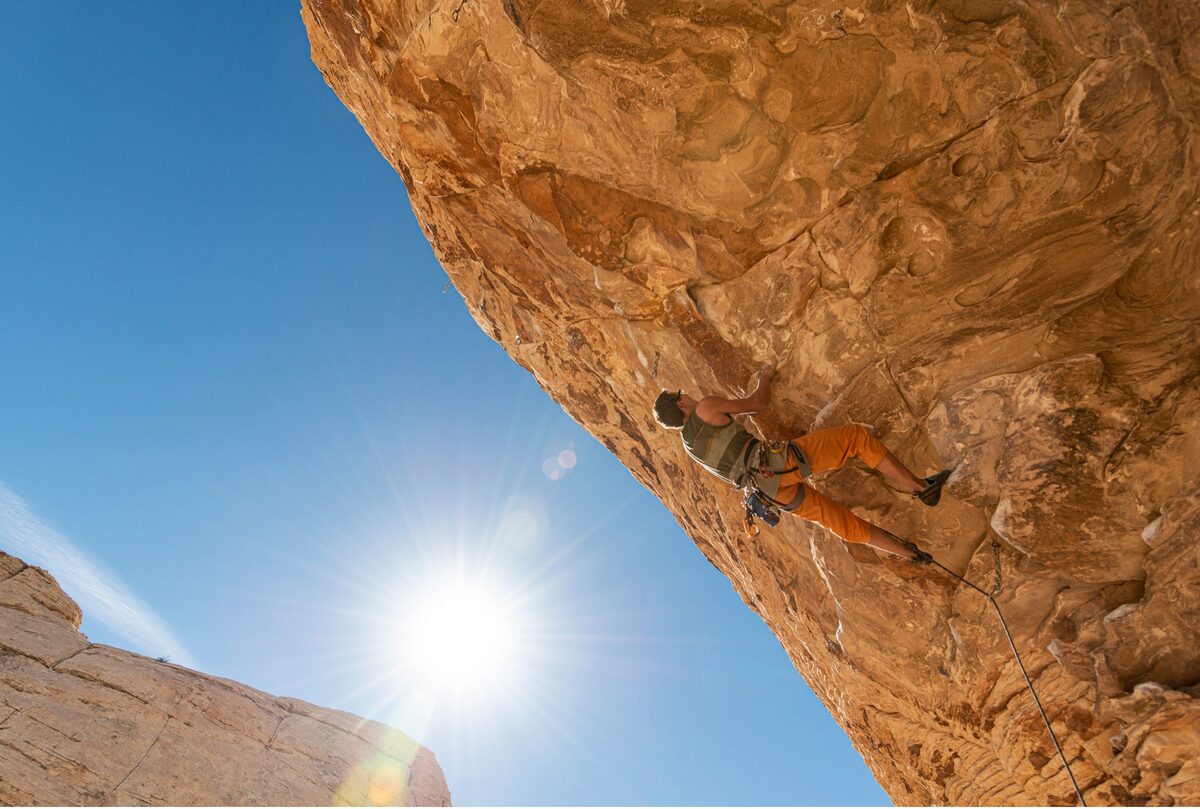
A rock climber climbing a steep roof in Red Rock, Nevada. Nikon D800, AF-S NIKKOR 24-70mm F2.8G ED. Exposure: 1/1250 sec., ƒ/5.6, ISO 200.
Rock climbing in Sinks Canyon, Wyoming. Nikon D810, AF-S NIKKOR 24-70mm F2.8G ED. Exposure: 1/250 sec., ƒ/5.6, ISO 100.
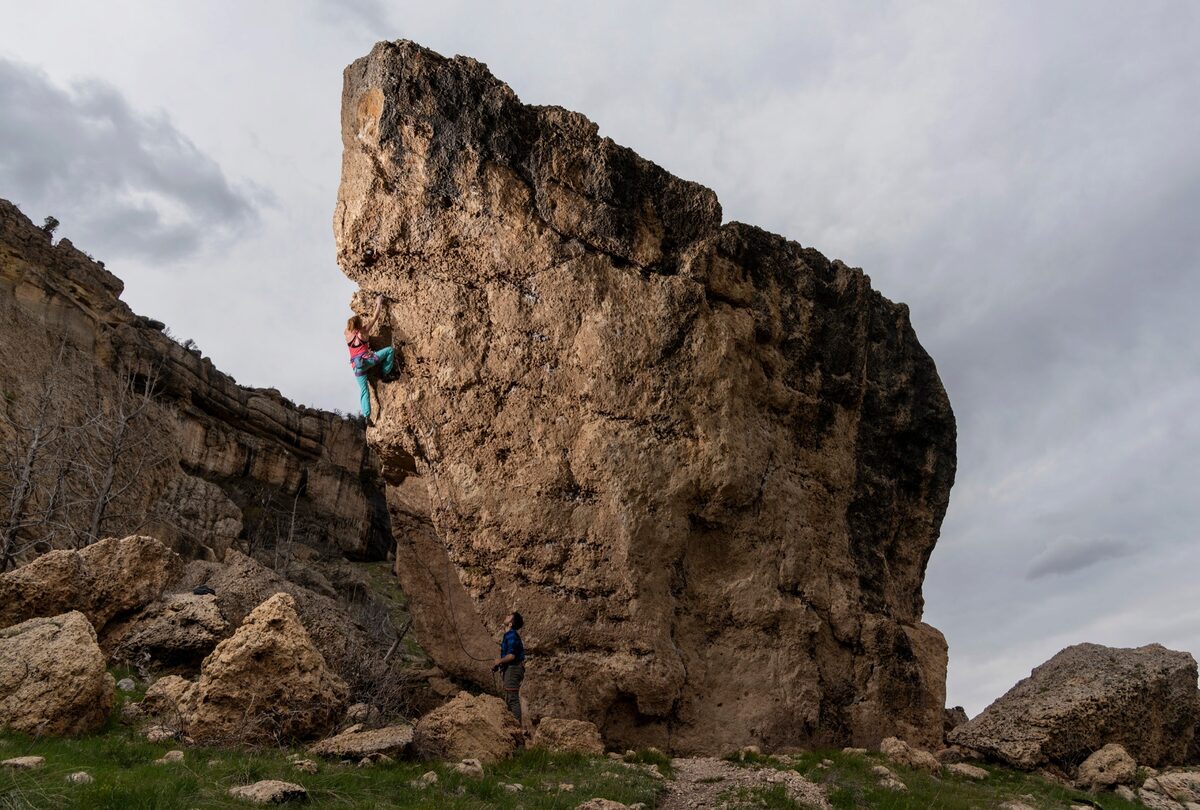
Climb A Rock
Rock climbing has become very popular and offers some of the most dramatic adventure sports photography you can imagine. Similar to whitewater kayaking, you don’t have to be on a cliff face to photograph rock climbing, but finding a good location to photograph a climber is very important.
Sometimes you can photograph from a safe perch at the same level or above the climber, which gives you the classic top-down perspective. Your other option is ascending a rope to get above the climber. This requires a solid climbing background. Hanging a few feet above a climber while they attempt a difficult move is a bucket list experience for many adventure sports photographers. I’m always struck at the emotional contrast of the moment. I’m safely attached to a rope with minimal danger and stress. Five feet away, the climber is making a hard move with big fall potential—their stress, focus and tension are palpable.
Most climbing photographers avoid shooting directly below a climber; try moving away from the cliff so you get more scale and a different perspective. Figures in a landscape create dramatic adventure sports images. The scale produces a sense of awe and wonder at the enormity of the situation.
Try photographing right up the rope leading to the climber from the belayer, as this creates a nice visual handrail for the eye to travel through the image. Cliff faces and spires provide diverse lighting options. Find a sunlit climber on a ridge against a shadowed background—the contrast will make the image pop. Or try the opposite scenario, photographing a climber in shade against a sunlit face for dramatic silhouettes. Take it a step further and use strobe to light the climber for more creative options.
Great rock climbing locations are scattered throughout the U.S. Stunning locations in the east include Red River Gorge in Kentucky, the Gunks in New York and Cathedral Ledge in New Hampshire. Out west, famous locations like Yosemite in California, Red Rocks in Nevada and Eldorado Canyon in Colorado beckon adventure sports photographers. I live in northern Colorado and really enjoy climbing and photographing at less-crowded limestone crags in neighboring Wyoming.

Mountain biking on the Slickrock Trail in Moab, Utah. Nikon D3S, AF-S NIKKOR 14-24mm F2.8G ED. Exposure: 1/250 sec., ƒ/20, ISO 200.
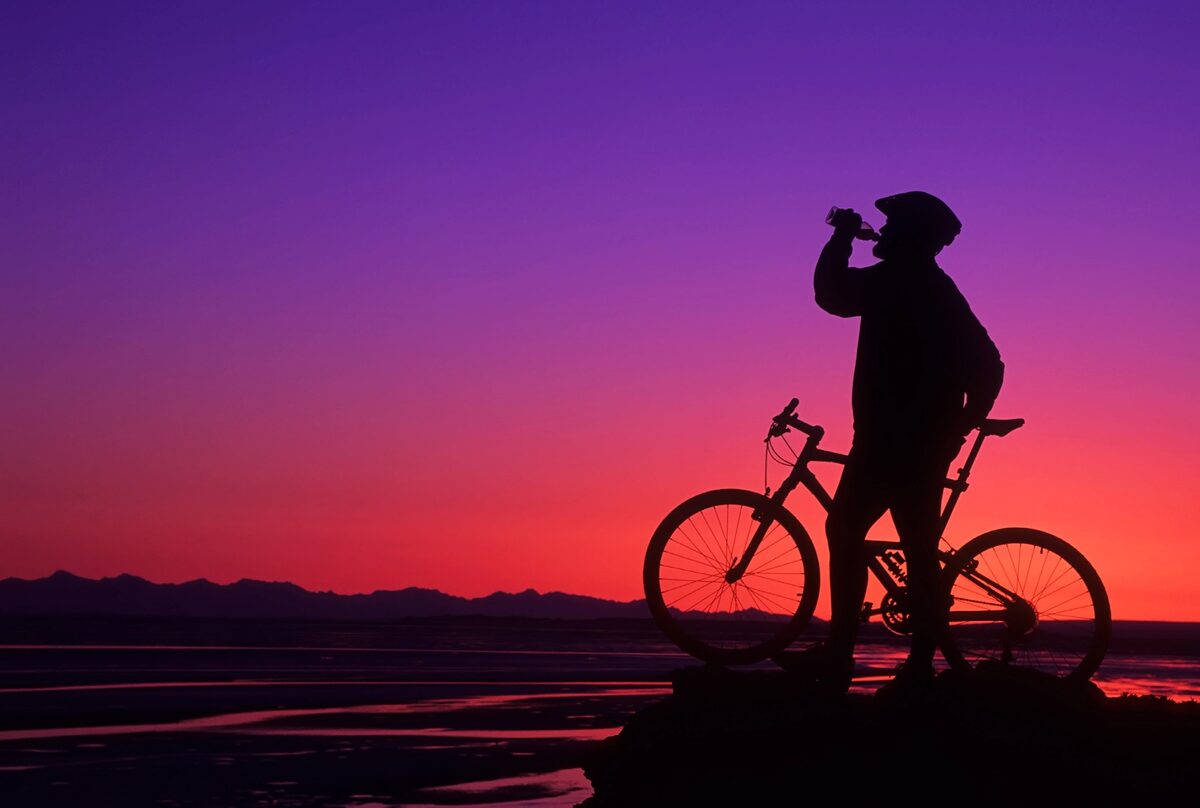
A mountain biker takes a break at sunset along Turnagain Arm, Alaska. Nikon F5, AF-S 70-200mm f/2.8E FL ED VR, Fujichrome Velvia 50. Exposure: 1/30 sec., ƒ/8.
Ride The Trails
Mountain biking is an adventure sports activity that almost anyone can photograph. Virtually every state has mountain biking locations, and connecting with good riders is as simple as checking in at the local bike shop. I had an assignment to photograph mountain biking on the Slickrock Trail in Moab, Utah, and needed some really good mountain bikers. Ten minutes after walking into a bike shop, I had three mountain bike guides excited and ready to ride for some images.
I learned early on that while most everyone can ride a bike, more extreme mountain biking is best left to advanced riders. During my assignment in Moab, I went over the handlebars twice—not good for the camera gear and your health.
Of all the sports I’ve mentioned, mountain biking is the fastest. Speeding riders offer great pan-and-blur photography opportunities. I like to start with my shutter speed around 1/30 sec. for these shots. The goal is to have some sharp focus on the riders and a blurry background. Remember, backgrounds are as important as subjects with pan-and-blur. Find a nice clean background with strong color to create striking images.
Capturing riders in midair going off jumps is also a great image. The biker doesn’t have to be 10 feet in the air. Try shooting from ground level using a fisheye lens to exaggerate the perspective and scale. For creative POV images, I like to attach a Manfrotto Magic Arm to my bike frame to hold my camera. I can then photograph interesting perspectives, including part of my own bike in the final image.
Check in with your local bike shop to see where the best trails are in your area. Or load up the bikes and drive to one of America’s mountain biking meccas like Moab, Utah; Crested Butte, Colorado; or Marin County, California, to name a few.
Get out your atlas, start planning your summer road trip and include some adventure sports photography on your itinerary. I can’t wait to put on my climbing harness or dip my paddle into the water. Time to hit the road. OP
See more of Tom Bol’s work at tombolphoto.com.

Put safety first to capture the stunning displays of lightning in your landscape photography
Text & Photography By Gary Hart
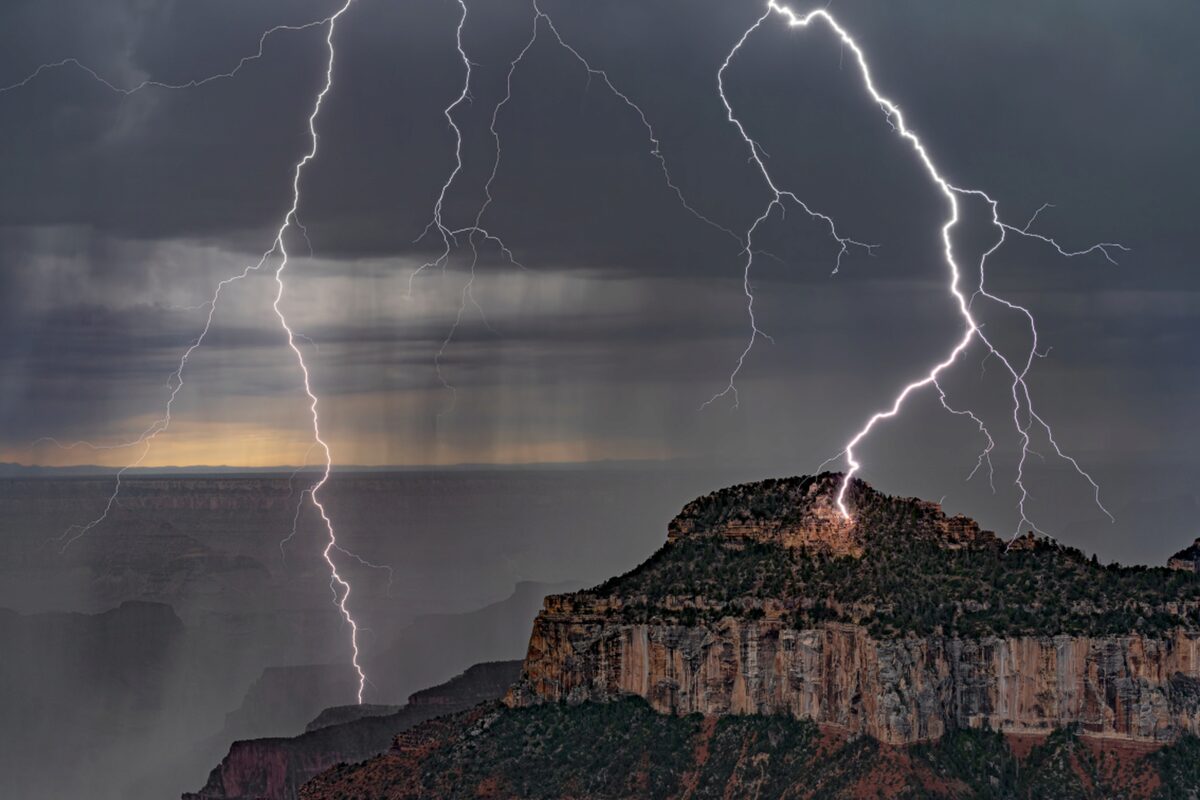
Lightning Explosion, Osa Butte, Grand Canyon North Rim. Set up on the Grand Canyon Lodge viewing deck with my workshop group, we watched this storm approach. This strike, about a mile away, was the signal to go inside.
F ew things in nature are more dramatic or unpredictable than lightning—or more dangerous. The more you understand lightning, how to anticipate it and what to do in its presence, the safer you’ll be and the more success you’ll have photographing lightning.
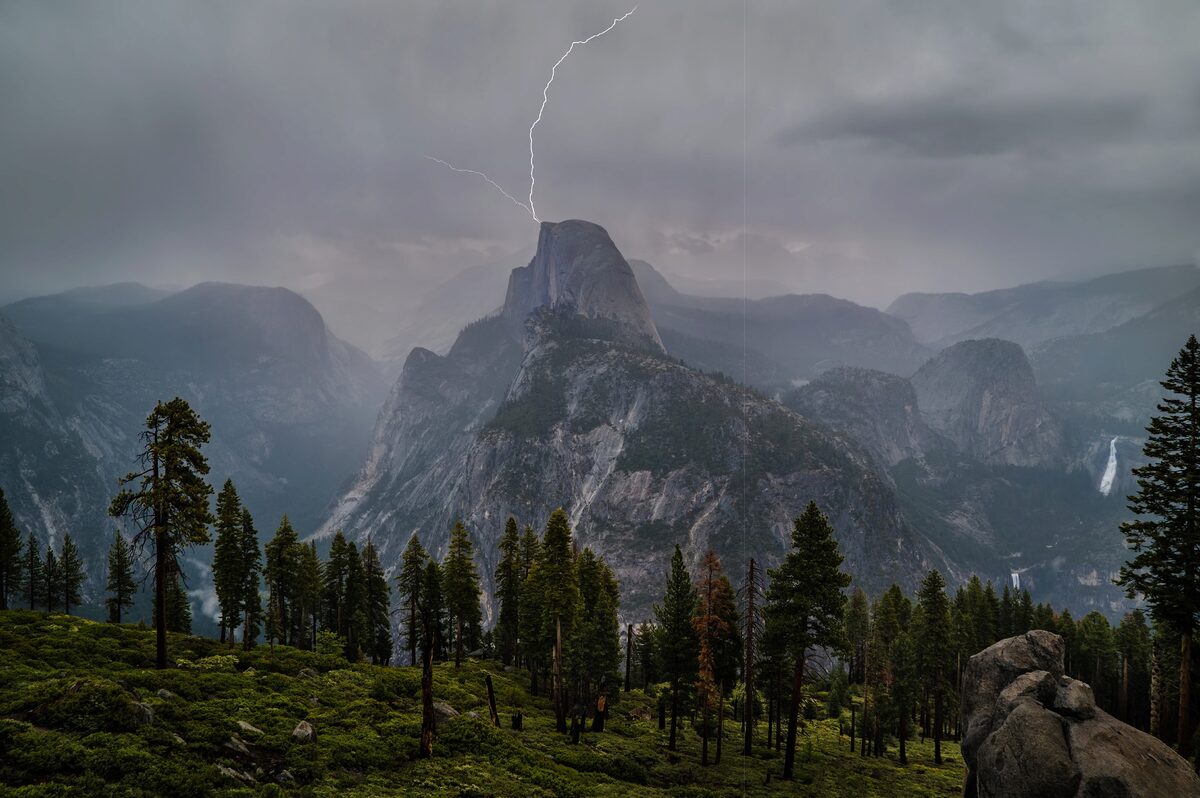
Direct Hit, Lightning Strikes Half Dome, Glacier Point, Yosemite. Lightning is relatively rare in Yosemite, but when the forecast looked promising for this July afternoon, I beelined to the park and set up at Glacier Point.
The “Shocking” Truths About Lightning
A lightning bolt is an atmospheric manifestation of the truism that opposites attract. In nature, we get a spark when two oppositely charged objects come in close proximity. For example, when you get shocked touching a doorknob, on a very small scale, you’ve been struck by lightning.
In a thunderstorm, the up/down flow of atmospheric convection creates turbulence that knocks together airborne molecules, stripping their negatively charged electrons. Lighter, positively charged molecules are carried upward in the convection’s updrafts, while the heavier negatively charged molecules remain near the bottom of the cloud. Soon the cloud is electrically polarized, more positively charged at the top than at the base.
Nature always takes the easiest path. If the easiest path to electrical equilibrium is between the cloud top and bottom, we get intracloud lightning. If it’s between two different clouds, we get intercloud lightning. Less frequent cloud-to-ground strikes occur when the easiest path to equilibrium is between the cloud and ground.
With lightning comes thunder, the sound of air expanding explosively when heated by a 50,000-degree jolt of electricity. Thunder travels at the speed of sound, a pedestrian 750 miles per hour, while lightning’s flash zips along at the speed of light, more than 186,000 miles per second.
Knowing that the thunder occurred at the same time as the lightning flash, and the speed both travel, we can calculate the approximate distance of the lightning strike. While we see the lightning instantaneously, thunder takes about five seconds to cover a mile. Dividing the number of seconds between the lightning’s flash and the thunder’s crash by 5 gives you the lightning’s distance in miles.
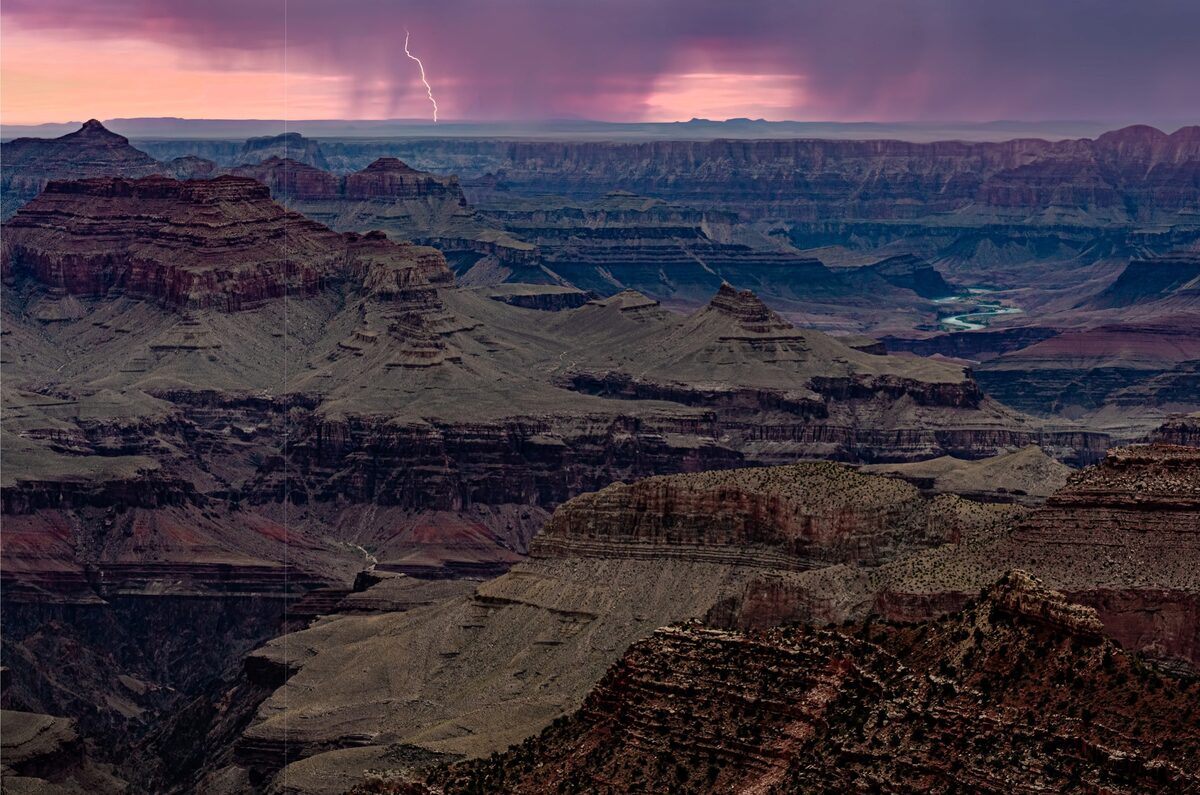
Twilight Lightning, Grandview Point, Grand Canyon. I was driving the road to Desert View at around sunset and pulled over at Grandview Point when I saw the sky light up and lightning firing in the east.
Photographing Lightning Safely
The thousands of humans killed by lightning each year have one thing in common: None believed they’d be struck by lightning. The safest place in an electrical storm is a fully enclosed structure or metal-framed vehicle (it has nothing to do with the tires), windows closed and away from windows, plumbing, wiring and electronics.
The surest way to be struck by lightning is to be outside in an electrical storm, but photographing lightning usually requires being outside. And while there’s no completely safe way to photograph lightning, it doesn’t hurt to improve your odds of avoiding injury.
Most lightning strikes are within a six-mile radius of the previous strike, but strikes have been known to happen much farther from the storm. Since thunder isn’t usually audible beyond 10 miles, if you hear thunder, you should go inside and stay there until at least 30 minutes after the thunder stops.
If you absolutely must be outside with lightning nearby, or you simply find yourself caught outside with no available shelter, there are things you should know and do to be safer:
• A lightning strike is often preceded by static electricity that makes your hair stand on end.
• Avoid high ground.
• Avoid exposed areas.
• Avoid metal and electronics.
• Avoid concrete, which is often reinforced with metal.
• Avoid tall isolated objects such as trees and open structures (and tripods).
• Avoid water.
• Stay at least 15 feet from other people.
• Don’t lie down.
• If you’re surrounded by trees, position yourself near shorter trees, as far from trunks as possible.
• Rubber-soled shoes provide no protection.
• As a last resort, crouch on the balls of your feet, with your feet together and your hands covering your ears.
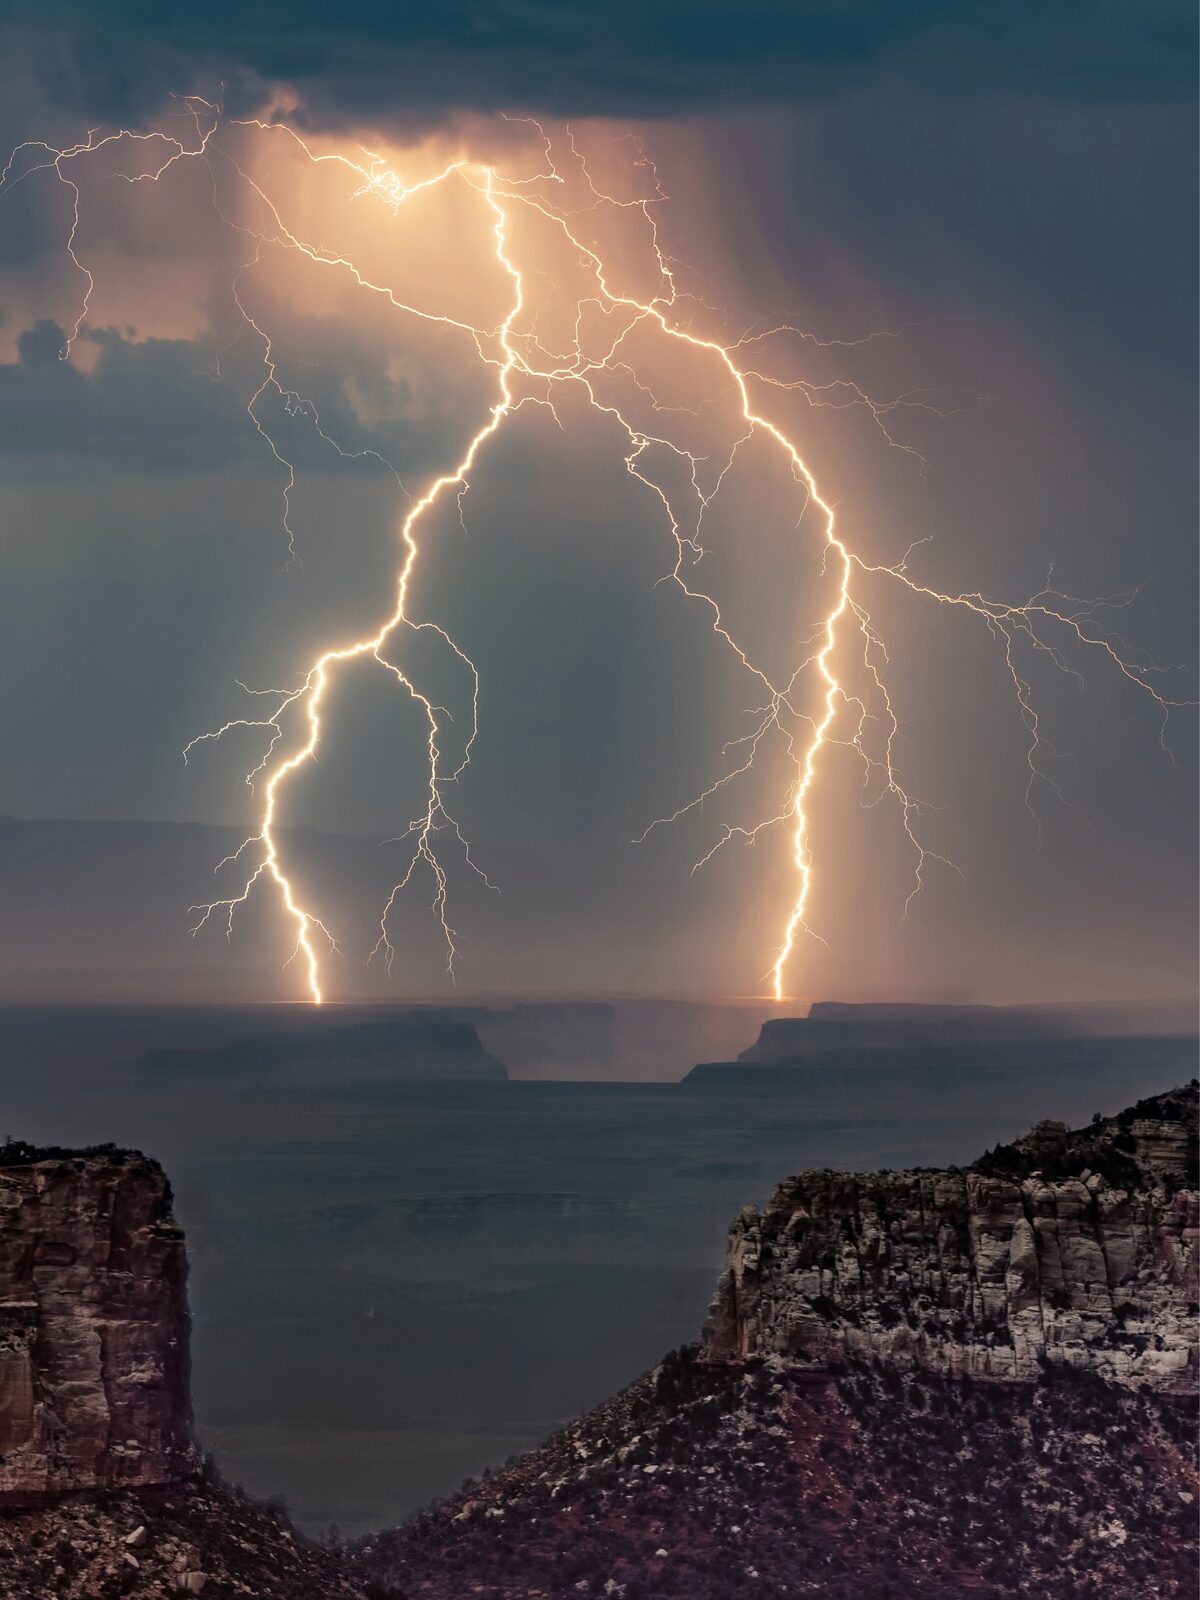
Opposite: Forked Lightning, Point Imperial, Grand Canyon. This storm started out by the Vermilion Cliffs, but I was able to bring it closer with my 100-400mm lens.
Equipment For Photographing Lightning
If, after factoring in all the risks, you still like the idea of photographing lightning, you need to gear up. The extreme contrast between darkness and brilliant lightning means photographing lightning at night is mostly a matter of pointing your camera in the right direction with a multi-second shutter speed and hoping the lightning fires while your shutter’s open—pretty straightforward.
Photographing daylight lightning is more problematic. It’s usually over before you can react, so any success just watching and clicking is probably just luck. And using a neutral-density filter to stretch the exposure time out to multiple seconds sounds great in theory, but in daylight, a lightning bolt with a life measured in milliseconds, captured in an exposure measured in seconds, will almost certainly lack the contrast necessary to show up in an image.
A lightning sensor is the key to consistent lightning photography success. This device attaches to your hot-shoe and connects to your camera’s remote port (where you plug in your remote cable). In action, the sensor detects the visible and/or infrared wavelengths of a lightning bolt and fires the shutter almost instantaneously. There are many devices out there that claim to catch lightning, but some are much better than others. Rather than trusting the manufacturer’s marketing claims (which I’ve found to be unreliable), try to find someone who has used and can recommend one. Lacking that, read the sensor’s reviews (don’t just count its rating stars). Of the many lightning sensors to choose from, in my experience, the Lightning Trigger from Stepping Stone Products is the most reliable and is what I recommend to all my workshop students.
Lightning is fast—really, really fast—so the faster your camera’s shutter responds after getting the command to fire, the more success you’ll have. The delay between the click instruction (whether from your finger pressing the shutter button, a remote release or a lightning sensor) and the shutter firing is called “shutter lag.”
In general, interchangeable lens cameras (mirrorless and DSLR) have the fastest shutter lag. But even with these cameras, it’s surprising how much shutter lag varies from manufacturer to manufacturer and even between models from the same manufacturer.
Ideally, your camera’s shutter lag should be 60 milliseconds (0.06 seconds) or faster, but 120 milliseconds (0.12 seconds) is usually fast enough. Most of the top cameras from Sony, Nikon and Canon are fast enough—currently, Sony cameras are fastest, Nikon is a close second and Canon is third.
Shutter lag can vary with the manufacturer’s model. While my Sony a7R IV may be the fastest camera out there, my original a7R was unusably slow, so you need to check your model’s shutter lag. Unfortunately, shutter lag isn’t usually in the manufacturers’ specifications. The best source I’ve found is the “Pre-focused” time in the Performance tab of the camera reviews at Imaging Resource.
Shutter lag varies a lot, depending on how your camera is set up. To minimize the camera’s “thinking” before firing, you should use manual focus and metering. If your camera offers an electronic front curtain option (as my Sony cameras do), use it.
In addition to a lightning sensor and fast camera, you’ll need:
• A solid tripod and head. Lightning photography is all about waiting with the camera ready to fire, so trying to photograph lightning handheld is a quick path to arm and eye fatigue.
• Rain gear that keeps you dry from head to toe.
• Umbrella to shield your camera and lightning sensor (some aren’t waterproof) while you compose and wait in the rain. I rarely use an umbrella because if the lightning is firing in the same cell that’s getting me wet, I’m too close.
• Lens hood to shield some of the raindrops that could collect on the front element of your lens.
• Neutral-density filter and/or polarizer to slow shutter speed into the ideal range (more on this later).
• A garbage bag to keep your camera and lightning sensor dry while you wait out a downpour.
• A rainproof camera jacket might let your camera keep shooting while you hide out in the car.
• Extra lightning sensor batteries because better safe than sorry.
• Extra memory cards. Cards fill fast when a storm is very close or active and your lightning sensor detects 30 strikes per minute (even when little or no lightning is visible to the eye).
• A towel.
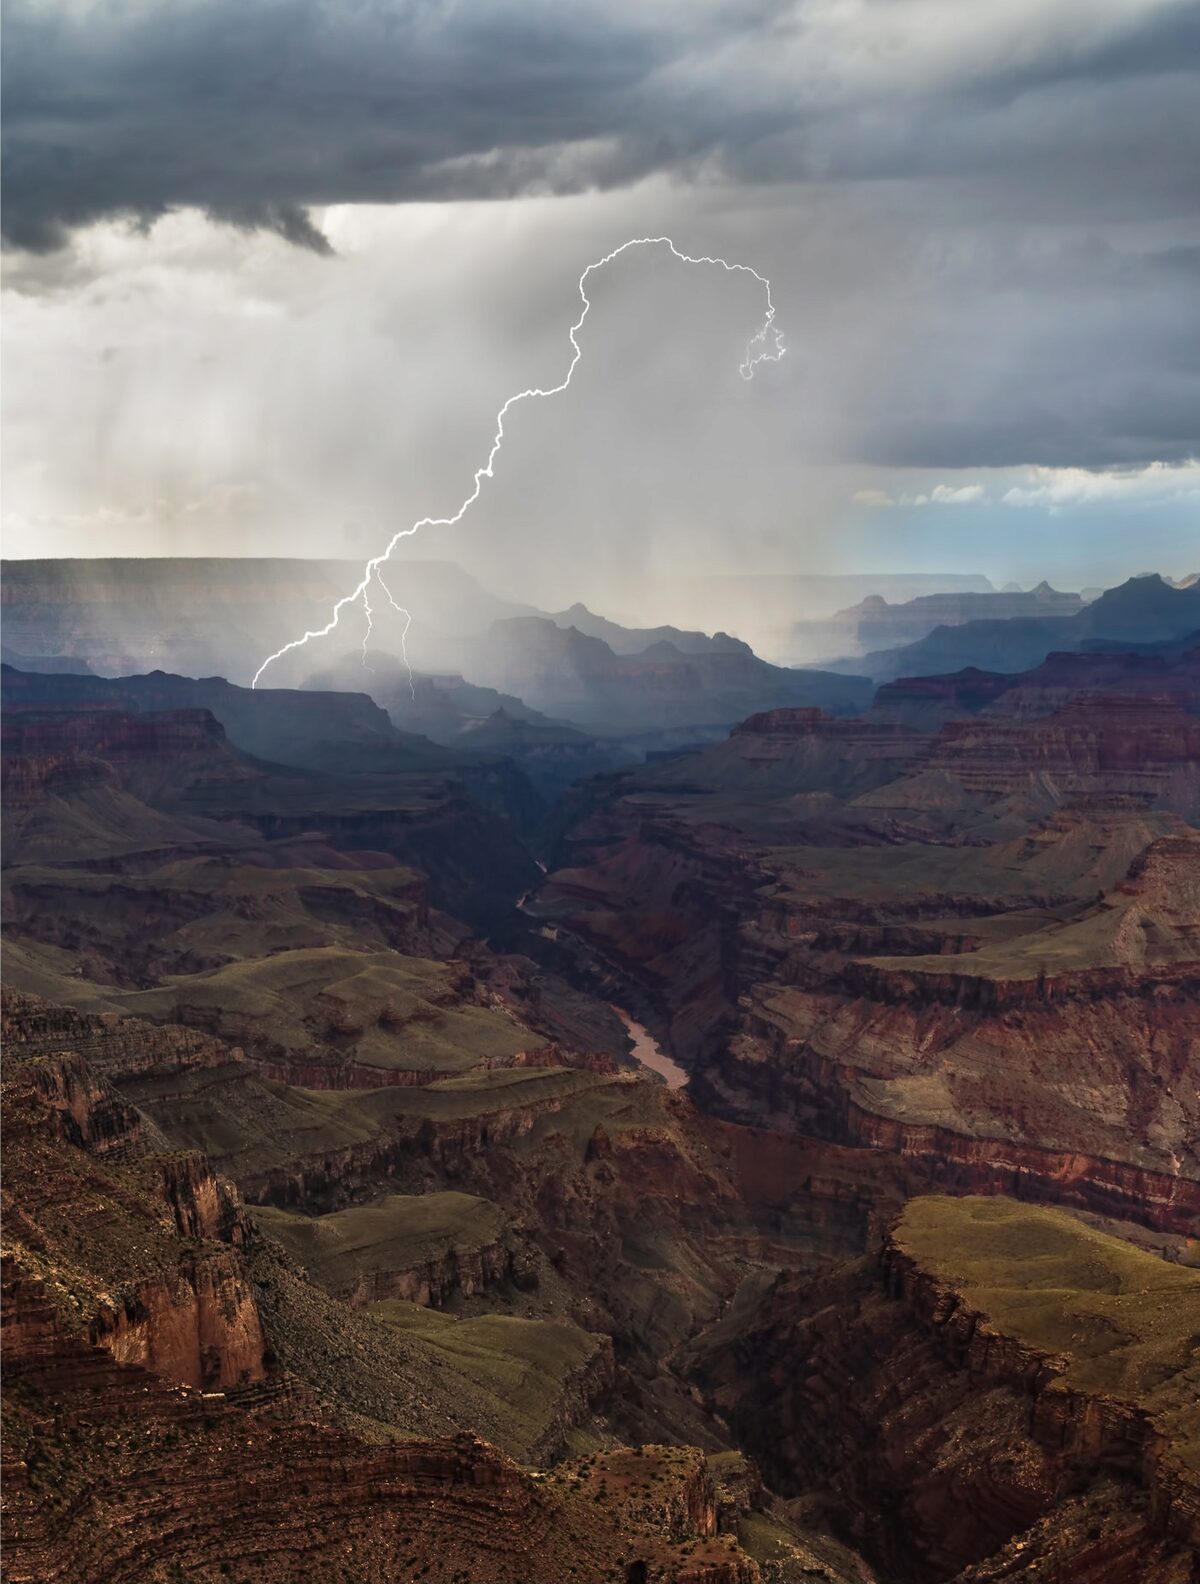
Diagonal Lightning, Lipan Point, Grand Canyon. Set up at Lipan Point, I watched this storm move up from the south and crossed my fingers that it would hold together until it reached the canyon.
Getting The Shot
Even if you can photograph lightning from your front porch, it’s usually best to pick a nice scene and then monitor the weather so you can be there to capture lightning with a great foreground.
I strongly recommend that you scout these lightning scenes in advance, not just for possible compositions but also for safe places to set up, escape routes and somewhere to retreat to if the lightning gets too close. I try never to shoot more than a quick sprint from my car.
Once you’re there, don’t wait until you see lightning before preparing your gear. If the sky looks even a little promising, get everything ready: tripod out, camera and lens mounted, lightning sensor attached. Then test your sensor to make sure it fires—I can’t tell you how easy it is to overlook one little thing and wonder why the lightning is firing, but your camera isn’t. I test my Lightning Triggers with an infrared TV remote or with the flash from my iPhone camera.
The trickiest part of lightning photography is getting the right shutter speed. With too fast a shutter speed you risk missing the strikes; too long and you risk washing out the lightning. My target shutter speed is usually 1/8 sec., plus or minus 1/8 sec.—long enough to include multiple pulses but not so long that I risk washing out the lightning.
When the sky is relatively bright, dropping to 1/20 sec. can help the lightning stand out better than 1/8 sec. but risks losing secondary strikes. Conversely, when the sky is extremely dark and the lightning is firing like crazy, extending to 1/4 sec. might increase your chances of capturing multiple pulses.
Even with a polarizer on, getting the shutter speed to my sweet spot sometimes requires dropping to ISO 50 and stopping down to ƒ/16 or smaller. In these situations, a neutral-density filter is a big help, but take care not to let the shutter speed go longer than necessary.
Lightning is most likely to strike in or near the gray curtains (clearly recognizable as distant rain) that hang beneath dark clouds—not only near the center but often on the fringe or just outside. The darkest and tallest clouds are usually the most likely to fire lightning. If you’re in the storm you’re photographing, you’re too close.
The best lens for lightning is usually a midrange zoom, such as a 24-70mm or 24-105mm. If you find yourself reaching for your 16-35mm (or wider), you’re too close.
I generally start fairly wide, but once I’m sure I’ve captured some good strikes, I usually compose tighter. While this narrower field of view can reduce the number of frames with lightning, the ones I get are much larger in the frame.
Here are a few more composition points to consider:
• Identify the most likely lightning cell and find the best composition that includes it.
• The more resolution you have, the looser you can compose, then crop to the best composition later.
• Don’t include too much room above the lightning—the most frequent rookie mistake I see is too much sky and clouds in the frame. I like my lightning bolts to originate just below the top of my frame.
• The second most frequent rookie mistake I see is lightning cut off at the top. Note the height from which the lightning originates and try to include enough cloud to get the stroke’s origin point. If you’re shooting really wide and still can’t get all the lightning, run!
• Don’t forget to try some vertical compositions.
There’s a lot of standing around while photographing lightning, but storms move, so the more you can keep your eyes on the sky, the better you’ll be at keeping lightning in your frame. The light can change by several stops as the storm moves, intensifies or winds down, so check your exposure frequently. Monitor your surroundings for active cells moving up behind you.
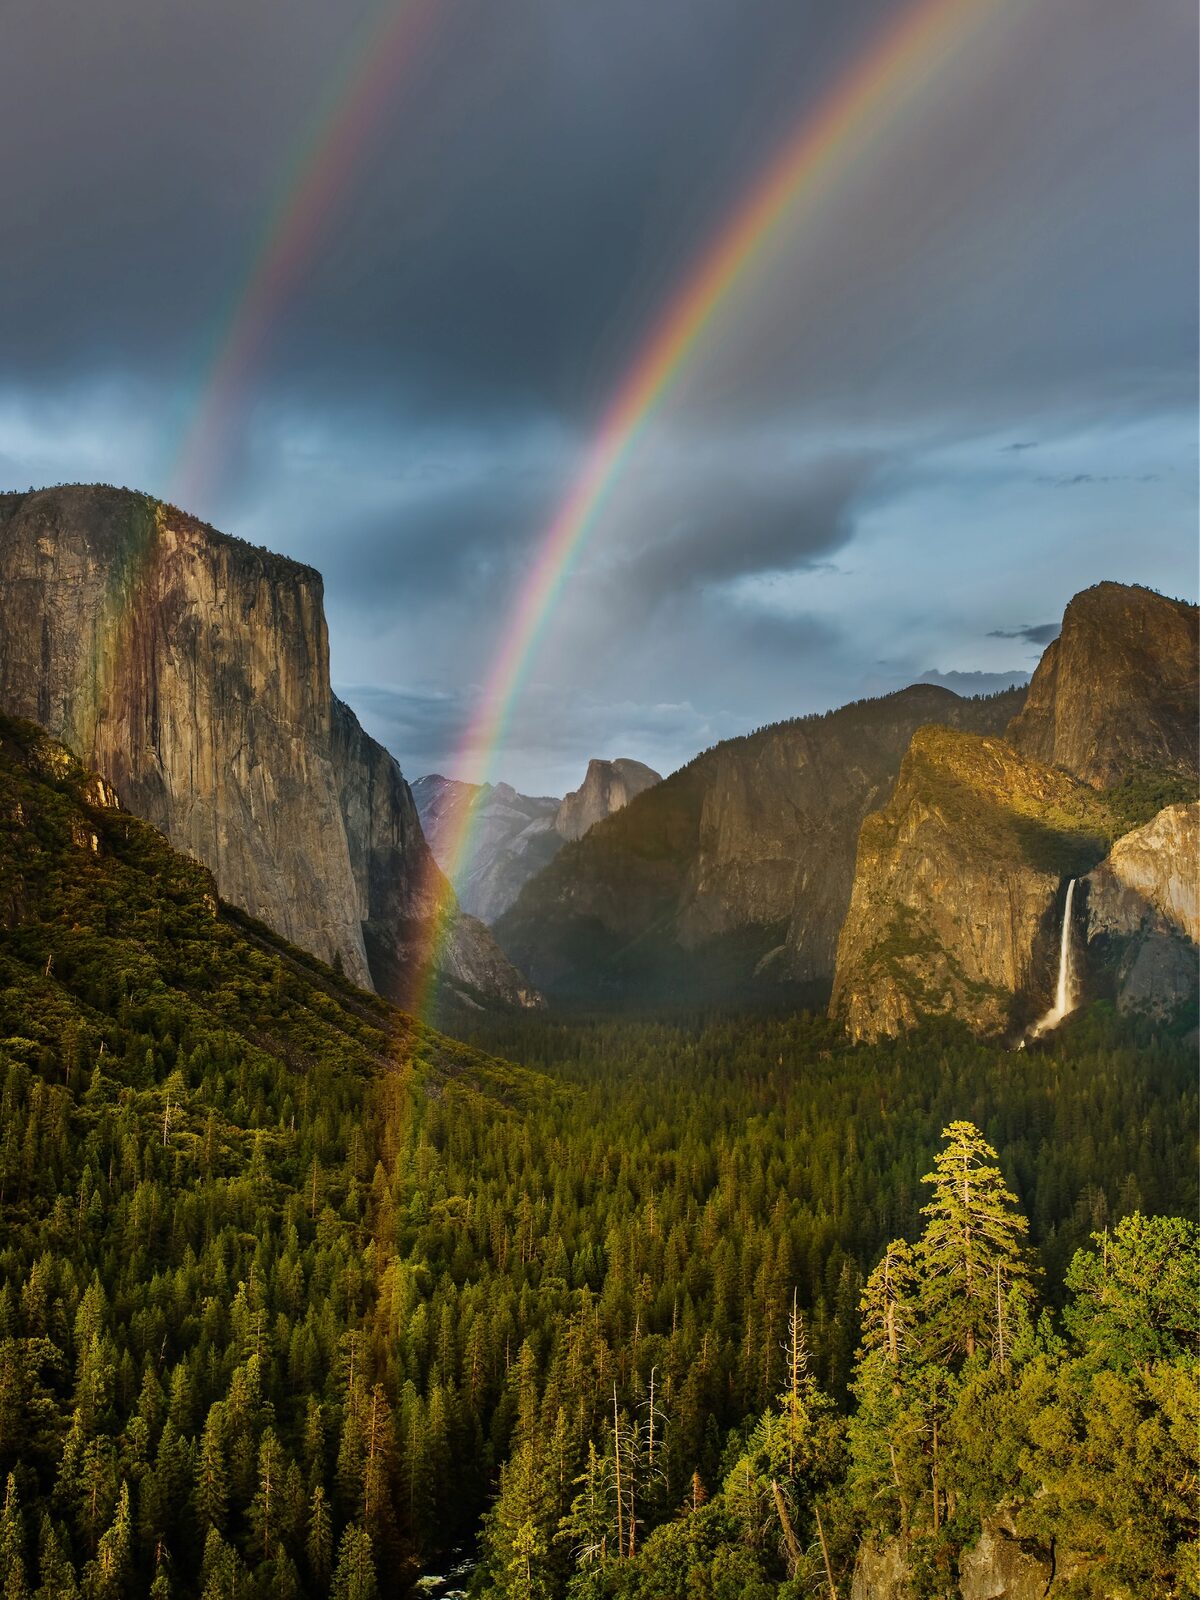
Double Rainbow, Yosemite Valley. Knowing that a rainbow was possible, I changed my plans and waited in a downpour for the sun to come out.
Rainbows
If lightning is the main course, a rainbow is the dessert. The recipe is simple: sunlight on raindrops when the sun is behind you and less than 42 degrees above the horizon.
Since electrical storms tend to be showery in nature, when photographing lightning, you should always prepare for the possibility the sun will break through while the rain still falls. One of the first things I do when I set up for a lightning shoot is take note of where a rainbow would appear and mentally prepare compositions.
A rainbow makes a circle at 42 degrees around the antisolar point. (For the anti-solar point, imagine a line from the sun through your head and out between your eyes), so your shadow always points to the center of the rainbow. If you had a polarizer on while photographing lightning, don’t forget to check its orientation—or just remove it—if a rainbow pops out.
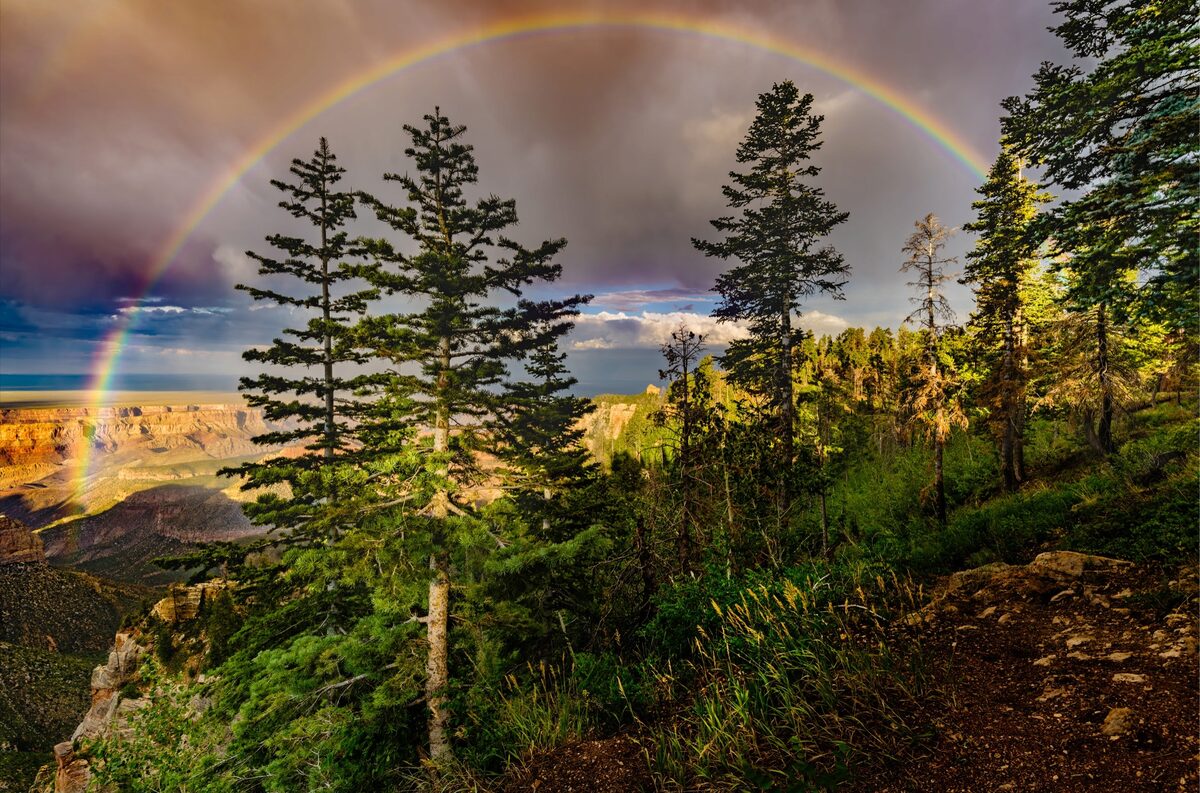
Full Rainbow, Vista Encantada, Grand Canyon. My workshop group watched this rainbow form and hang in the sky while we sped to the canyon rim for a better view. Fortunately, it hung in there long enough for us to make it to the first viewpoint on the Cape Royal Road, Vista Encantada.
Be Safe!
Lightning photography can be thrilling, but sometimes the desire to get the shot overrides good sense. Be smart, don’t take chances and live to photograph another day. OP
See more of Gary Hart’s work at garyhartphotography.com.

How photography helped me find a renewed, deeper appreciation for my home on the edge of wilderness
Text & Photography By Matt Stirn
In the springtime, the ranch and surrounding Jackson Hole valley erupt in multiple tones of vibrant green.
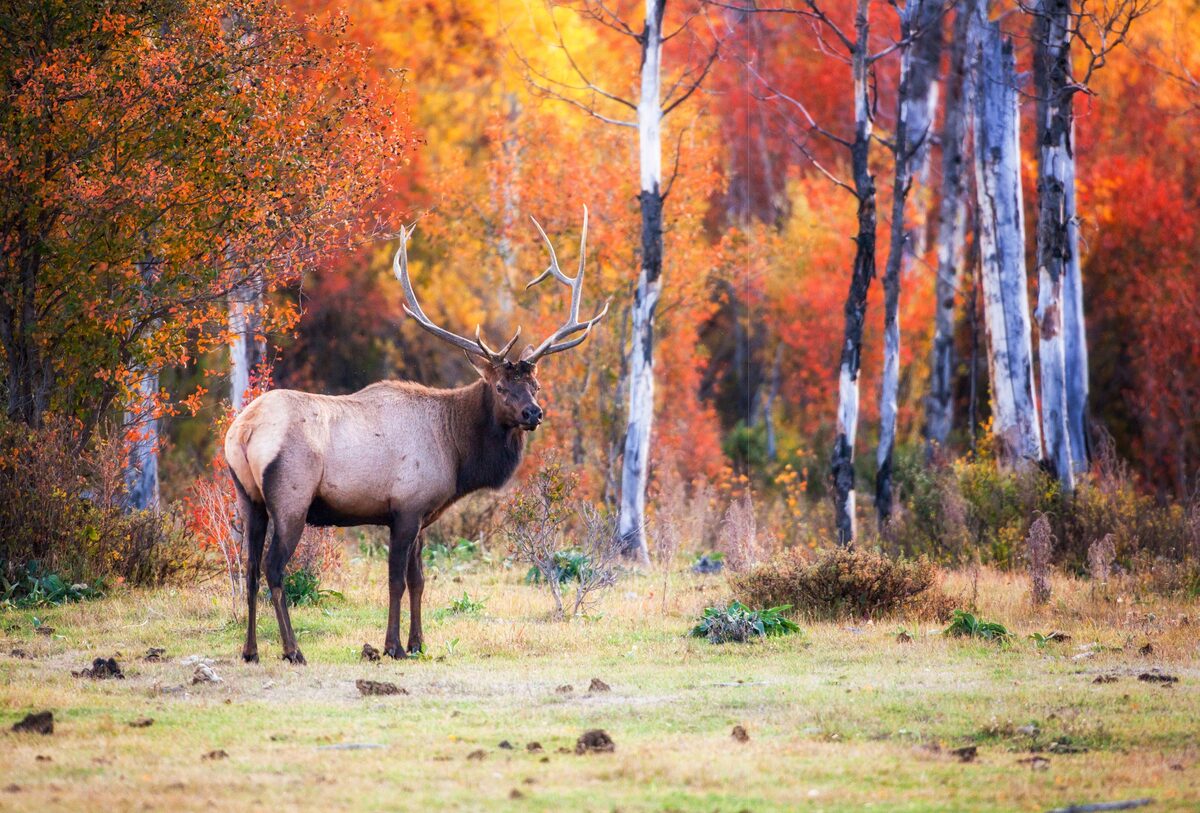
A bull elk stands among vibrant fall foliage in my parents’ front yard. He had just finished chasing a harem of females and briefly strutted against some incredible color as the sun set behind him.
T he sliding glass door in my parents’ room began to rattle, bowing and flexing inward toward their bed. Champ, their elderly Australian Shepard and lover of all animals, let out an uncharacteristic growl that turned into a whimper as the window above her continued to bend and shake. My dad awoke and sleepily clicked on the porch light, which exposed the silhouette of an enormous standing bear, his face and paws pressed up against the window, which was putting forth a valiant effort of defending the house from outside invaders.
Windows and doors, however, only succeed when they’re closed, and it was at that moment that my parents looked at each other, wide-eyed, remembering they had left every window in the living room open to help cool down the house on this warm summer evening. Racing into the hallway and past my bedroom, where I slept peacefully and oblivious to the drama, they began hurriedly shutting the windows before the furry prowler realized what opportunities awaited him on the other side of the house. On the last window, the crank handle snapped off entirely, sending my dad on a frantic hunt for a screwdriver. Finally, just as he successfully forced the window shut, my mom tapped on his shoulder and whispered for him to look up. Out of the darkness, two beady eyes materialized as the great bear stood up and pressed his nose up against the glass.
I later awoke—unaware of what had happened in the night—to my parents sitting quietly in the kitchen, staring outside, their eyes dark and puffy. As my sleepy vision began to focus, I realized why they were so tired. Every pane of glass bore large, smudgy bear prints from where a visitor had tried repeatedly to break in. “I think you’re going to be late to school today,” said my mom as she poured herself another glass of tea and pointed outside, where the large bear, worn out from his evening exploits, sat lazily munching on hawthorn berries between the front door and our car. Just another morning on the ranch.
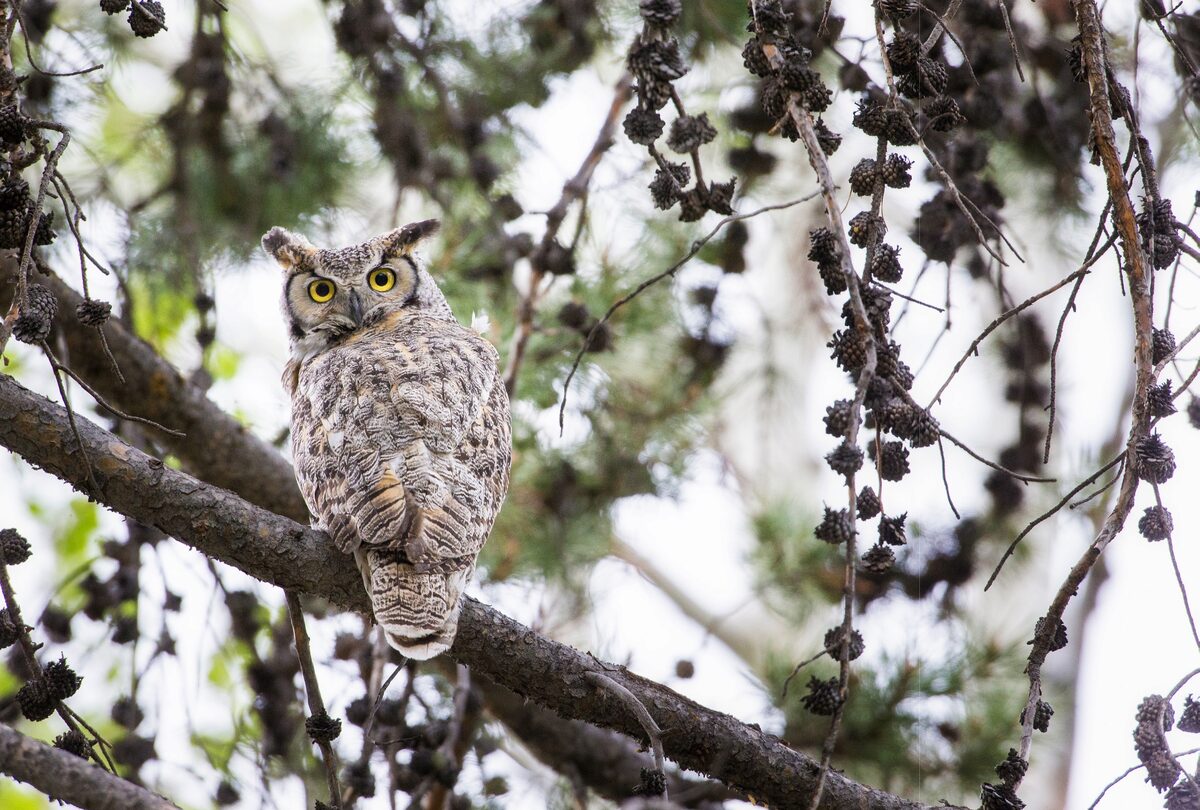
Most springs, a pair of great horned owls return to the ranch to build a nest and raise their young. Last year, this happened right outside our bedroom window. The mother, pictured here, would guide her young to wait in our front yard while she caught a gopher and then flew to the roof above our window with the hope of coaxing them to fly up and dine with her. After weeks of squawking, banging and plenty of flapping, the young owlets finally got the hang of it.
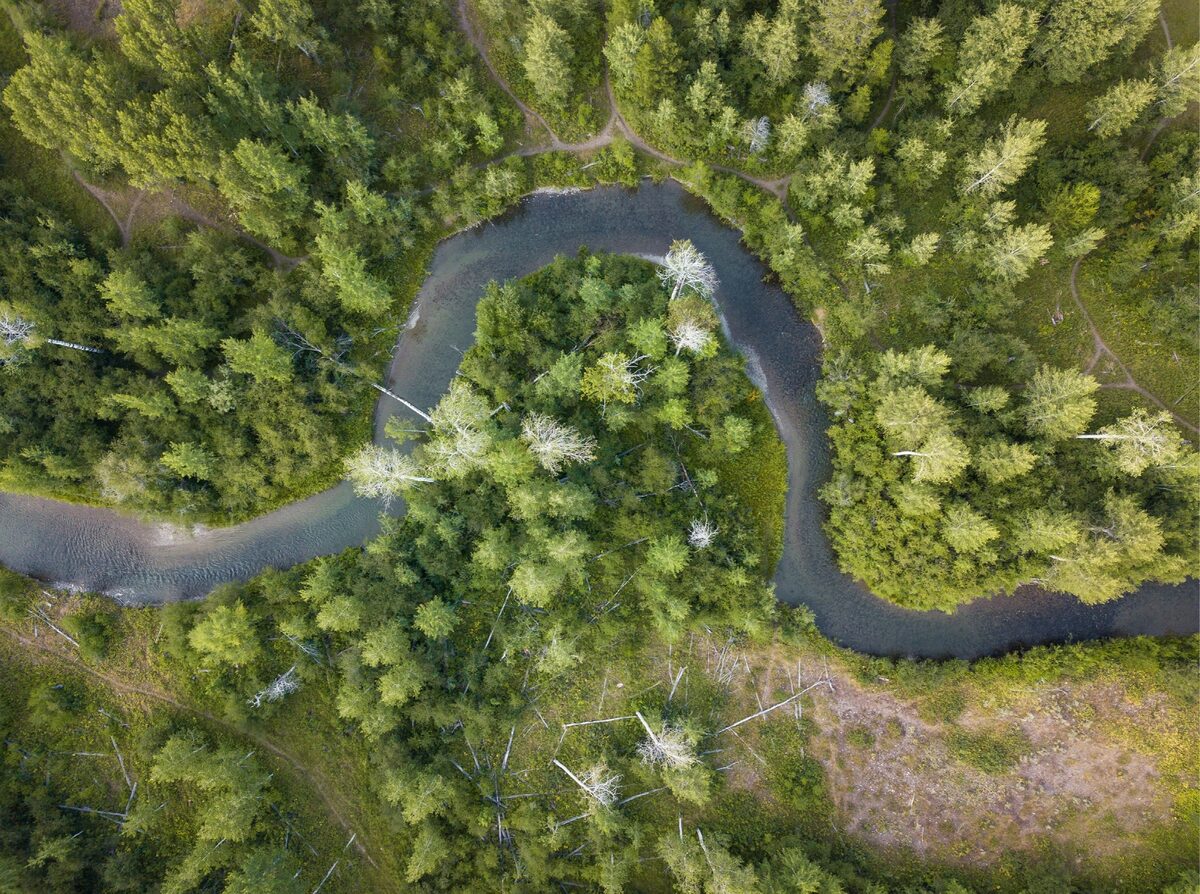
Flat Creek begins high in the Teton Mountains before flowing down Granite Canyon and eventually into the ranch. As a kid, I'd often innertube down the creek, floating next to baby moose out for an afternoon swim.
Growing up on a ranch in Jackson Hole was an experience like no other. Everything revolved around the outdoors, and dinnertime conversations were rarely guided by the activities of the day but instead by the animals we had encountered. A walk around the ranch was like stepping into a safari where an incredible population of wildlife could be found without an arduous search. Whether it was seeing a herd of 300 elk thunder across the Snake River, hearing the eerie call of a wolf echo through the November fog or watching fox kits emerge for their first spring from beneath the barn porch, animals were part of my daily experience, and interactions with them were as commonplace as getting up in the morning or eating a meal.
While living in a place surrounded by natural wonders and visited by millions of people each year was an incredible experience, the reoccurring wonders occasionally dissolved into the routine of everyday life, and it wouldn’t be until years later that photography helped me rediscover and reconnect with the uniqueness of my home.
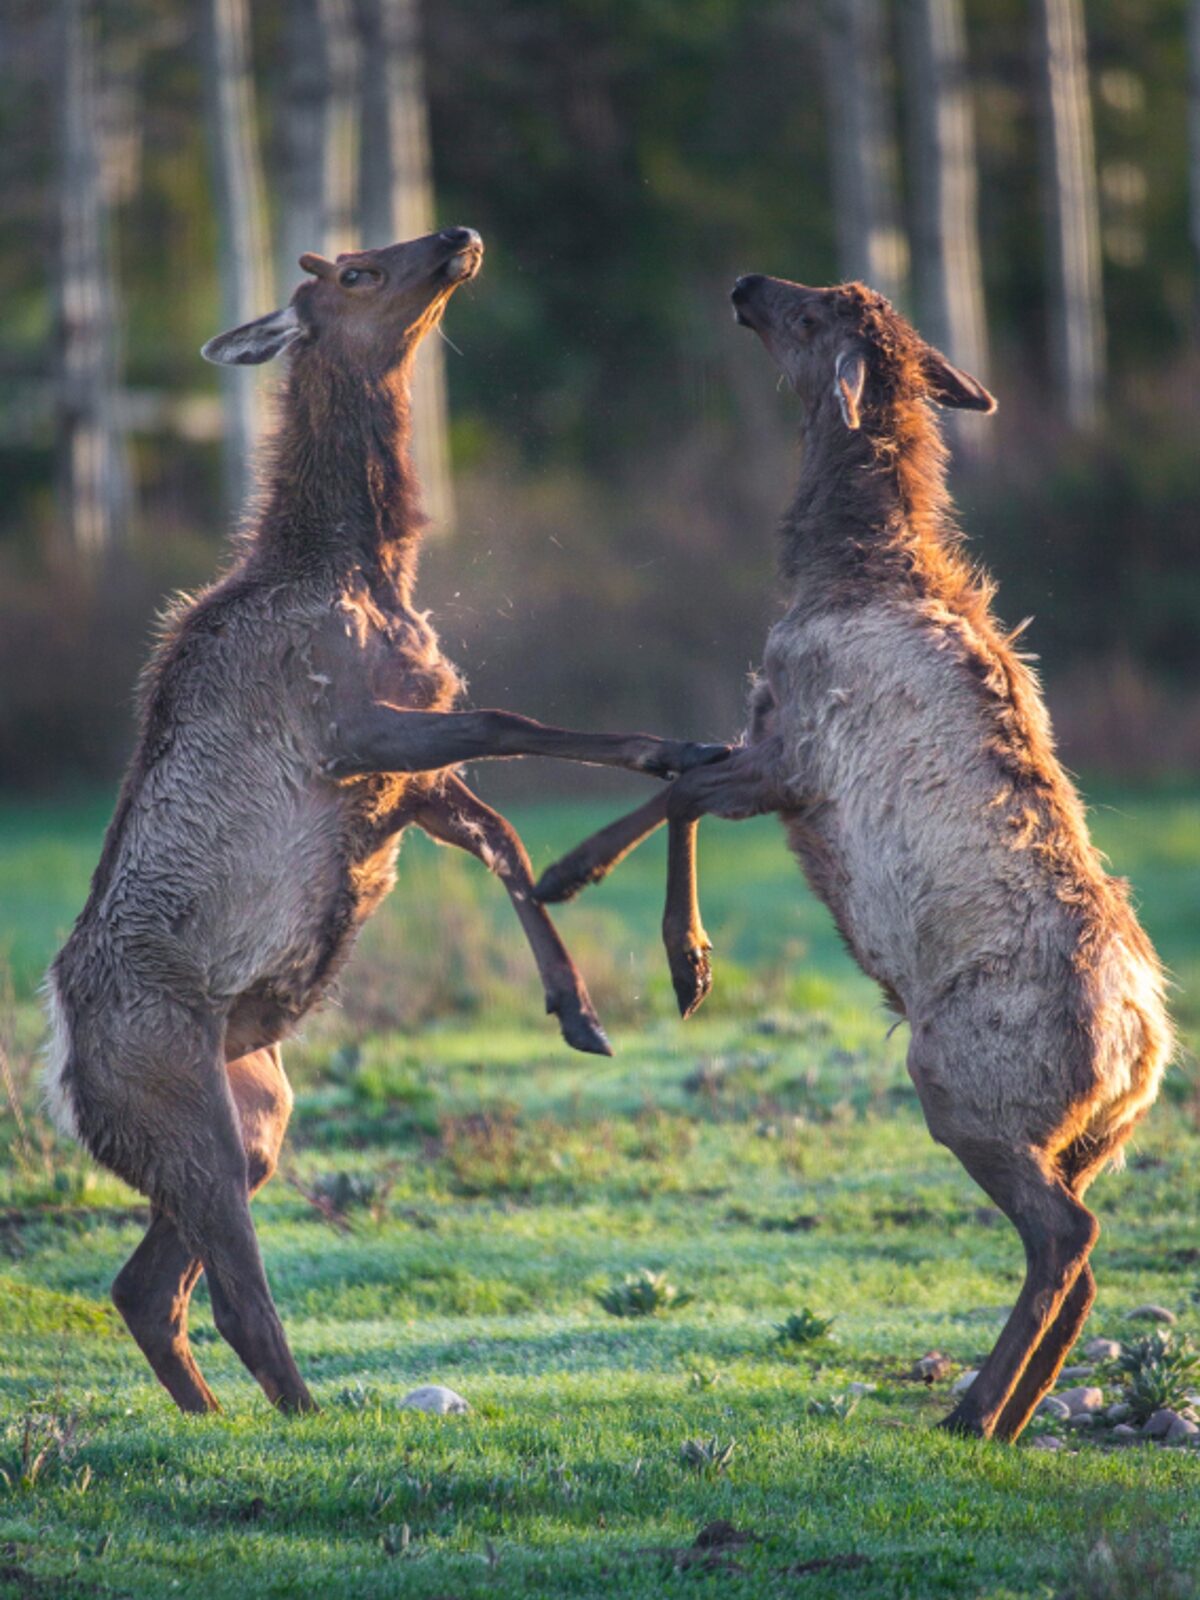
Every spring and fall, hundreds of elk pass through the ranch on their annual migrations. Once here, they often spend several weeks settling down, having babies or participating in the dramatic fall rut. One morning, I was woken up by a racket and found two juvenile elk sparring in the field beyond our bedroom window. They'd rear up, box and then playfully bounce and chase each other through the trees.
One of my favorite places on the ranch is the banks along the Snake River just at sunrise. Before the sun has come up, it's as if the world is on pause. Animals stay quiet, everything is still, and the air is crisp. But the moment the sun peeks over the Gros Ventre Range to the east, everything changes, and the day quickly unfolds as geese take flight and herds of animals march across the quickly flowing water.
R Lazy S
Resting at the northern end of Jackson Hole, Wyoming, the R Lazy S Ranch is situated in an oasis of lush aspen groves, cottonwood stands and sagebrush flats bordered by the Snake River to the east, the Teton Range to the west and Grand Teton National Park to the north. All that separates us from the national park is a buckrail fence. This inanimate boundary holds no conviction to the herds of elk, deer, moose and occasional bison that migrate over, under and through it each season. The territory has no border, and to the animals, our ranch is part of a seamless ecosystem that begins near the town of Jackson and stretches all the way through Yellowstone National Park nearly 50 miles to the north.
The ranch currently operates as a guest ranch and maintains a tradition of inviting visitors to experience the “wild west” in a fashion that has remained unchanged for nearly 80 years and predates my family’s involvement. My great grandparents first visited Jackson in the 1940s during the heyday of western Americana, when people flocked to Wyoming in search of the idyllic cowboy culture that was portrayed in Hollywood movies and amongst the pages of Owen Wister’s The Virginian. At that time, the R Lazy S operated in Grand Teton National Park, about 10 miles north of its current home.
In the late 1950s, a large tract of pristine land along the Snake River was slotted to become one of the first large residential subdivisions in rural Jackson, a prospect that horrified my family, who couldn’t conceive how such a wild and beautiful place could be built upon. Without much of a plan, my great grandparents purchased the property for the sole purpose of preserving it. Thirty years later, in 1972, the original R Lazy S Ranch closed its operations and all the structures were picked up, moved and reopened by my grandparents on our property. The ranch was shortly thereafter established as the first private conservation easement in Jackson Hole, which would forever protect it from future development.
Conservation became an ethos on the ranch and for those of us who grew up there—both my family members as well as the families who visit every summer as dudes and have come to consider our ranch a second home. Being stewards of the land wasn’t a conscious decision but rather an ingrained lifestyle.
Today, the R Lazy S continues to invite visitors from around the world each summer to ride horses, experience the cowboy lifestyle and connect with nature. At its center lie historic log cabins nestled in the willows, a dining lodge placed amongst a sea of yellow dandelions and the barn, which provides a home to nearly 100 horses, including several mustangs that grew up wild in Wyoming’s deserts to the south. While the buildings, guests and horses may compose the beating heart of the ranch, its soul is manifested through an intricate relationship with nature and wildlife.
Each year, we have a female ruffed grouse who raises a train of chicks in our driveway flowerbed. We’ll hear their chirping and fluttering once they're a few weeks old and become brave enough to explore the yard. On one particular evening, we returned home to find the mom and her babies all over a hawthorn tree eating berries.

This was the first portrait I captured during my initial encounter with the coyote family near my house. The one on the right with the frown became comfortable and curious with my presence and would trot to greet me each time I visited their home. These two still live on the ranch today and frequently mouse at the far end of our backyard.
Reconnecting With My Home
I’ve worked professionally as a photographer, writer and archaeologist for the past 15 years. This suite of careers has taken me to over 40 countries and introduced me to an exhilarating and adventurous lifestyle that I’d have never dreamt to be possible. I’ve dived on shipwrecks in the Black Sea, spent months hunting for prehistoric villages in Wyoming’s wilderness, photographed orangutans in Sumatra and ventured amongst remote pyramids in the Sudan. While my education and development as a photographer and scientist have been incredibly influential on my life, the majority of it has occurred away from my home.
Before returning in 2014, I spent nearly eight years away from Wyoming, except for the occasional holiday visit or archaeological field excursion squeezed in between semesters at graduate school or work assignments. During those years growing as a photographer and scientist, I learned to take an interrogative approach to life—identifying, analyzing and connecting details to craft stories that could be explored through images. This was an outlook that had guided me around the globe, but one I had never fully experienced at home.
After moving back to Jackson, I took strolls around the ranch much as I had always done, but this time with a camera in hand. By seeking out animals and vistas to photograph, I explored the ranch with a fresh perspective and began to observe things about my home that I had overlooked in the past. As a result, I was granted access to small and amazing worlds that had always been there but were previously shrouded by familiarity, a powerful cloak that can subdue even the most vibrant details if not shaken free from time to time.
A few years ago, I got word from a family friend who lives on the ranch that she had spotted a baby coyote playing in the sagebrush near her cabin. I had seen coyote pups before, but as a photographer, I was now interested in more detailed questions about their lives that wouldn’t have previously occurred to me. How did they interact with their mom? Did the pups have different personalities? How would their relationship with one another change throughout the summer? Rather than simply being aware of and enjoying animals on the ranch, I found myself becoming more attached and invested by wanting to document their lives and wellbeing.
When I arrived, I found not just one but six coyote pups frolicking and wrestling on a patch of dirt near one of our horse pastures. Not wanting to disturb them, I set up my telephoto lens and began to take pictures of the puppy playtime unfolding in the distance. What happened next, though, caught me by complete surprise. I heard a noise to my left and looked over to see an adult female coyote, the mother of the pups, lounging lazily in the grass only 30 feet away from me. I immediately recognized her by the distinct coloring of fur on her neck as the same coyote who'd frequently mouse in our front yard unperturbed, even while we worked or sat outside. I knew her, and I believe that she recognized me as she laid down to continue lounging, entirely carefree, while her puppies pounced on each other nearby.
As she watched, the youngest and smallest of the pups, a male with an animated frown, trotted up to my tripod, yipped and ran back to play with his siblings. I realized at that moment that I had been granted permission to observe and photograph this family. I returned several times throughout the rest of the summer to continue documenting my newfound neighbors. On each occasion, the curious pup with the frown, just a little bit older and just a hair bigger, would run to greet me on the trail before trotting back to join his family.
Since the summer of the coyotes, I’ve had a few other opportunities to watch and photograph intimate stories of animals on the ranch. I watched as a great horned owl learned to hunt near (and occasionally on top of) our house. I photographed groups of young elk taking their first steps in the back pasture, and I documented a family of six long-eared owls who’d gather around the bathroom window each morning to watch ranch guests shower and shriek in surprise. On each of these special occasions, just by looking through the viewfinder, I found myself wondering and learning new things about animals I had always thought I understood. I have long believed that a camera and an idea can offer the freedom to experience a familiar place as if visiting for the very first time. By heading out to explore my childhood home and document stories that had always been there but sometimes went unnoticed, I discovered that this mindset couldn’t be truer.
Winter on the ranch is a different world. The people are gone, and the animals move silently and softly. Our horses go to the desert a few hours away, and the barn sits under the snow, waiting for their spring return.
Something Worth Saving
Places, just like people or animals, have lives that can be observed and experienced. They grow, change and foster relationships with each other and the environment. Places also have emotions, but you have to look long and hard before being granted a glimpse into their personalities. Returning to my home as a photographer allowed me a special opportunity to reconnect with a place I loved and appreciated and to see it under a new light. Conservation was always an underlying part of my life, but I became more aware and attached to the concept as I began to watch and photograph the animated lives of the many animals here. They were no longer just actors who moved and grazed stoically across the field but instead were integral characters in a complex story that involved my own life as much as theirs.
Over the past decade or so, we’ve noticed an increase in the number of animals who migrate through the ranch during the change of seasons. Elk sometimes number in the hundreds, and higher numbers of moose, deer and occasional carnivores like wolves or mountain lions also move through each year. While this is a wonderful spectacle for those who live at or visit the ranch, it’s not exactly how it should be. Jackson Hole is growing, and with that change has come a decrease in the amount of accessible land throughout the valley.
As houses replace quiet aspen groves and golf courses busy once-open fields, animals are becoming drawn to places that still feel wild. My great grandparents started a legacy, and I’m honored, along with the help of my family, to continue their dream of conserving the natural wonder we’re able to call home. A few nights ago, in the midst of writing this, I looked up and noticed two adult coyotes mousing just on the other side of the fence. As they trotted past the window, I smiled as I thought I saw a distinct frown on the smaller one in the back. I don’t know what life will be like for the coyote family, or what antics the young elk will get up to this spring, but I’m excited to find out and will eagerly await with camera in hand to see what story next unfolds on tomorrow’s walk around the ranch. OP
See more of Matt Stirn’s photography at mattstirnphoto.com.
behind the shot
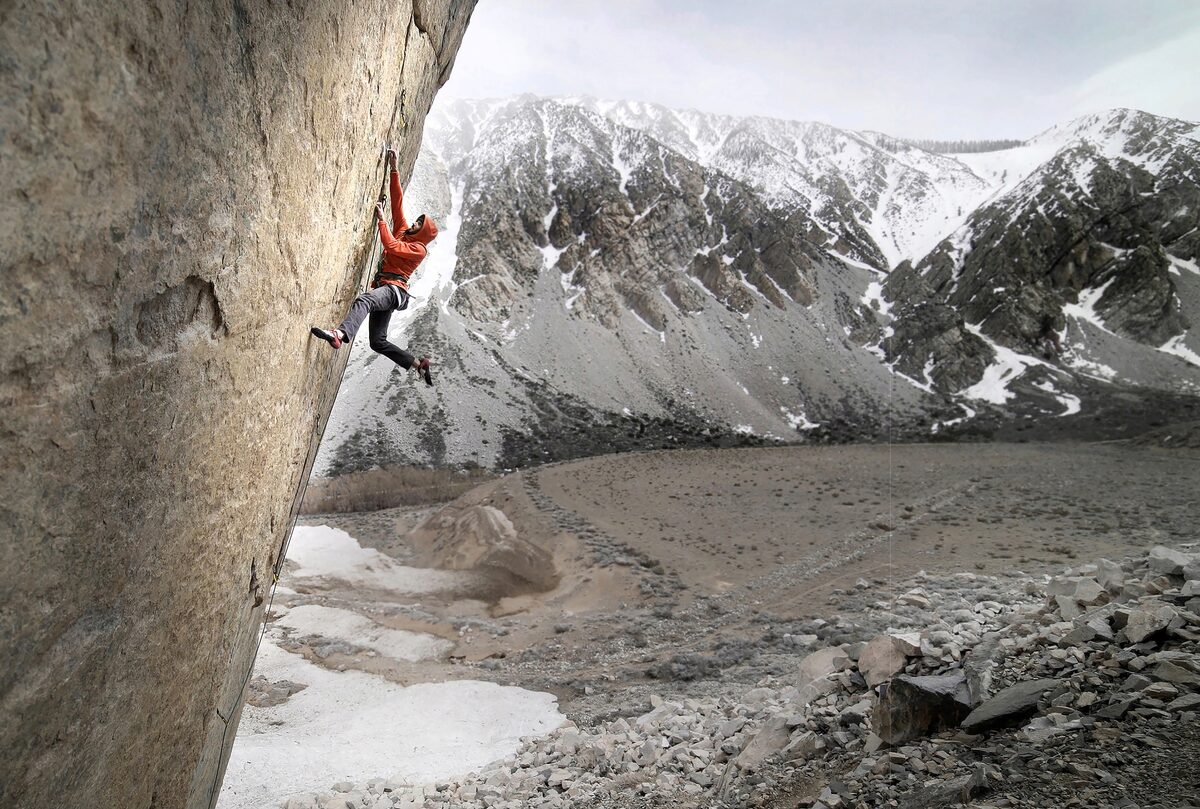
Sony a7S II, Rokinon 14mm F2.8 ED AS IF UMC. Exposure: 1/250 sec., ƒ/4, ISO 200.
Everything Is Karate
Pine Creek Canyon Near Bishop, California
Text & Photography By George Bruce Wilson
T he howling wind burned my skin. How could it be this cold this time of year in California? My team and I had just finished hauling our film equipment up a steep talus field to get a better angle of the climb we’d be shooting. The clouds passed overhead quickly, painting the canyon with shadows and highlights. We were on assignment shooting for a client of mine, Mad Rock. One of its athletes, Ethan Pringle, a California climber who has a proven track record of some of the world’s most difficult climbs, was attempting to be the first to do what would be one of the hardest granite sport climbs in the country, and it was my job to tell that story via motion and stills.
The Eastern Sierra is known amongst rock climbers as being one of the most iconic areas to climb. The history of rock climbing has deep roots here, and to be able to add your name to that in any way is an honor. We were in Pine Creek Canyon near the town of Bishop, California. Ethan would be trying a line his friend Patrick O’Donnell had bolted, but the route was too difficult for Pat, so the line remained unclimbed. Ethan had tried the route a year or so previous to this trip and was close to being able to “send the route” and thought that this could be the time. Going into this scenario has some pressure to it, for both Ethan and my team. All you can do is prepare.
I had been shooting climbing for some years at this point and had an idea of how I wanted to shoot the climb, but a lot of that would depend upon being there in person. You can only prepare so much beforehand, and we didn’t have the chance to scout the location. From outside the canyon, it’s hard to tell how epic the landscapes and features are going to be, but as you drive up the steep road, it feels like you’re transported to a different part of the world. The rugged peaks and couloirs make you feel like you’re high up in the alpine somewhere in Pakistan or the Himalaya.
This year, the snowfall had been high, and the temperatures and climate reflected that. It was windy and cold. We’d go through random isolated rain and snowstorms; the elements were there to create a good image. I like to say 70 percent of success is putting yourself in the right spot to make the right content. We were there, and everything was coming together.
Directing video and creating stills at the same time is a challenge but quite necessary these days. Once the crew was in position, Ethan began to climb and relearn the route’s moves. I found what I thought the best position would be to capture the elements I wanted in the image, to show the feeling of how epic this place was. I wanted the weather, the light and the effort Ethan was putting in all to be represented in the image. OP
See more of George Bruce Wilson’s work at threepeakfilms.com.

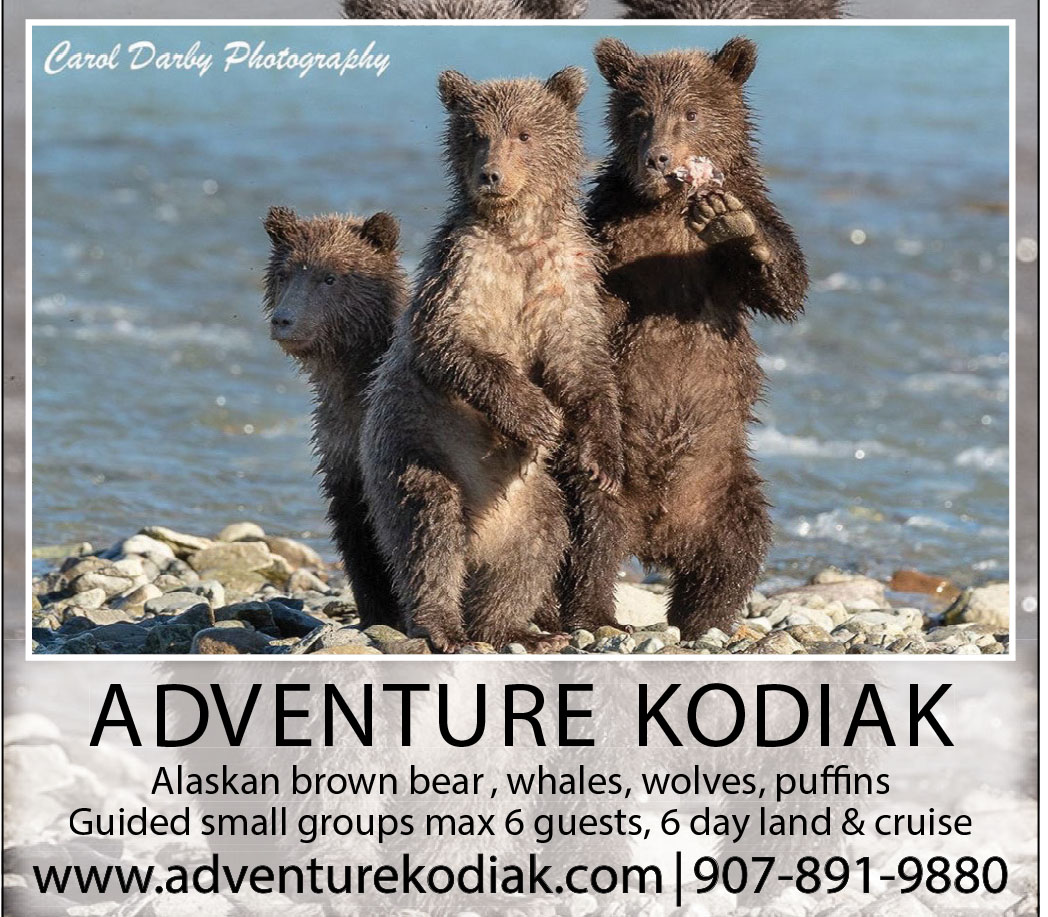


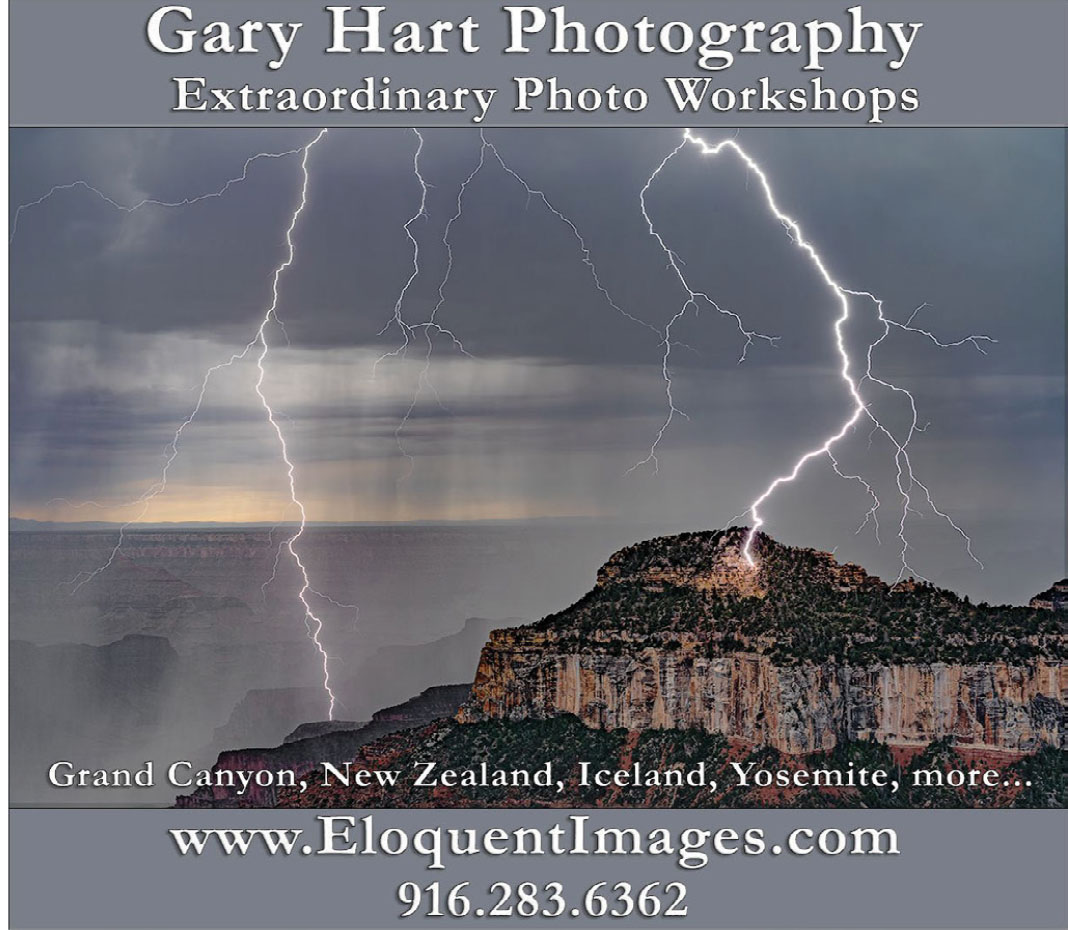


last frame
Canon EOS-1D X, Canon EF 500mm f/4L IS II USM, Manfrotto tripod, Jobu Jr. ballhead. Exposure: 1/800 sec., ƒ/4, ISO 1250.
Burrow Dustup
“One of my favorite subjects to photograph are burrowing owlets,” says Barb D’Arpino. “They’re one of the easier owls to photograph because they’re diurnal, which means they hunt during the day and night, which allows for more opportunities than nocturnal owls.
“I arrived at the site before sunrise, and the owls were beginning to stir. I sat on the ground to be at their eye level and stayed a respectful distance away so as not to disturb them. I was focused on this owlet when I noticed that mom was kicking sand and debris out of their burrow. I was surprised the owlet didn’t move out of the way, but I was happy to photograph the scene.”
See more of Barb D’Arpino’s work on Instagram @barb_darpino.


Favorite Places: Pigeon Spire
Bugaboo Provincial Park, British Columbia, Canada
Text & Photography By David Connel
Wild By Nature: How To Photograph A Fox Den
Field ethics and technical advice for capturing the delightful interactions of the marvelous fox
Text & Photography By Melissa Groo
Making Connections: Mindful Photo Editing
An attitude of gratitude brings great things
Text & Photography By Ken Kaminesky
The Surfing Life
How a lifelong love and respect for the ocean inspires my photography
Text & Photography By Zak Noyle
Local Adventure
Opportunities for adventure sports photography are likely nearby or just a short drive away
Text & Photography By Tom Bol
Lightning Strike!
Put safety first to capture the stunning displays of lightning in your landscape photography
Text & Photography By Gary Hart
Home on the Range
How photography helped me find a renewed, deeper appreciation for my home on the edge of wilderness
Text & Photography By Matt Stirn